Data models and forms
Setting up and modifying data models and forms in beCPG is intended for administrators. It requires knowledge of XML and content modeling. A video presents the creation of models and forms using the designer.
The data model and forms in beCPG allow you to customize and adapt the system to the specific needs of your company by adding extra fields to store additional data and displaying them in the relevant objects.
This modification is done in 3 steps:
- Modification of the data model to create the additional fields
- Modification of the forms to add and display the field in the concerned object(s)
- Publish the files to take into account the changes
It is therefore necessary to create or modify 2 files:
- {$client}Model.xml for the modification of the data model
- {$client}-form-config.xml for the formatting of the forms
where {$client} is the name of the client.
1. Modification of the data model (manually)
The standard data models are defined in the following files:
| File | Description |
|---|---|
| becpgModel.xml | beCPG Model |
| gs1Model.xml | GS1 Model |
| ecmModel.xml | Process Mode |
| projectModel.xml | Project Model |
| packagingModel.xml | Packaging Model |
| qualityModel.xml | Quality Model |
| nonConformityModel.xml | Non Conformity Model |
The client data model is defined in the file: {client}Model.xml available in the Repository > Data Dictionary > Models. If this one is not available, you can create it using the extCustomModel.xml file. In the {client}Model.xml file, it is possible to add:
- Properties: text values, number, datalists etc...
- Associations: association to an object type (eg: geographical origin, raw material..)
- Objects types: a compound of several properties/associations (eg : new list..)
- Aspects: group of properties and/or associations which can be added to a type of object. This allows the re utilization of a group of properties, common to many object types, for example a group of properties « Saleable products ».
Prefix
When creating a client model, a prefix must be defined in <namespace>. All fields created in the template will start with this prefix (eg: client:name).
<model xmlns="http://www.alfresco.org/model/dictionary/1.0" name="$client:extensionModel">
    <description>Extension model</description>
    <author>beCPG</author>
    <version>1.0</version>
    <imports>
        <import uri="http://www.alfresco.org/model/dictionary/1.0" prefix="d"/>
        <import uri="http://www.alfresco.org/model/content/1.0" prefix="cm"/>
        <import uri="http://www.bcpg.fr/model/becpg/1.0" prefix="bcpg"/>
        <import uri="http://www.bcpg.fr/model/quality/1.0" prefix="qa" />
        <import uri="http://www.bcpg.fr/model/project/1.0" prefix="pjt" />
    </imports>
    <namespaces>
        <namespace uri="http://www.bcpg.fr/model/$client/1.0" prefix="$client"/>
    </namespaces>
Setting of a property
Properties types are :
| Types | Description |
|---|---|
| d:date | Date |
| d:text | Simple text |
| d:mltext | Multilingual |
| d:content | Document |
| d:int | Integral number |
| d:float | Number with 6-7 decimal |
| d:datetime | Date with hour and minutes |
| d:double | Number |
| d:boolean | Check box |
| d:noderef | Hierarchy |
| d:path | Node path |
The properties of an object type are defined in the <properties> section. Model for defining a property:
      <property name="...">
        <type>Type of data</type>
        <mandatory>true or false</mandatory>
        <multiple>true or false</multiple>
        <default>Default value</default>
        <constraints>
           <constraint ref="ID" />
        </constraints>
      </property>
Example :
    <property name="bcpg:productType">
        <type>d:text</type>
        <mandatory>true</mandatory>
        <multiple>true</multiple>
        <constraints>
        <constraint ref="bcpg:systemProductType" />
        </constraints>
    </property>
Setting of a constraint
Constraints are defined in the section <constraints> of the file {$client}Model.xml.
Here are some examples of constraints :
- Classical expression
    <constraint name="test:regex1" type="REGEX">
           <parameter name="expression"><value>[A-Z]*</value></parameter>
           <parameter name="requiresMatch"><value>false</value></parameter>
    </constraint>
Adding forbidden characters to a field.
Example
<constraint name="test:regex1constraint" type="REGEX">
<parameter name="expression">
<value>(')|(TM)|(®)|(œ)|(Œ)|(Æ)|(ç)|(ù)|(é)|(è)|(ê)|(ë)|(â)|(ô)|(à)|(ï)|(î)|(")|(&)</value>
</parameter>
<parameter name="requiresMatch">
<value>false</value>
</parameter>
</constraint>
- Length Min/Max
    <constraint name="test:stringLength1" type="LENGTH">
            <parameter name="minLength"><value>0</value></parameter>
            <parameter name="maxLength"><value>256</value></parameter>
    </constraint>
- Number Min/Max
    <constraint name="test:minMax1" type="MINMAX">
            <parameter name="minValue"><value>0</value></parameter>
            <parameter name="maxValue"><value>256</value></parameter>
    </constraint>
- Fixed value list
    <constraint name="test:list1" type="LIST">
            <parameter name="allowedValues">
                <list>
                    <value>ABC</value>
                    <value>DEF</value>
                </list>
            </parameter>
            <parameter name="caseSensitive"><value>true</value></parameter>
    </constraint>
- Dynamic value list (Administration)
<constraint name="test:dynListConstraint1" type="fr.becpg.repo.dictionary.constraint.DynListConstraint">
   <parameter name="path">
      <list>
         <value>/System/Lists/bcpg:entityLists/NutGroups</value>
      </list>
   </parameter>
   <parameter name="constraintType">
      <value>bcpg:listValue</value>
   </parameter>
   <parameter name="constraintProp">
      <value>bcpg:lvValue</value>
   </parameter>
</constraint>
Aspects
The aspects are defined in the section <aspects>. An aspect is a group of properties or associations which can be applied to a type. An aspect can be mandatory or not.
        <aspect name="cm:auditable">
             <title>Auditable</title>
             <properties>
                <property name="cm:created">
                   <type>d:datetime</type>
                </property>
                <property name="cm:creator">
                   <type>d:text</type>
                </property>
                <property name="cm:modified">
                   <type>d:datetime</type>
                </property>
                <property name="cm:modifier">
                   <type>d:text</type>
                </property>
                <property name="cm:accessed">
                   <type>d:datetime</type>
                </property>
             </properties>
    </aspect>
The addition of a mandatory aspect to a type is done in the section <mandatory-aspects>.
Example :
    <type name="XXX">
        <parent>YYY</parent>
        <mandatory-aspects>
            <aspect>ZZZ</aspect>
        </mandatory-aspects>
    </type>
Where ZZZ is the mandatory aspect defined on the type XXX.
Good practice:
It is important to create several aspects to store the fields and not to put them all in the same aspect. We recommend you to create a separate aspect for each "storage place" of the fields (ex: finished product, semi-finished product, ingredient list... ). If some fields are used on several objects, it is possible to group them in a common aspect named product or list for example.
2. Modification of the forms
Client forms are defined in the : {$client}-form-config.xml available in the Repository > Data Dictionary > Configuration. If these are not available, you can create them using the standard becpg forms. The standard beCPG forms are available here:
| File | Description |
|---|---|
| becpg-plm-fp-form-config.xml | Finished product form |
| becpg-plm-sfp-form-config.xml | Semi-finished product form |
| becpg-plm-rm-form-config.xml | Raw material form |
| becpg-plm-pm-form-config.xml | Packaging form |
| becpg-plm-form-rp-config.xml | Form resources |
| becpg-plm-form-config.xml | List Form and Other form |
| becpg-project-form-config.xml | Project form |
| becpg-quality-form-config.xml | Quality form |
Configuration
For each xml form, 2 configurations (<config>) are available one for the creation (model type) and one for the (node type) (see the section Form types) including several forms themselves (<forms>).
To overload a form, copy the two blocks <config> with the name of the object type as a condition and add "replace=true" in the config tags.
For example: you want to modify the form for creating a raw material
- Copy the two blocks <config> with condition "bcpg:rawMaterial " by adding "replace="true " to the line <config>
- Modify the <forms> create
<config evaluator="model-type" condition="bcpg:packagingMaterial" replace="true">
   <forms>
      <form id="create">
      ...
      </form>
   </forms>
</config>
Types form
There are different types of forms. A form is identified by its ID (create, formulation...).
Creation form
This is the form displayed when creating a product by clicking on "+ Create... ".
Example: Finished product creation form
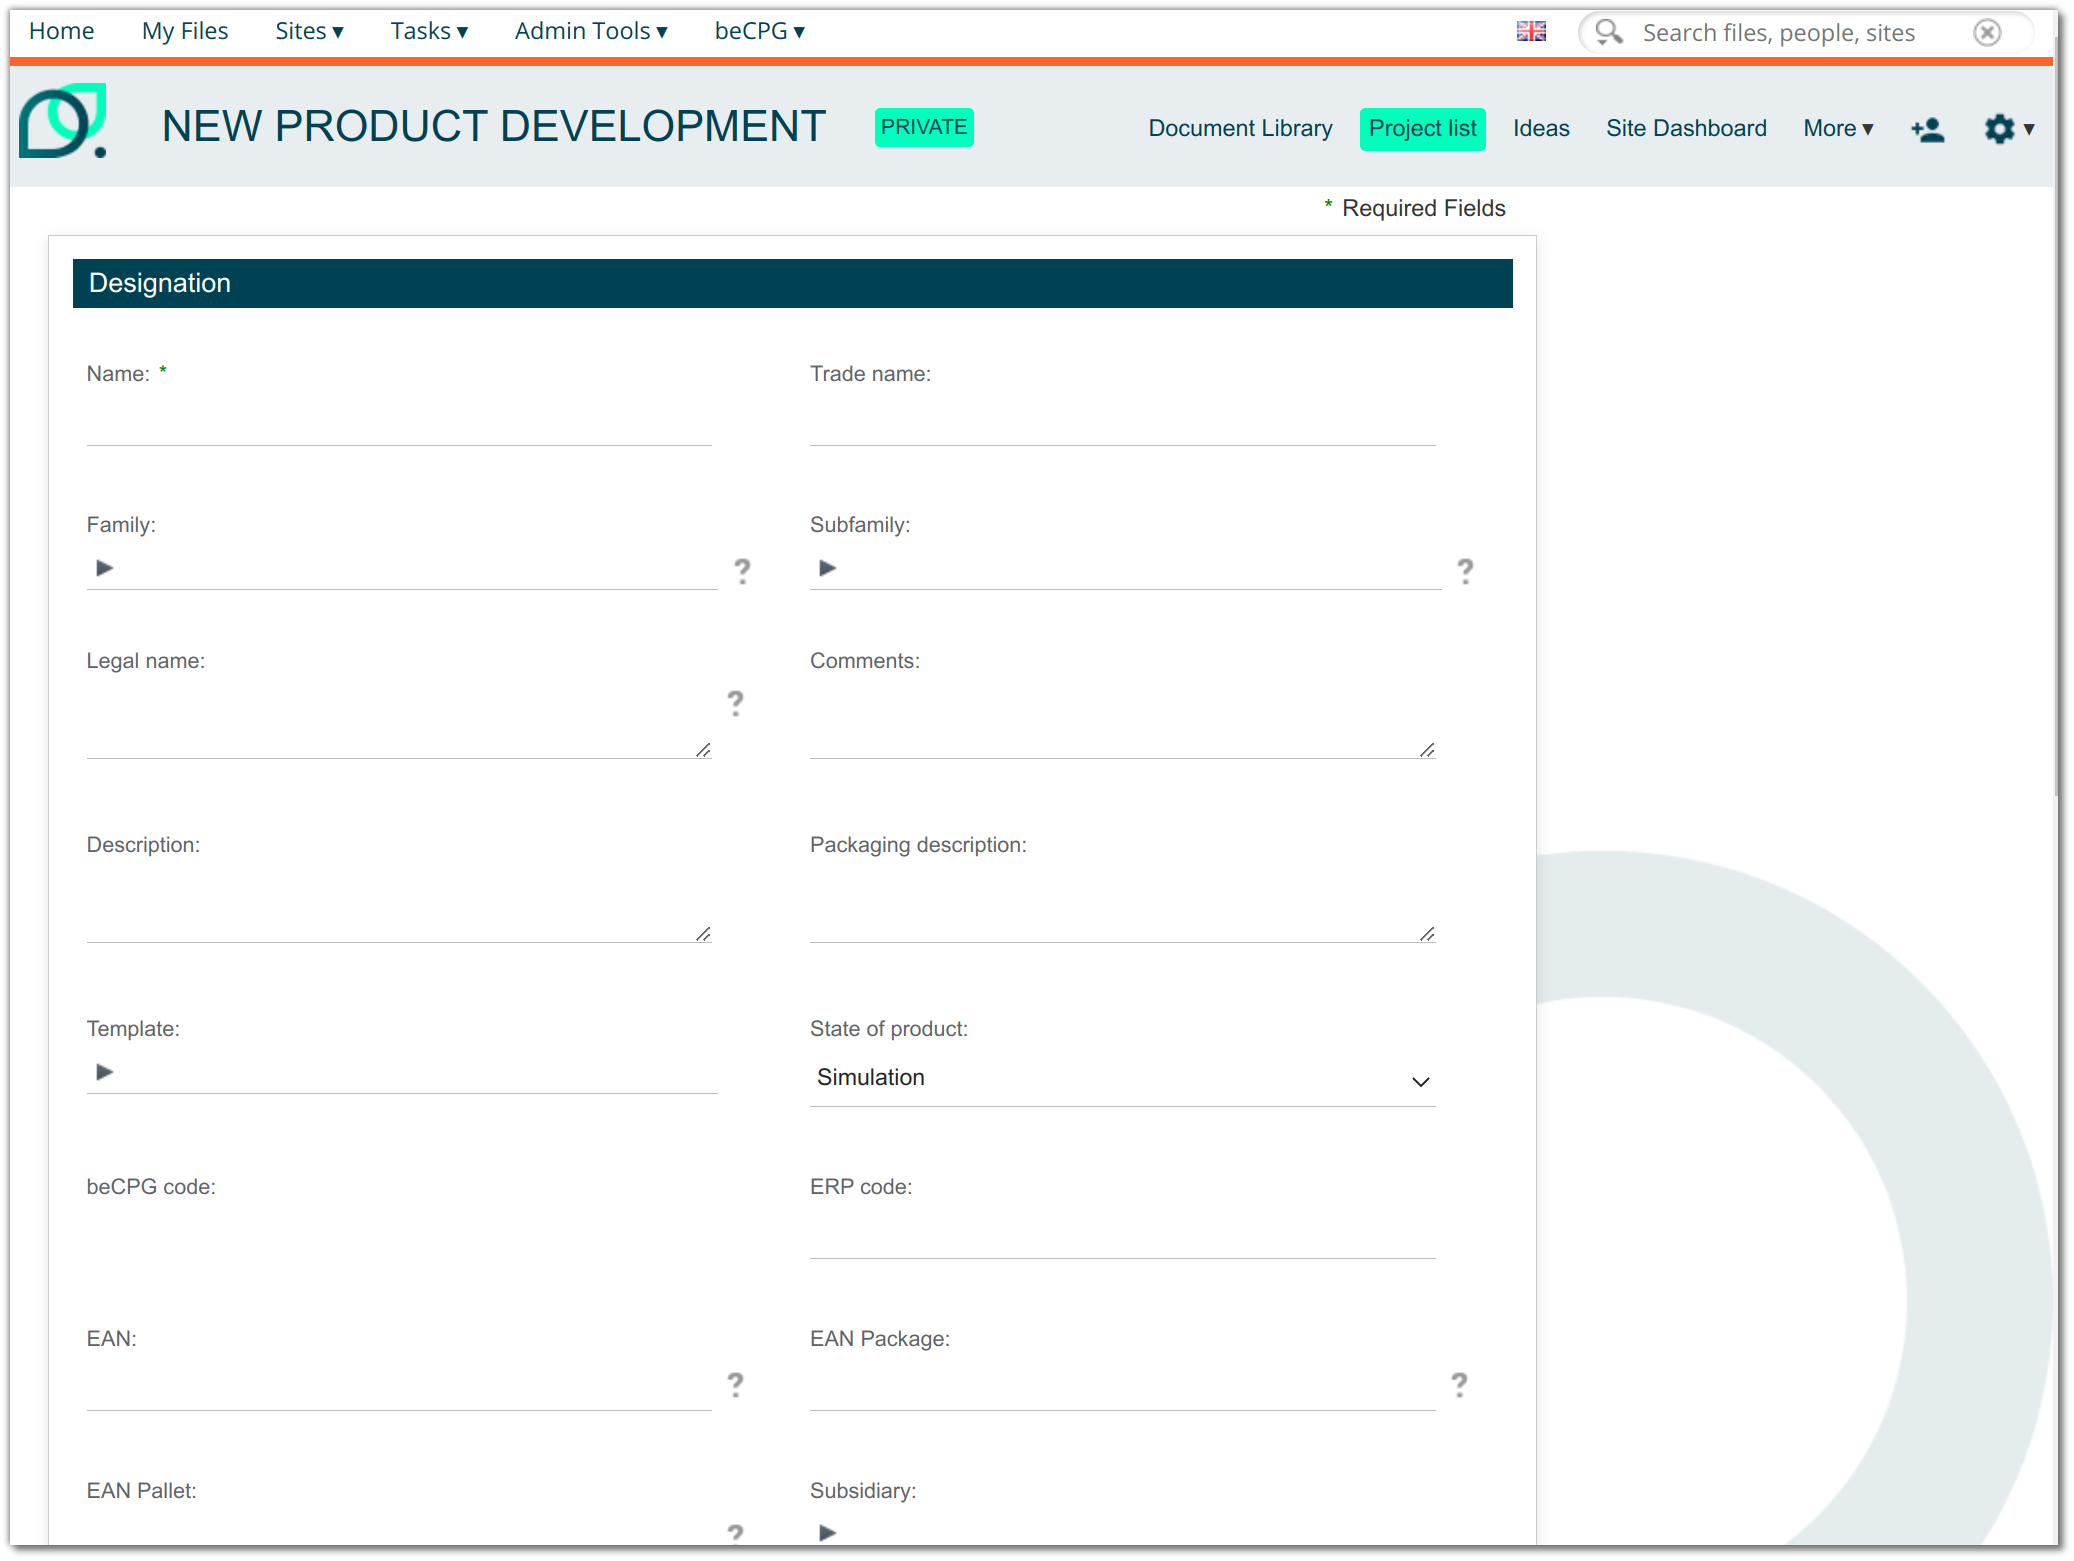
To modify it, you must override the <config> with the name of the type concern by the condition and the evaluatormodel-type, then modify <forms> with the id="create".
    <config evaluator="model-type" condition="bcpg:finishedProduct">
      <forms>
        <form id="create">
Formulation form
This is the creation form displayed when a product is added to the recipe composition datalist.
Example: Raw material formulation form
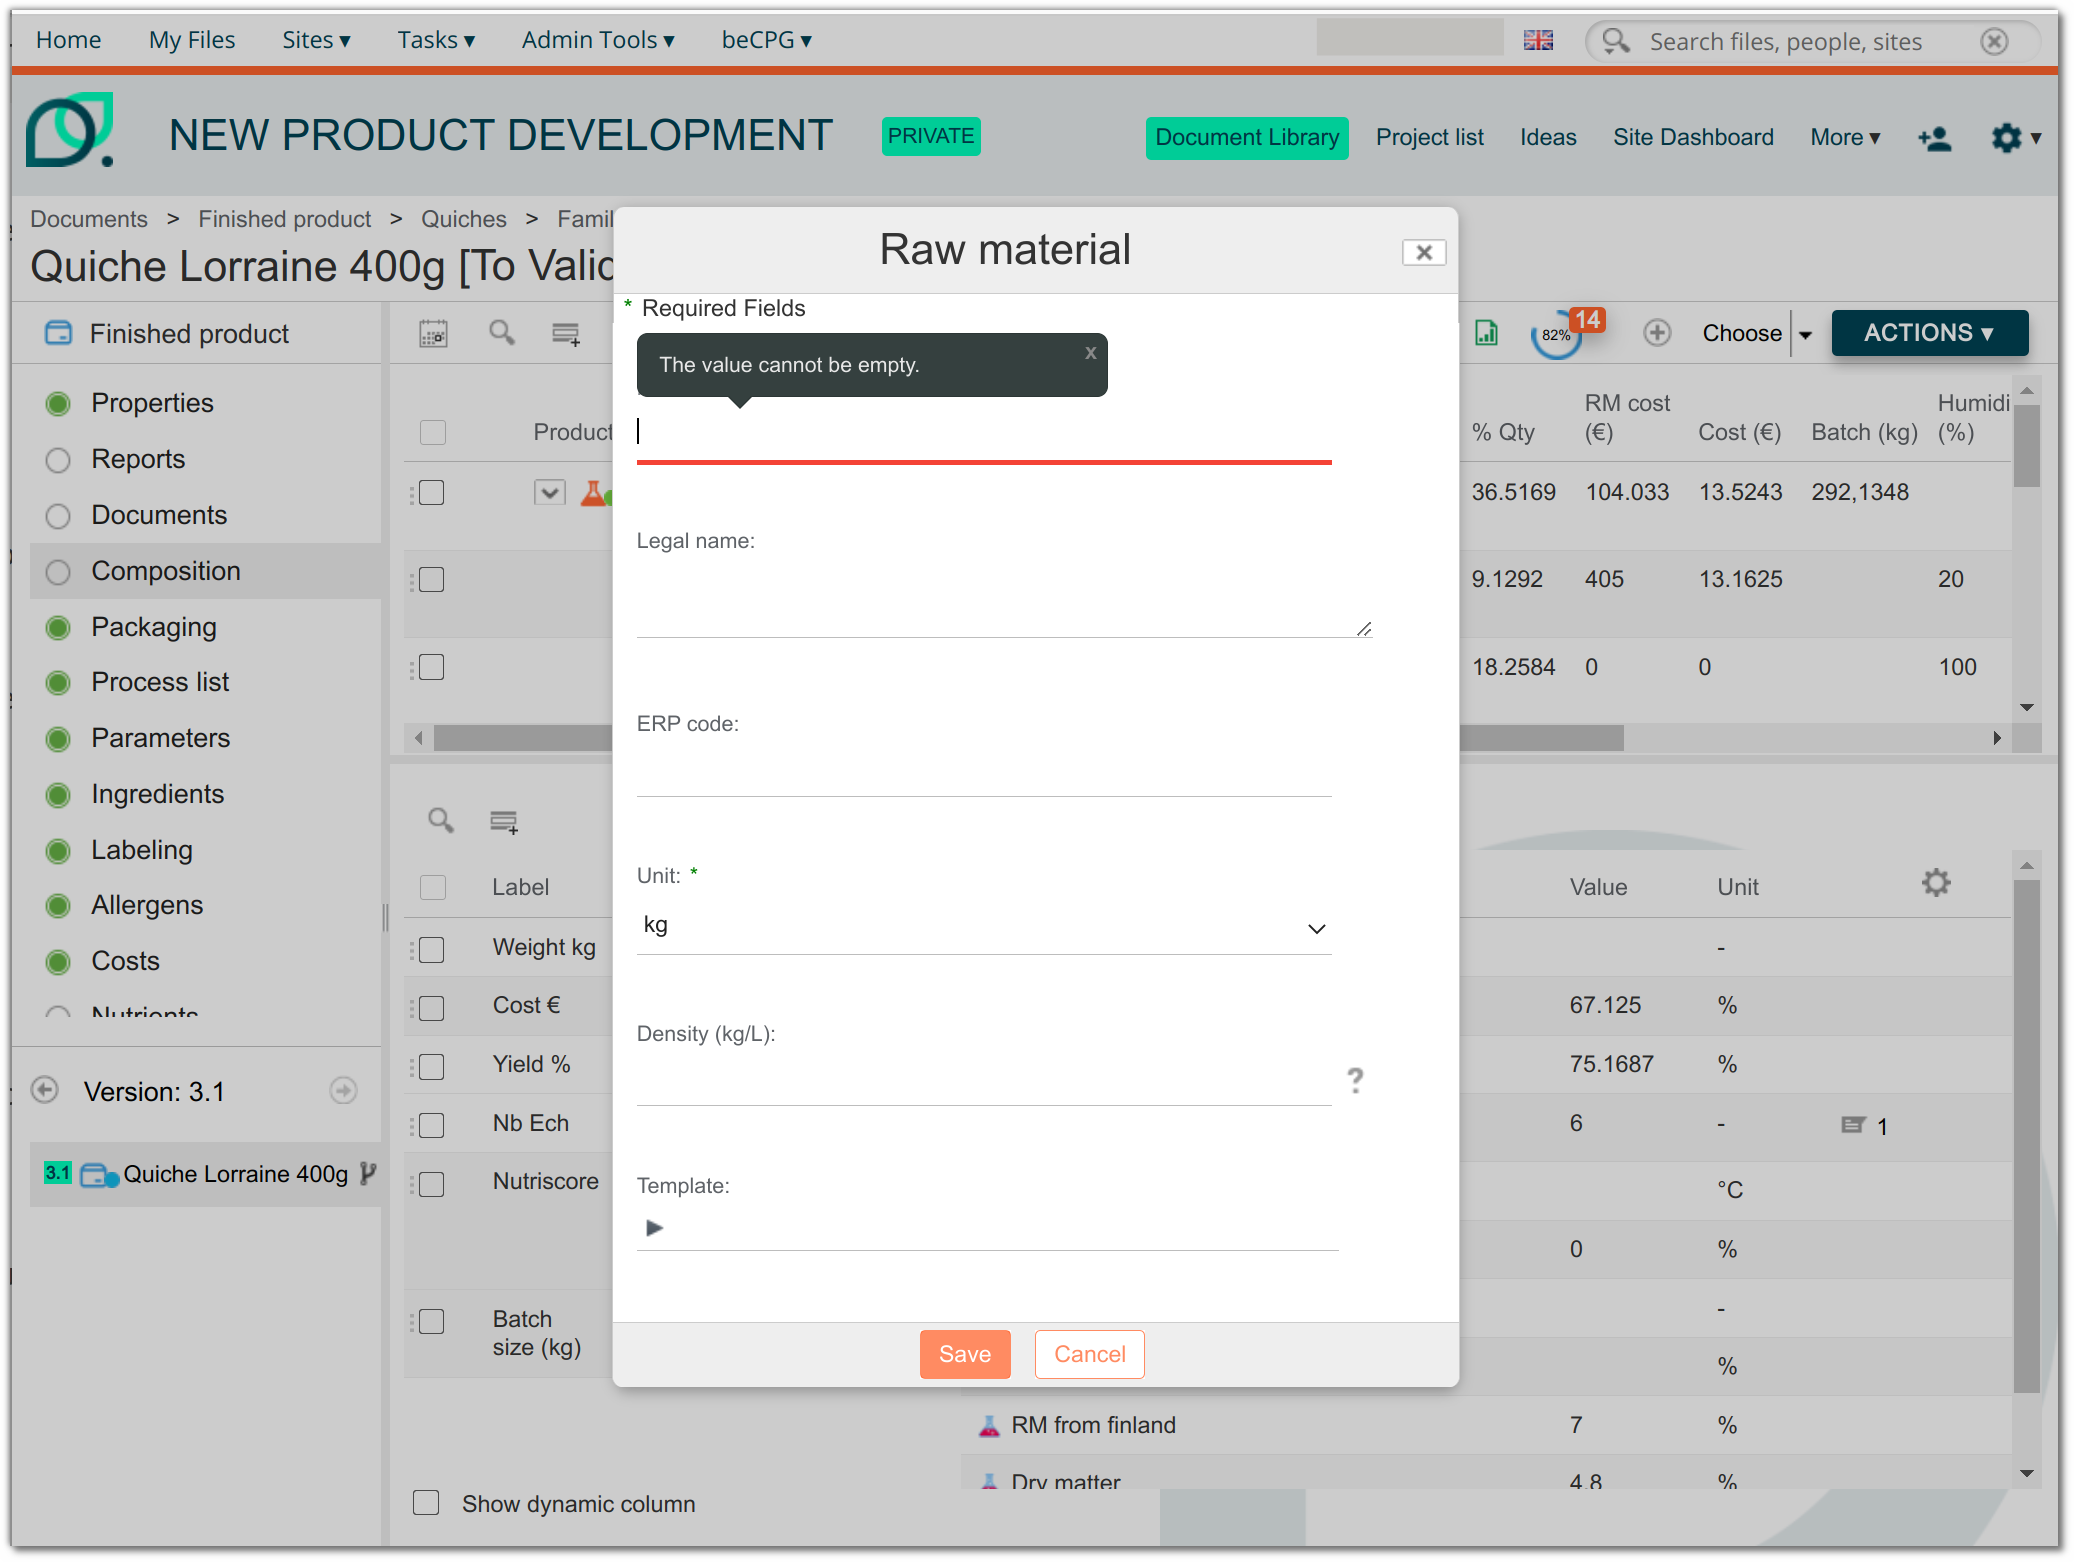
To modify it, you must override the <config> with the name of the type concern by the condition, then modify <forms> with the id="formulation".
    <config evaluator="model-type" condition="bcpg:rawMaterial">
      <forms>
        <form id="formulation">
Editing form
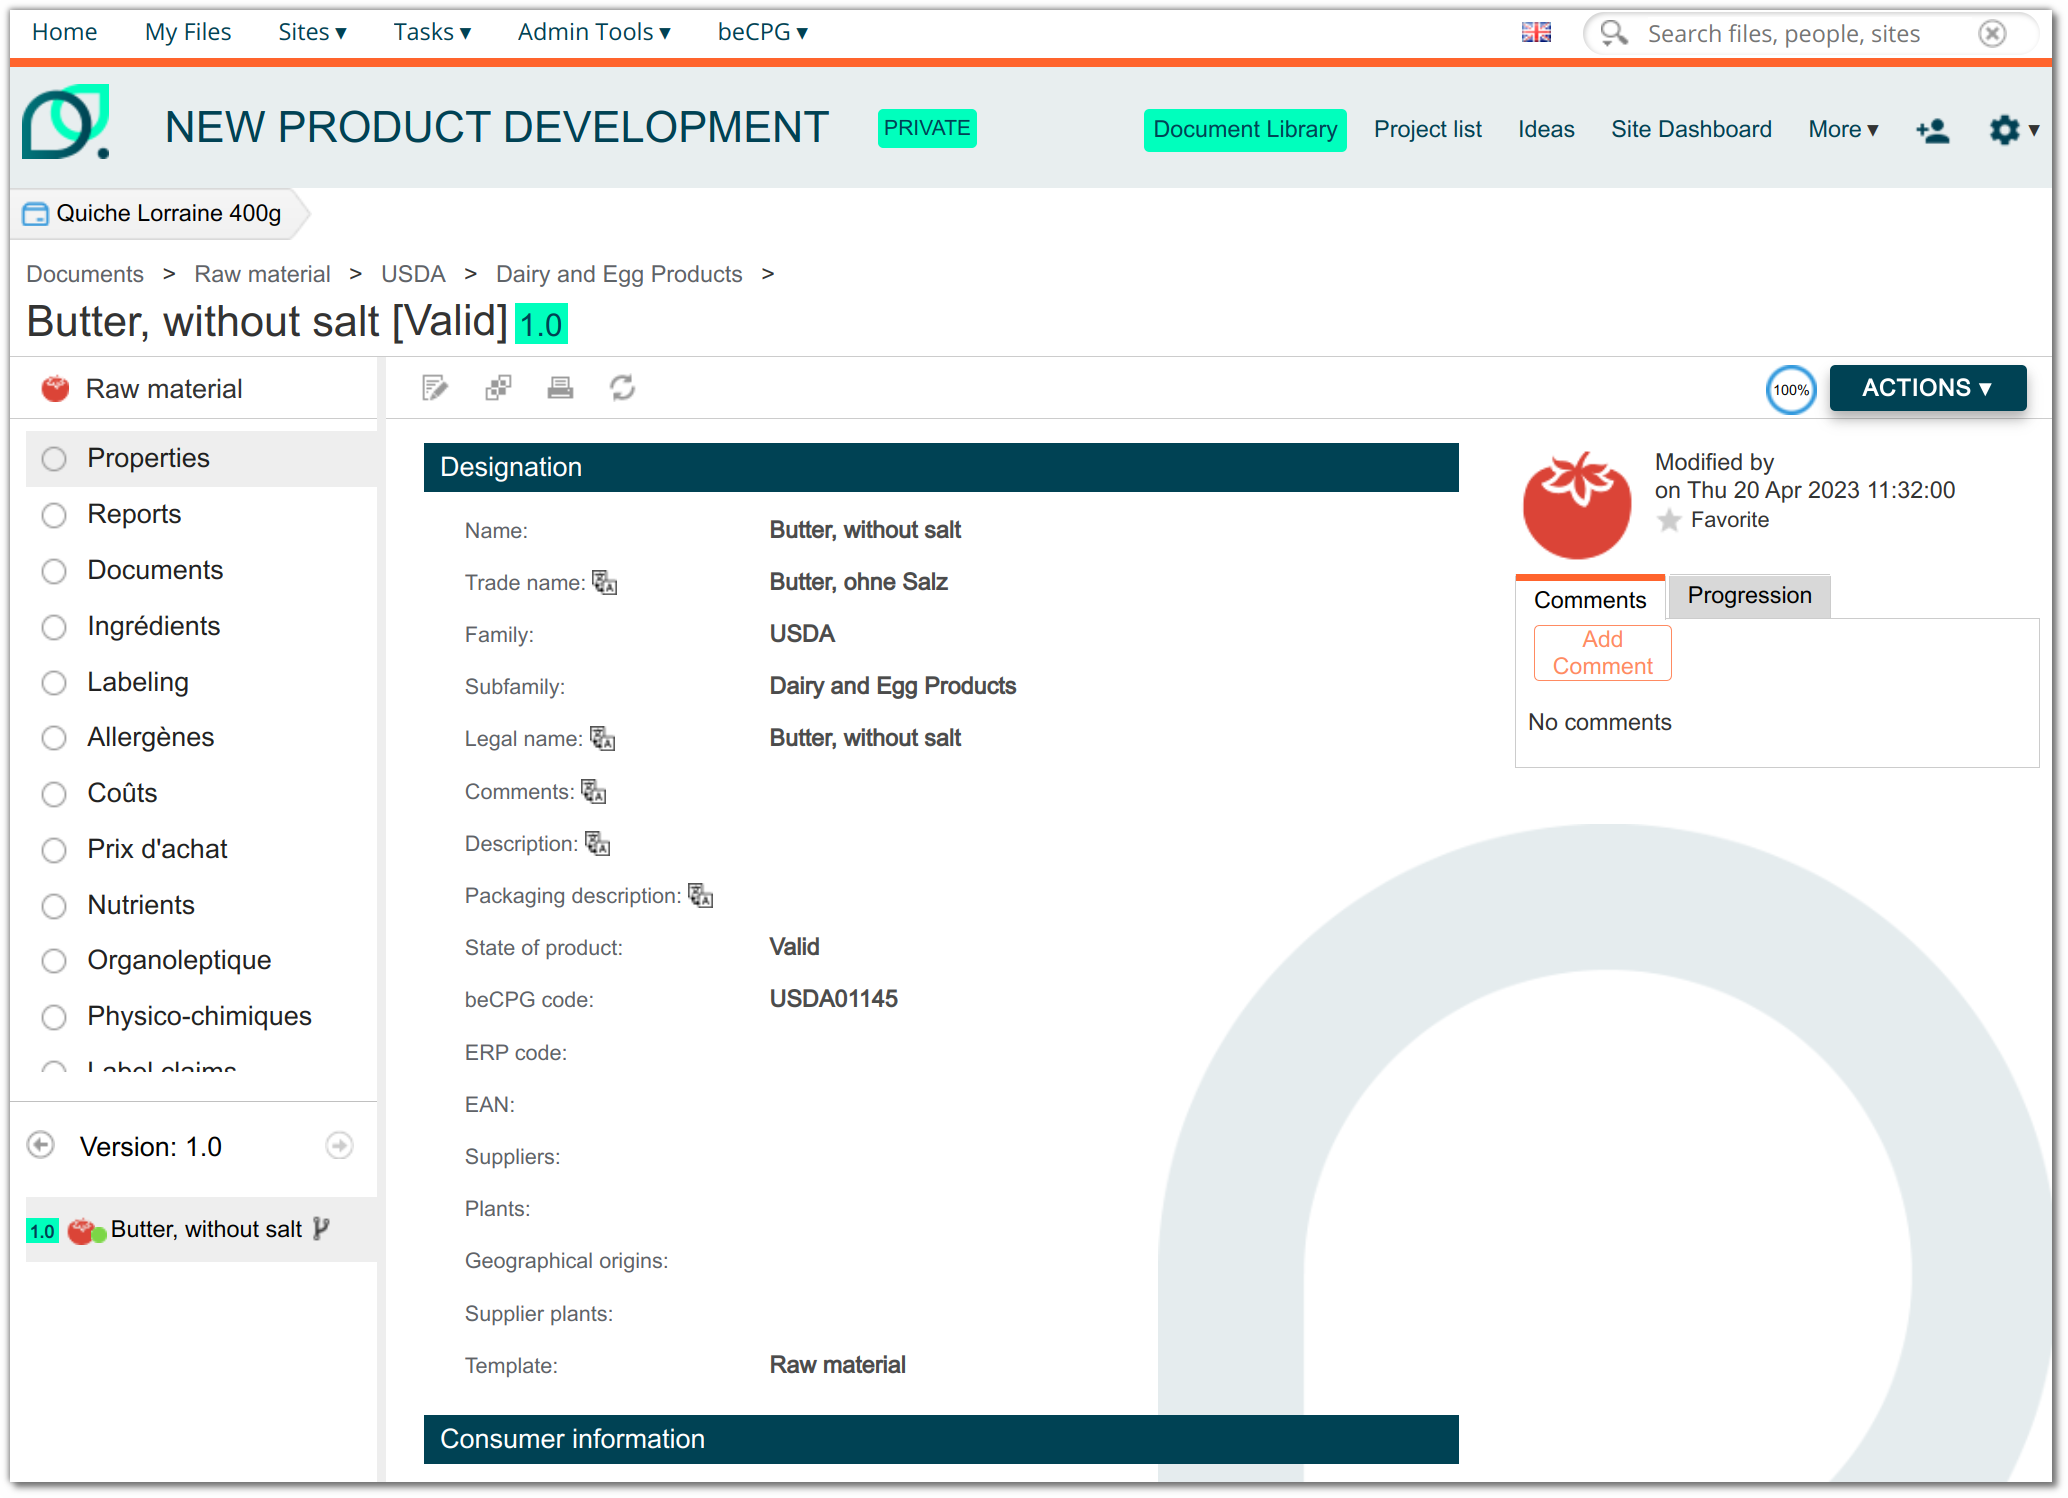
This is the form displayed when editing the properties of a product by clicking "Edit Properties".
Example: Form for editing the properties of a finished product.
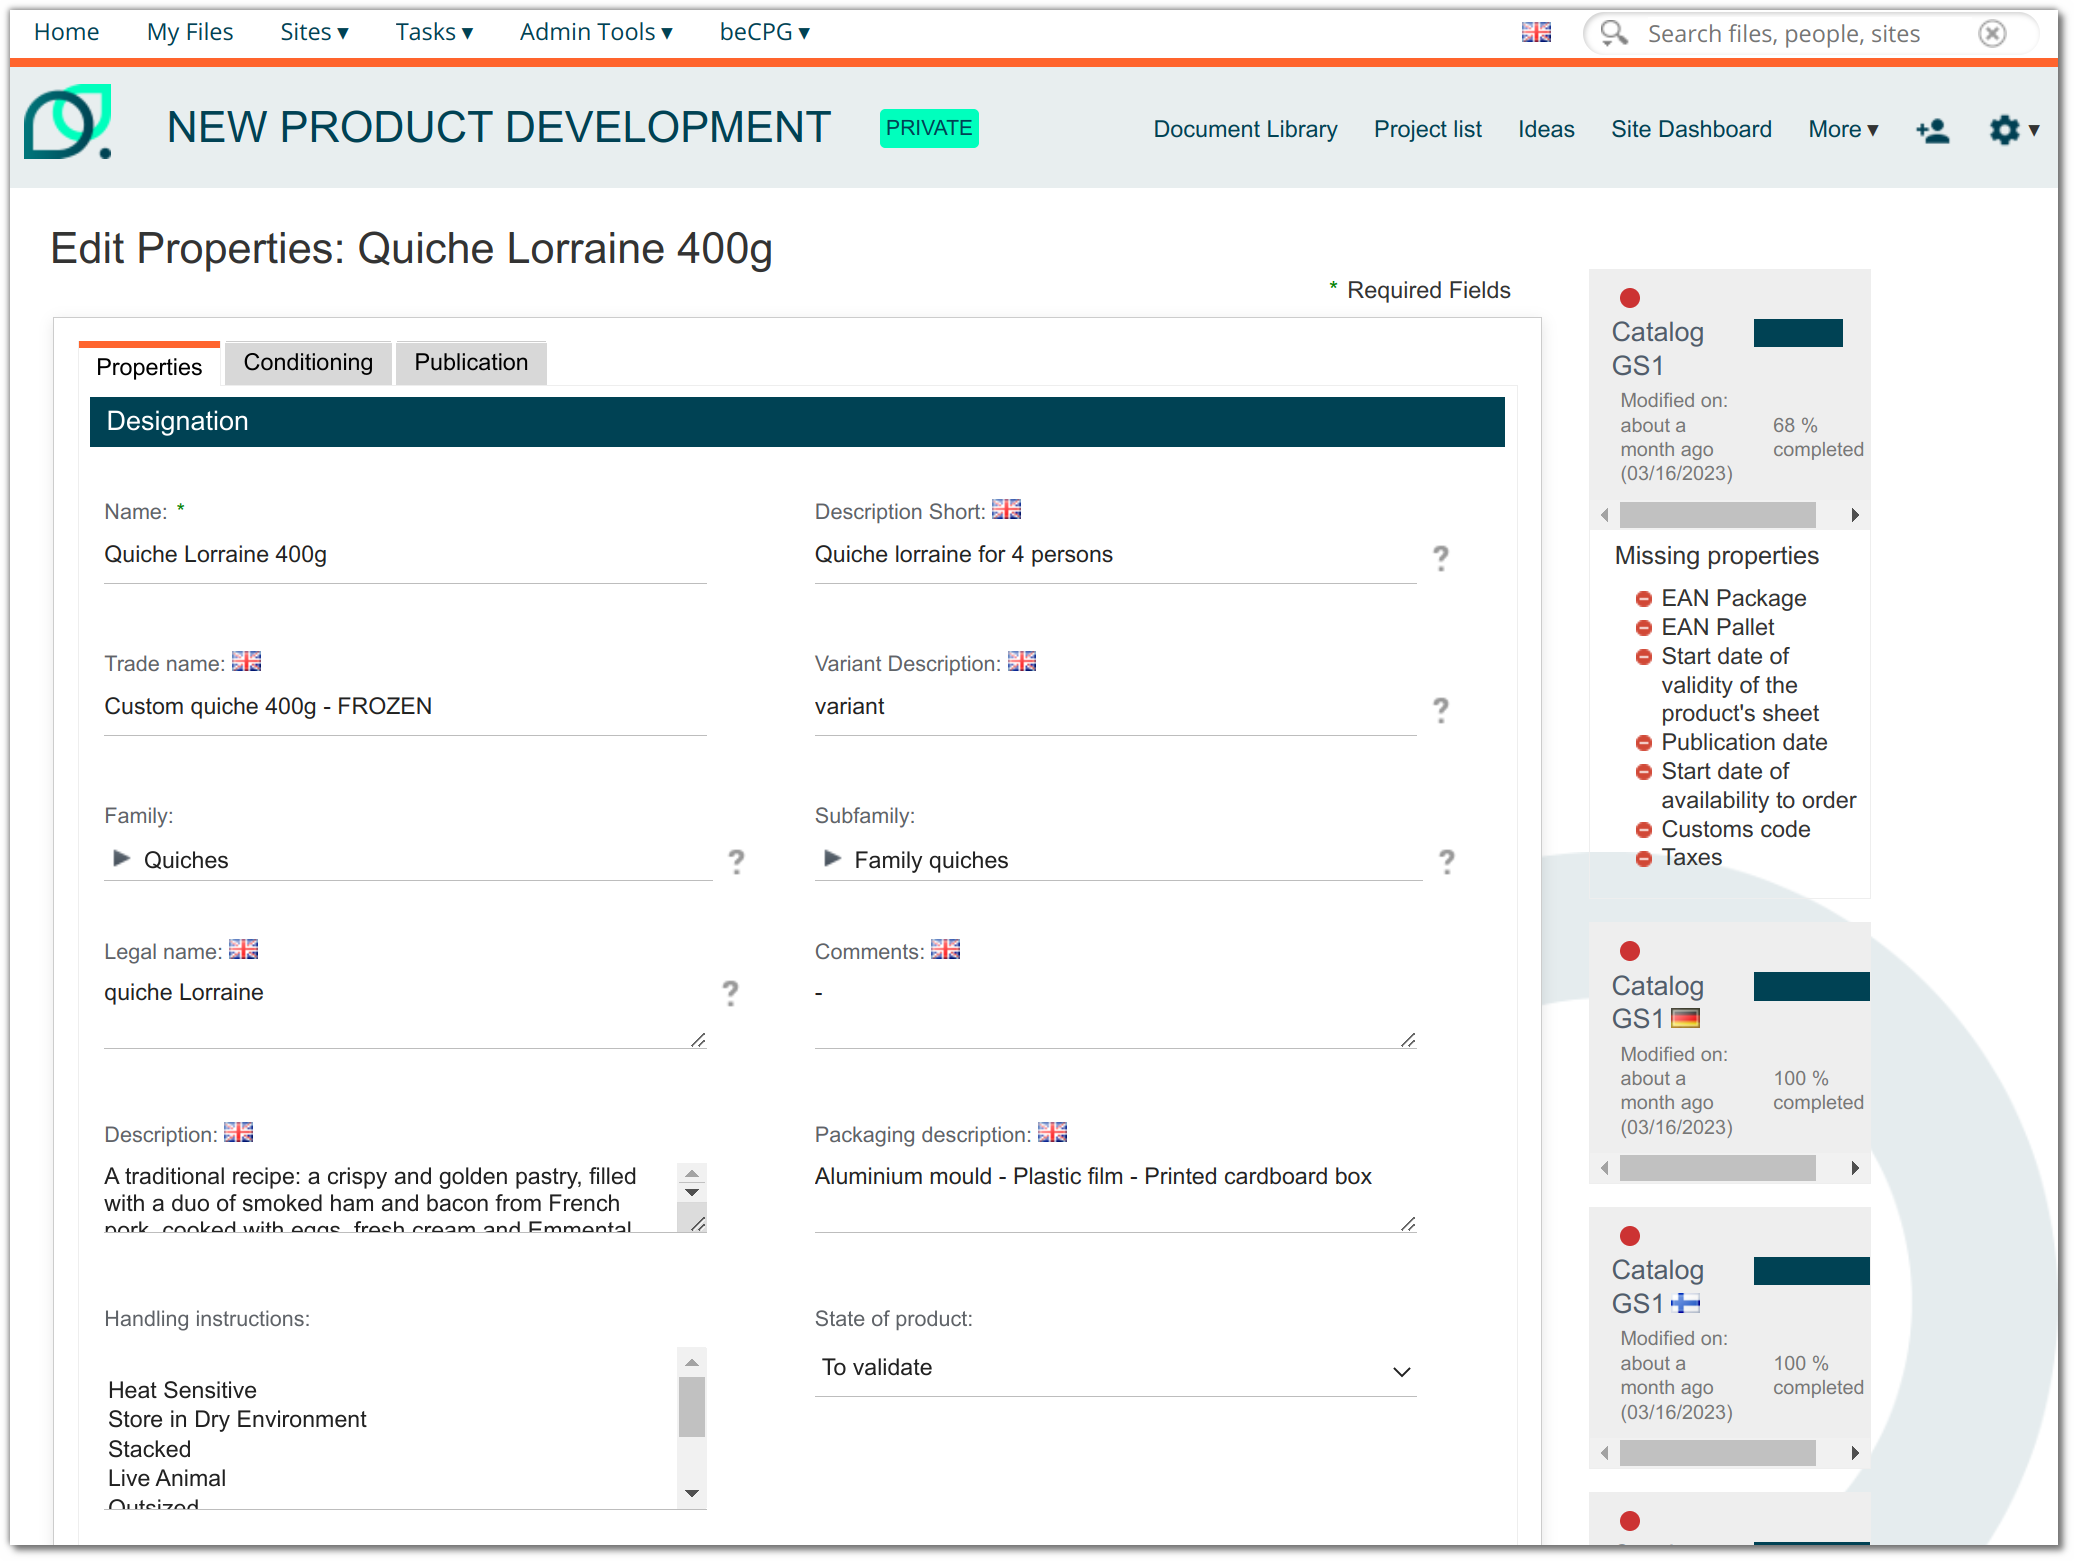
To modify it, you must override the <config> of the product in question with the evaluator node-type, then modify <forms> by default, that is without id.
    <config evaluator="node-type" condition="bcpg:finishedProduct">
      <forms>
        <form>
Editing form from the warehouse
When editing the properties of a product from the warehouse, a pop-up window appears. This is a less detailed edit form than the previous one.
Example: Form for editing the properties of a raw material from the warehouse
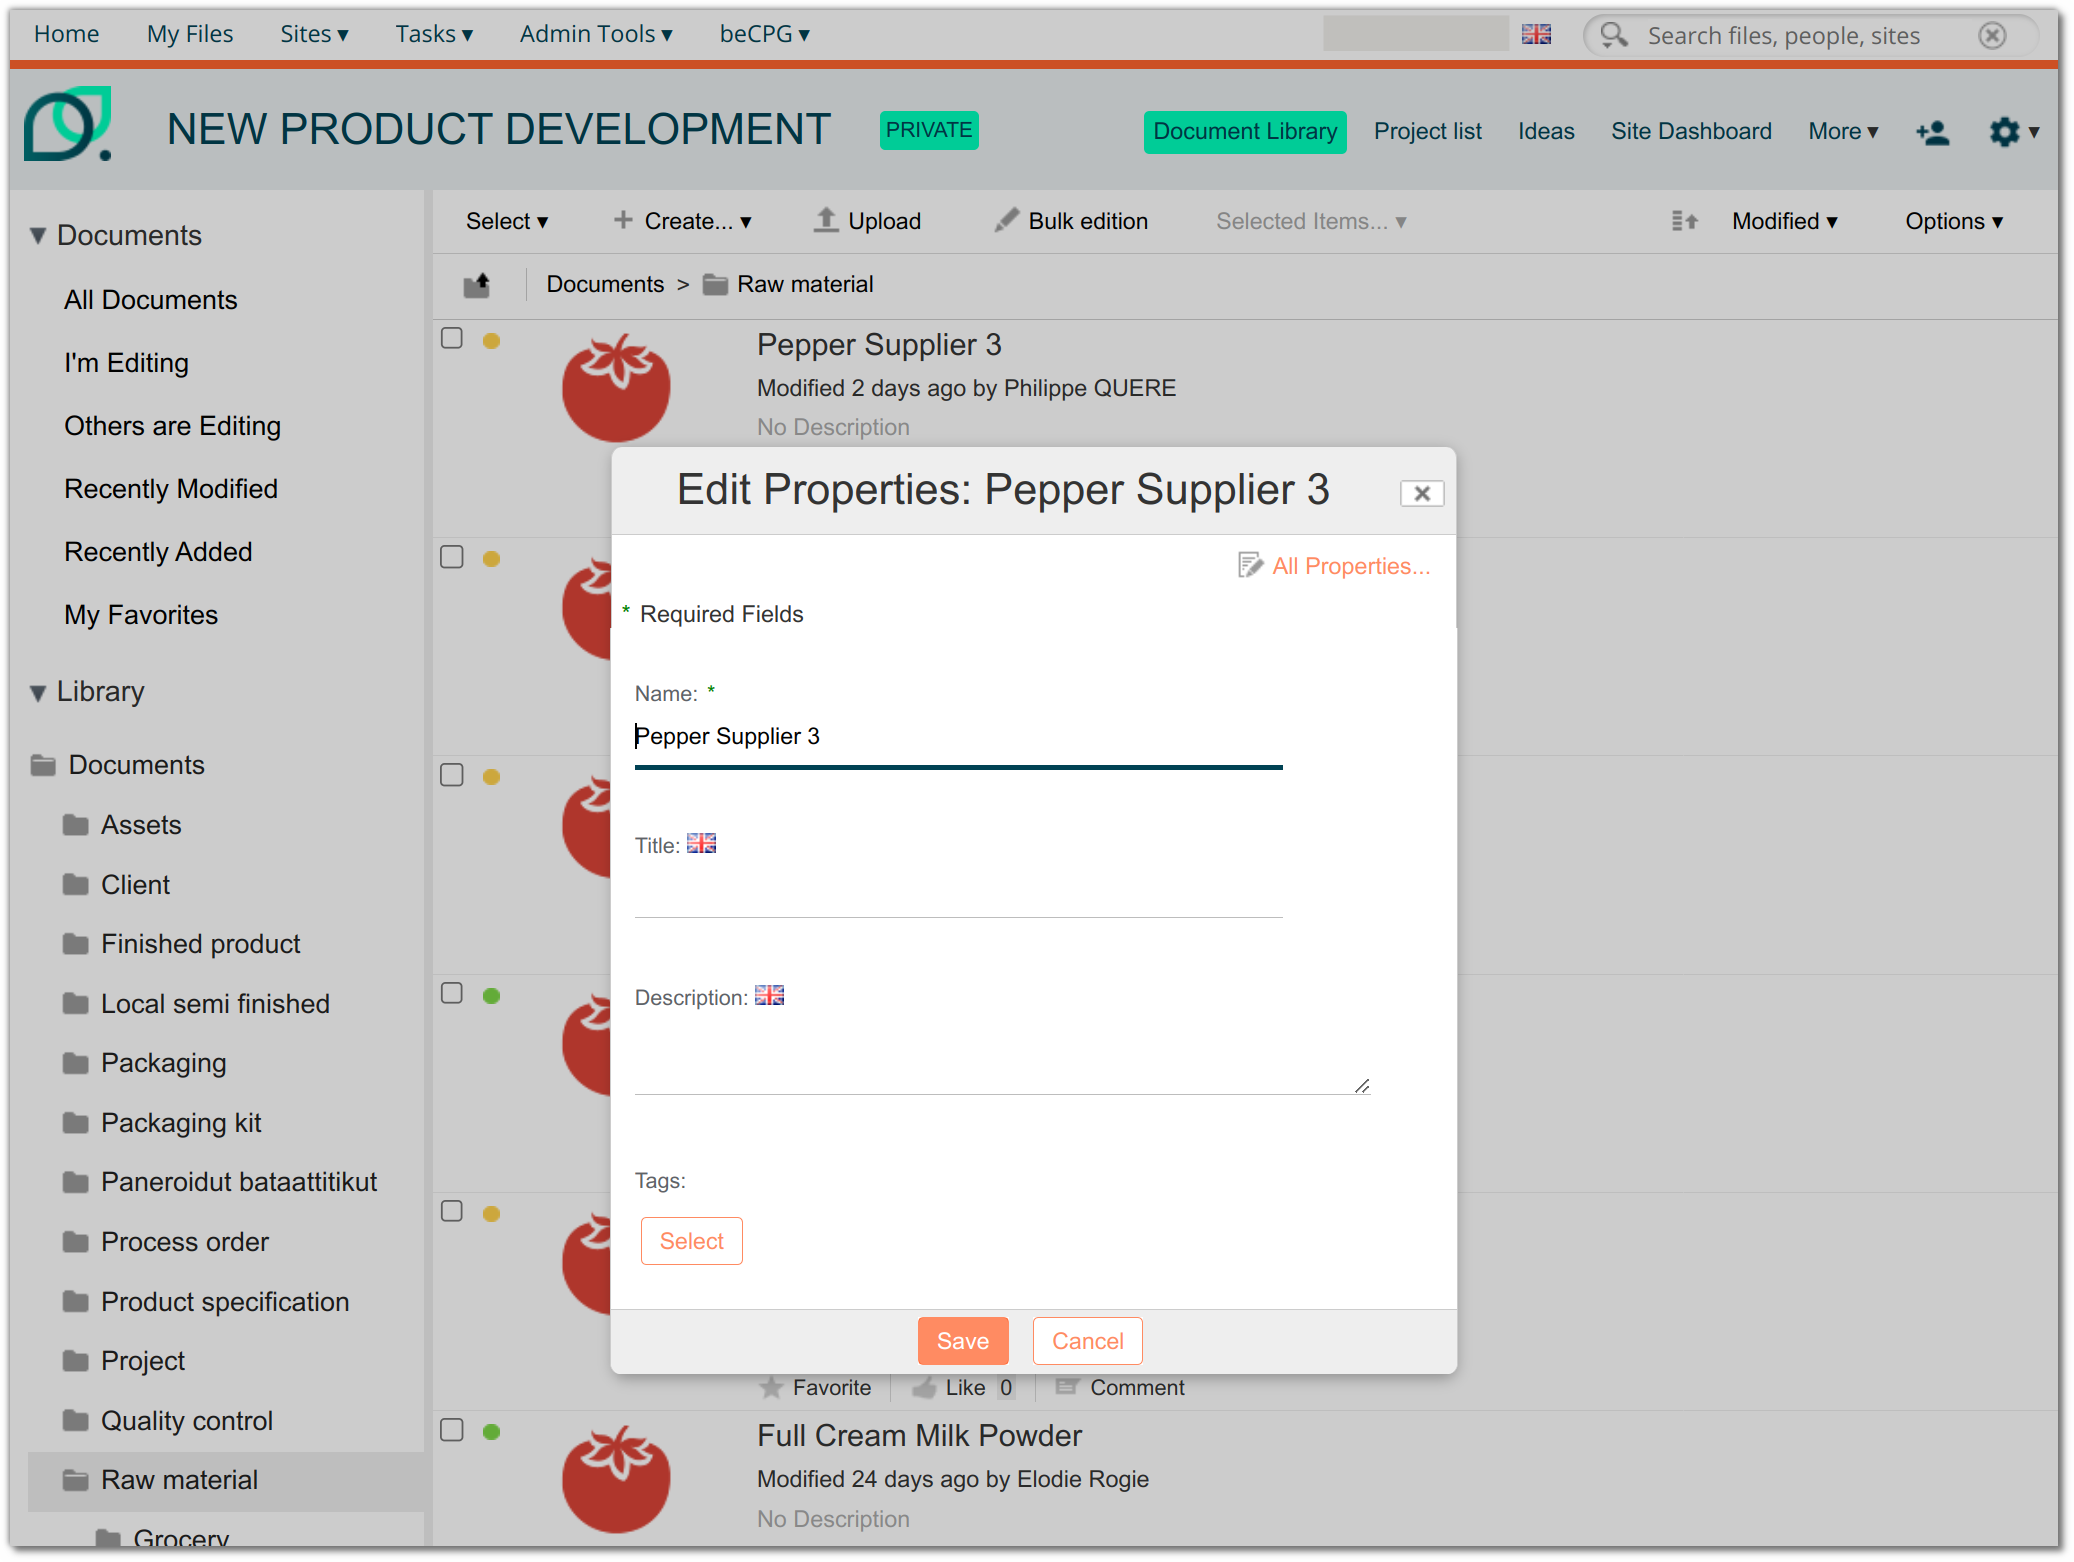
To modify it, you must override the <config> of the product in question with the evaluator node-type, then modify <forms> with the id="doclib-simple-metadata".
    <config evaluator="node-type" condition="bcpg:rawMaterial">
      <forms>
        <form id="doclib-simple-metadata">
Consultation form
This is the form that is displayed when the properties of a product are viewed by pressing "Properties ". It has the same fields as the edit form.
Example: Form for consulting the properties of a raw material
Report settings form
This is the form displayed when changing report parameters by pressing the nut from a data sheet.
Example: Finished product report parameters form

To modify it, you must override the <config> of the product in question with the evaluator node-type , then modify <forms> with the id="reports-parameters".
    <config evaluator="node-type" condition="bcpg:finishedProduct">
      <forms>
        <form id="reports-parameters">
Form per site
It is possible to define a form specific to a particular site. To do this, simply add the site ID to the form ID.
Example: Definition of a raw material creation form in the ID validated products site valid
<config evaluator="model-type" condition="bcpg:rawMaterial">
   <forms>
      <form id="create-valid">
         </form>
datalists form
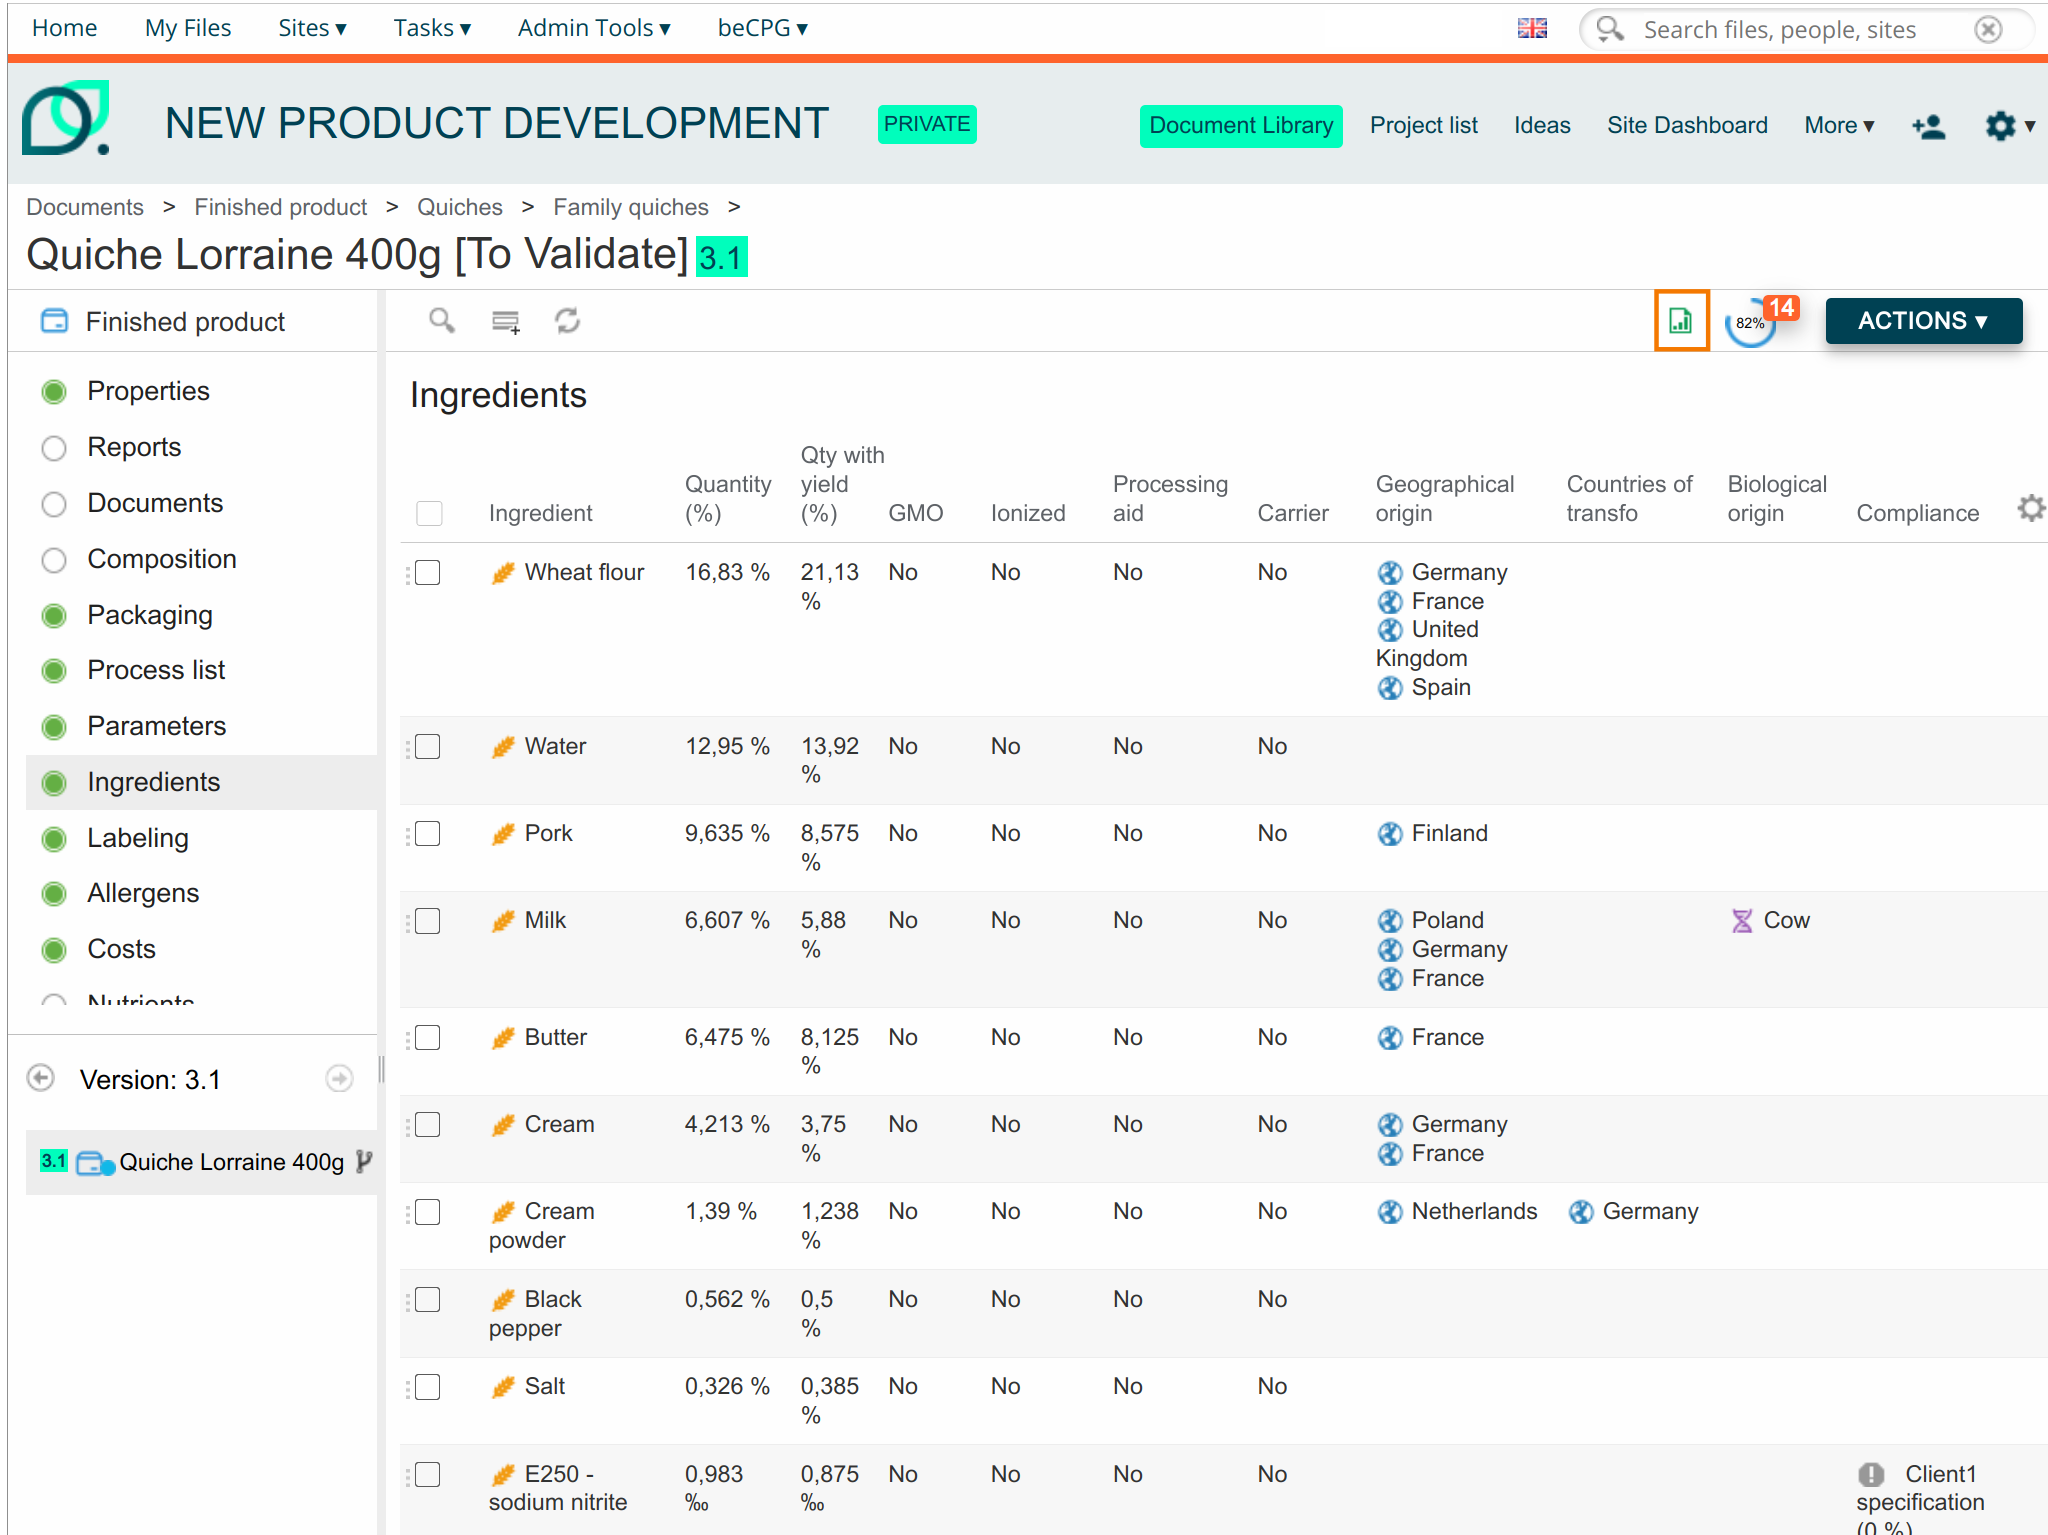
In the different datalists (tabs on the left panel: properties, composition...) of a product, you can configure the columns to be displayed on the central panel.
Example: Columns of the Nutrients datalist of a finished product
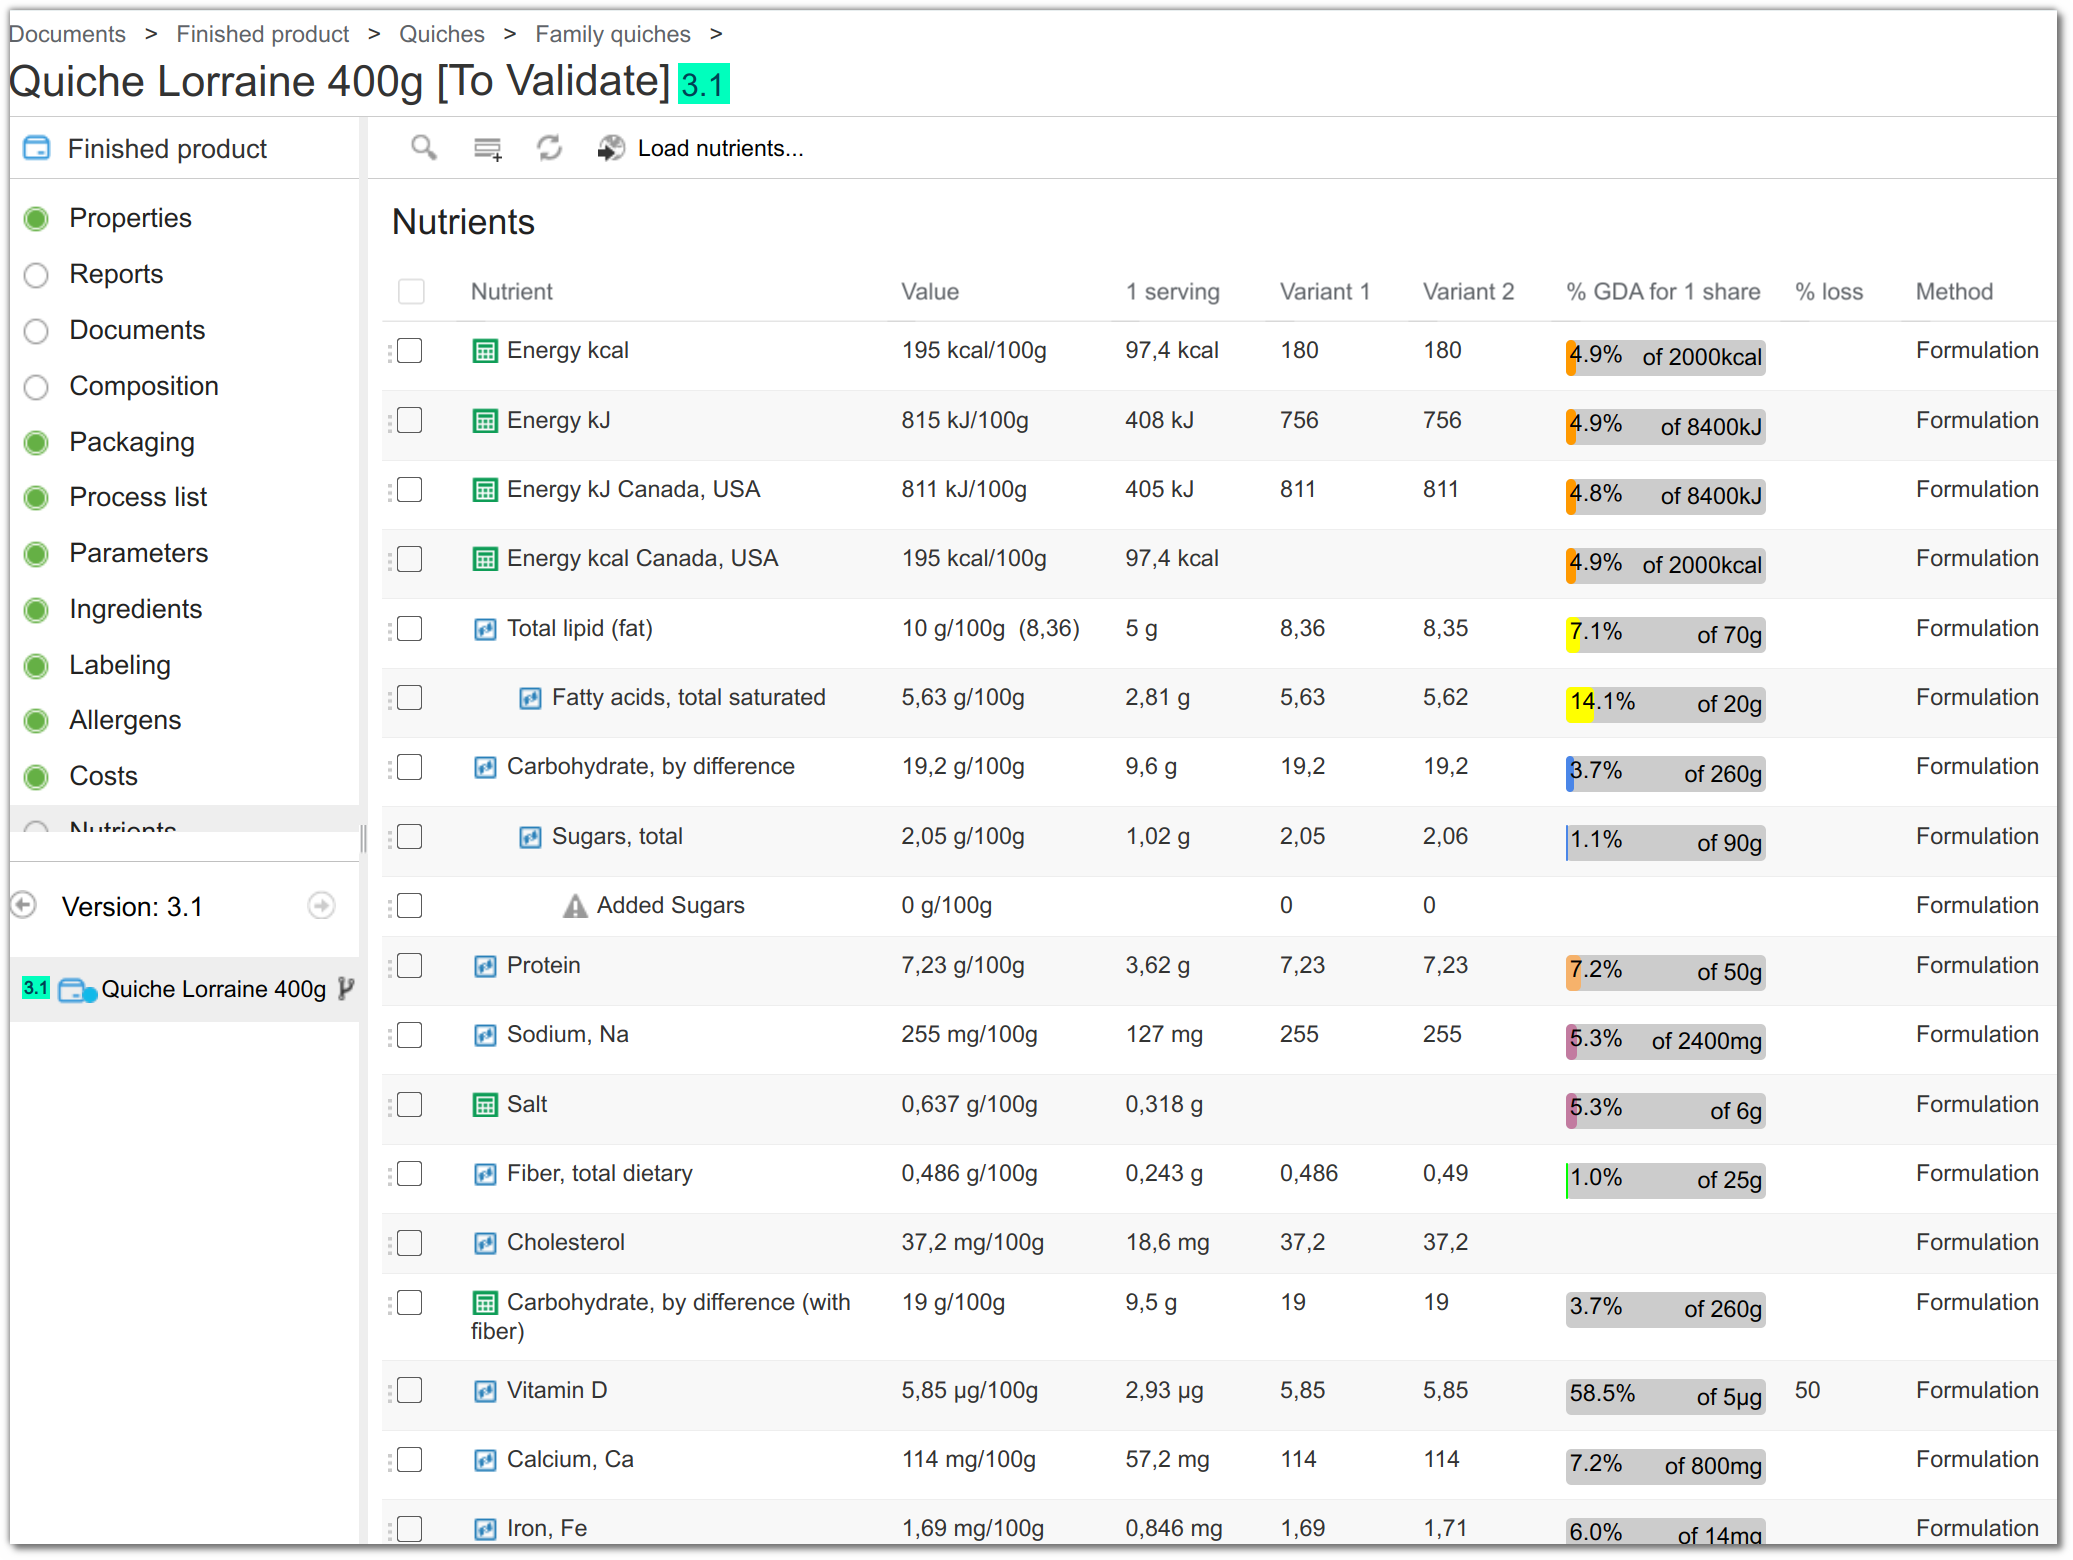
To add or remove the columns to be displayed, the <config> of the product, evaluator model-type and modify the <forms> with theid=""datagrid" .
    <config evaluator="model-type" condition="bcpg:nutList">
       <forms>
          <form id="datagrid">
On the list form, it is also possible via the help parameter to specify column sizes (see Help)
Export form
It is possible to make an export form on a list in order to be able to export it under Excel with the button export under Excel :
<config evaluator="model-type" condition="bcpg:ingList">
       <forms>
          <form id="export">
If there is no "export" form, the Excel export takes into account the "data grid" form.
List form
In some datalists (such as nutrients) of a specific type, a panel on the right displays a form with additional information.
Example: Nutrient filter form for a finished product
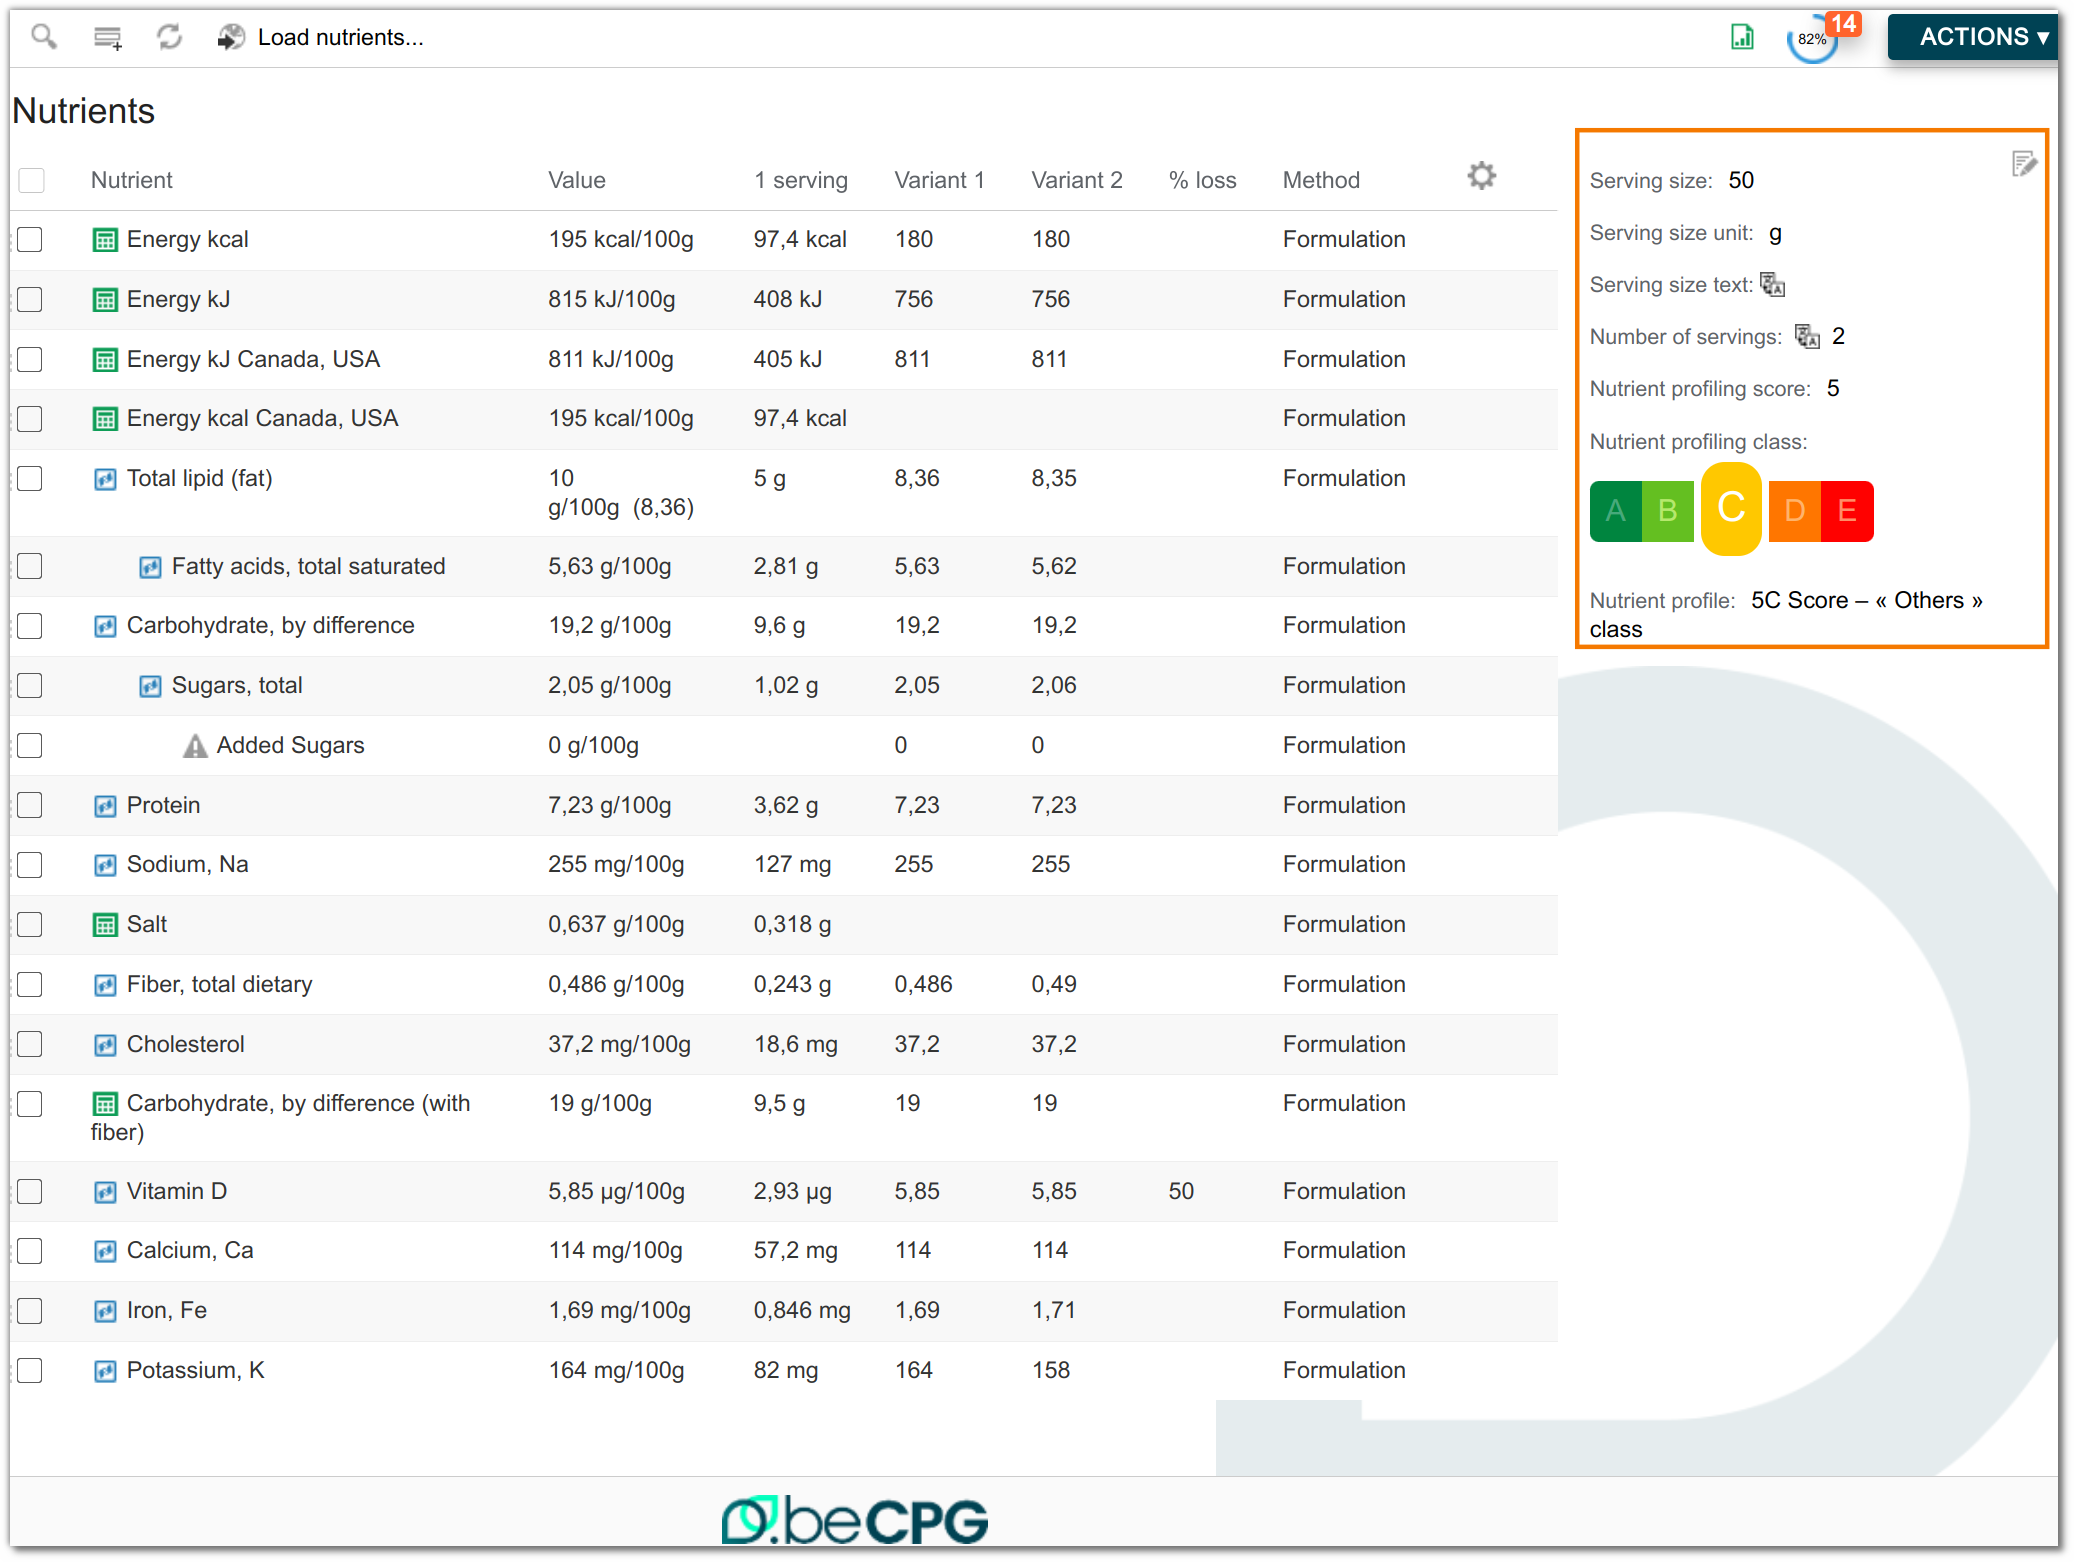
To modify it, you must override the <config> of the product, evaluator node-type and modify the <forms> with the'id="datalist.
Example: for the Nutrients datalist of a finished product, the form ID is "nutList.
    <config evaluator="node-type" condition="bcpg:finishedProduct">
       <forms>
          <form id="nutList">
Filter and search form
Filter
In the product datalists, you can filter the items to be displayed by clicking on the magnifying glass. A form showing the different characteristics of the filter is then displayed.
Example: Nutrient filter form for a finished product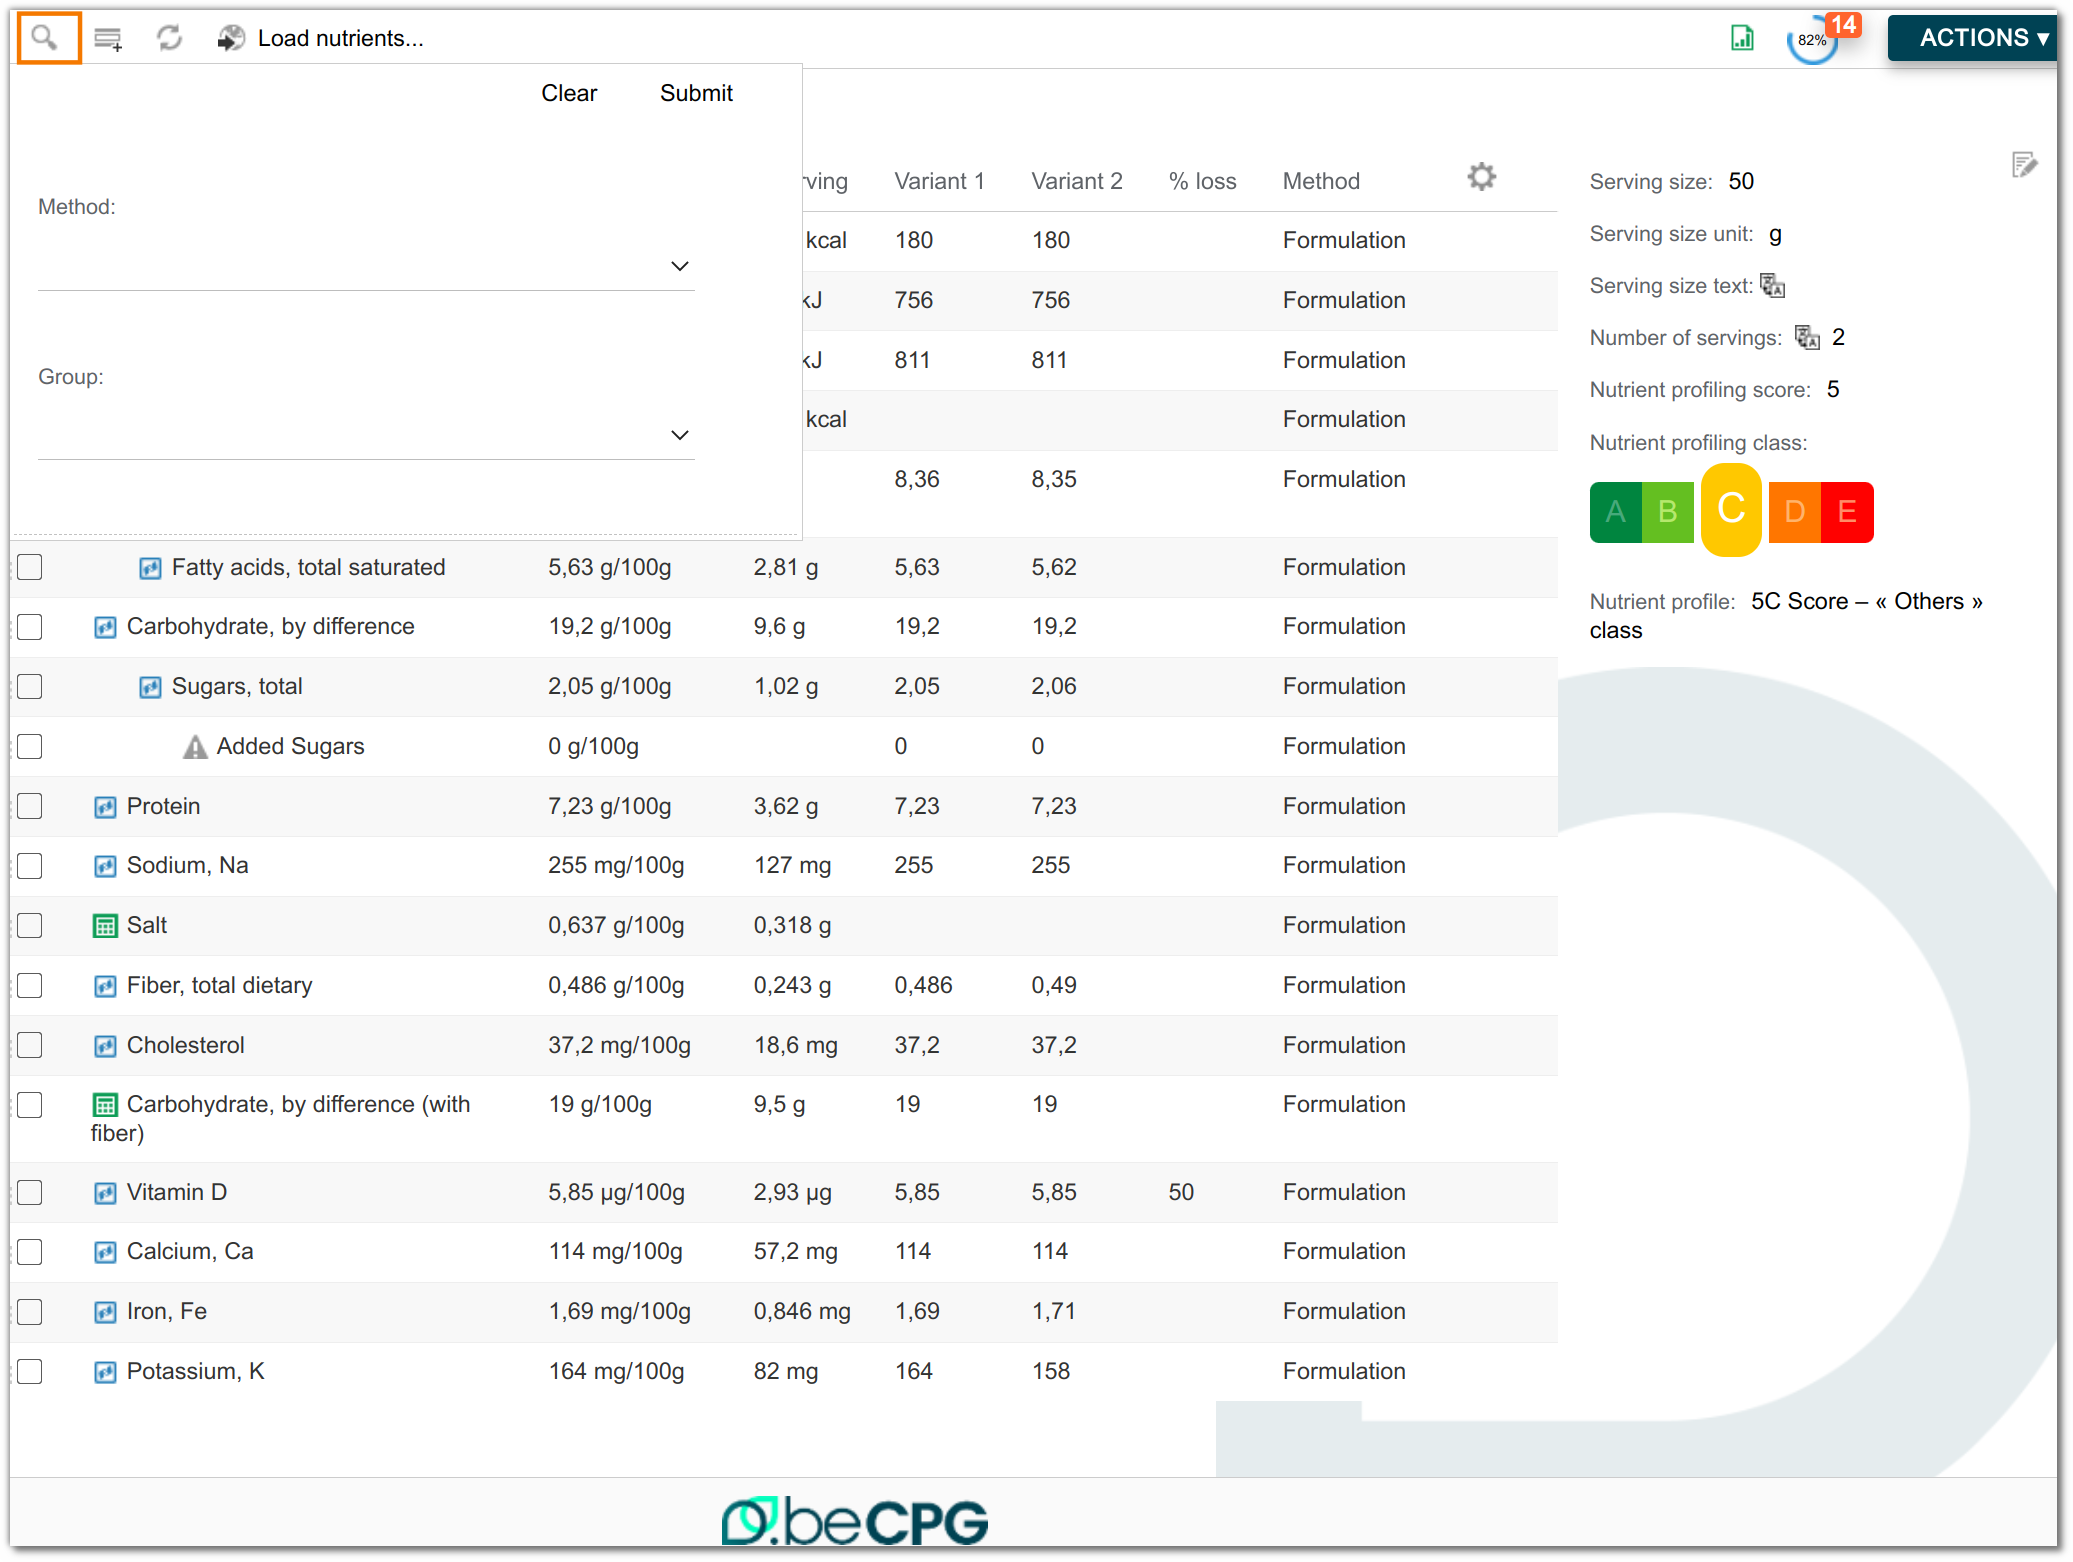
To modify it, you must override the <config> of the product, evaluator model-type and modify the <forms> with the id="filter".
    <config evaluator="model-type" condition="bcpg:nutList">
       <forms>
          <form id="filter">
Search
This is the form displayed when doing an advanced search on a specific product type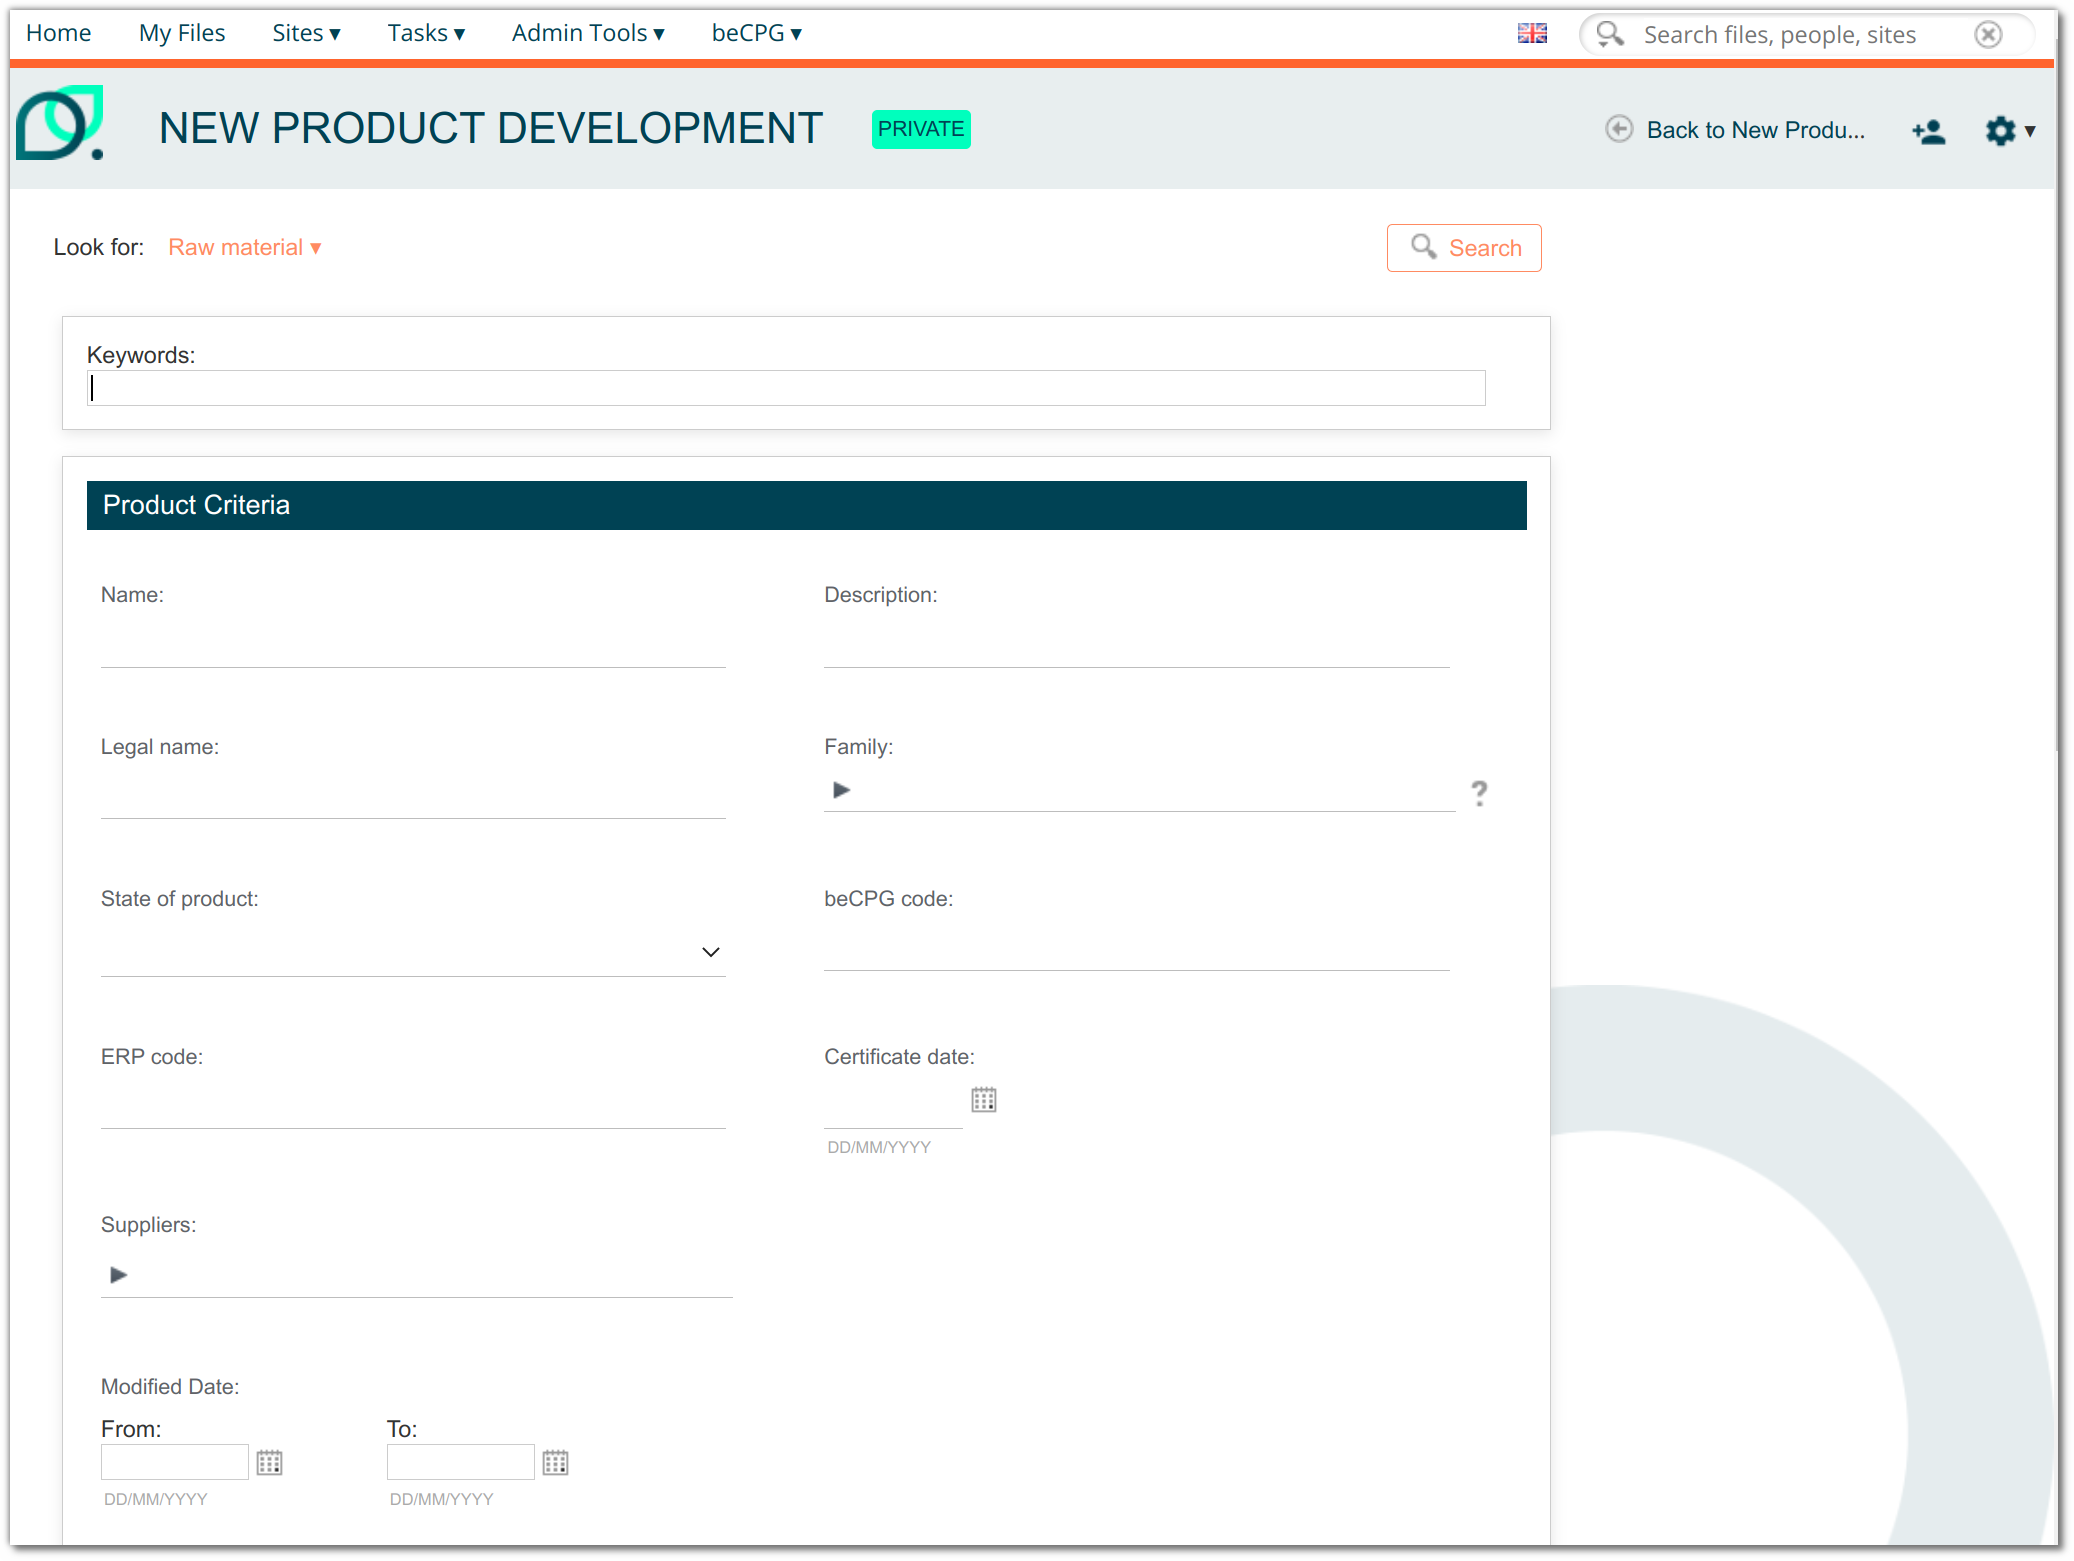
To modify it, you must override the <config> of the product, evaluator model-type and modify the <forms> with theid="search".
    <config evaluator="model-type" condition="bcpg:rawMaterial">
       <forms>
          <form id="search">
Bulk edit and where used form
Bulk edit
This is the form displayed when performing a bulk edit to choose which fields we want to display for a particular content. It is displayed by pressing "Bulk Edit" from the warehouse.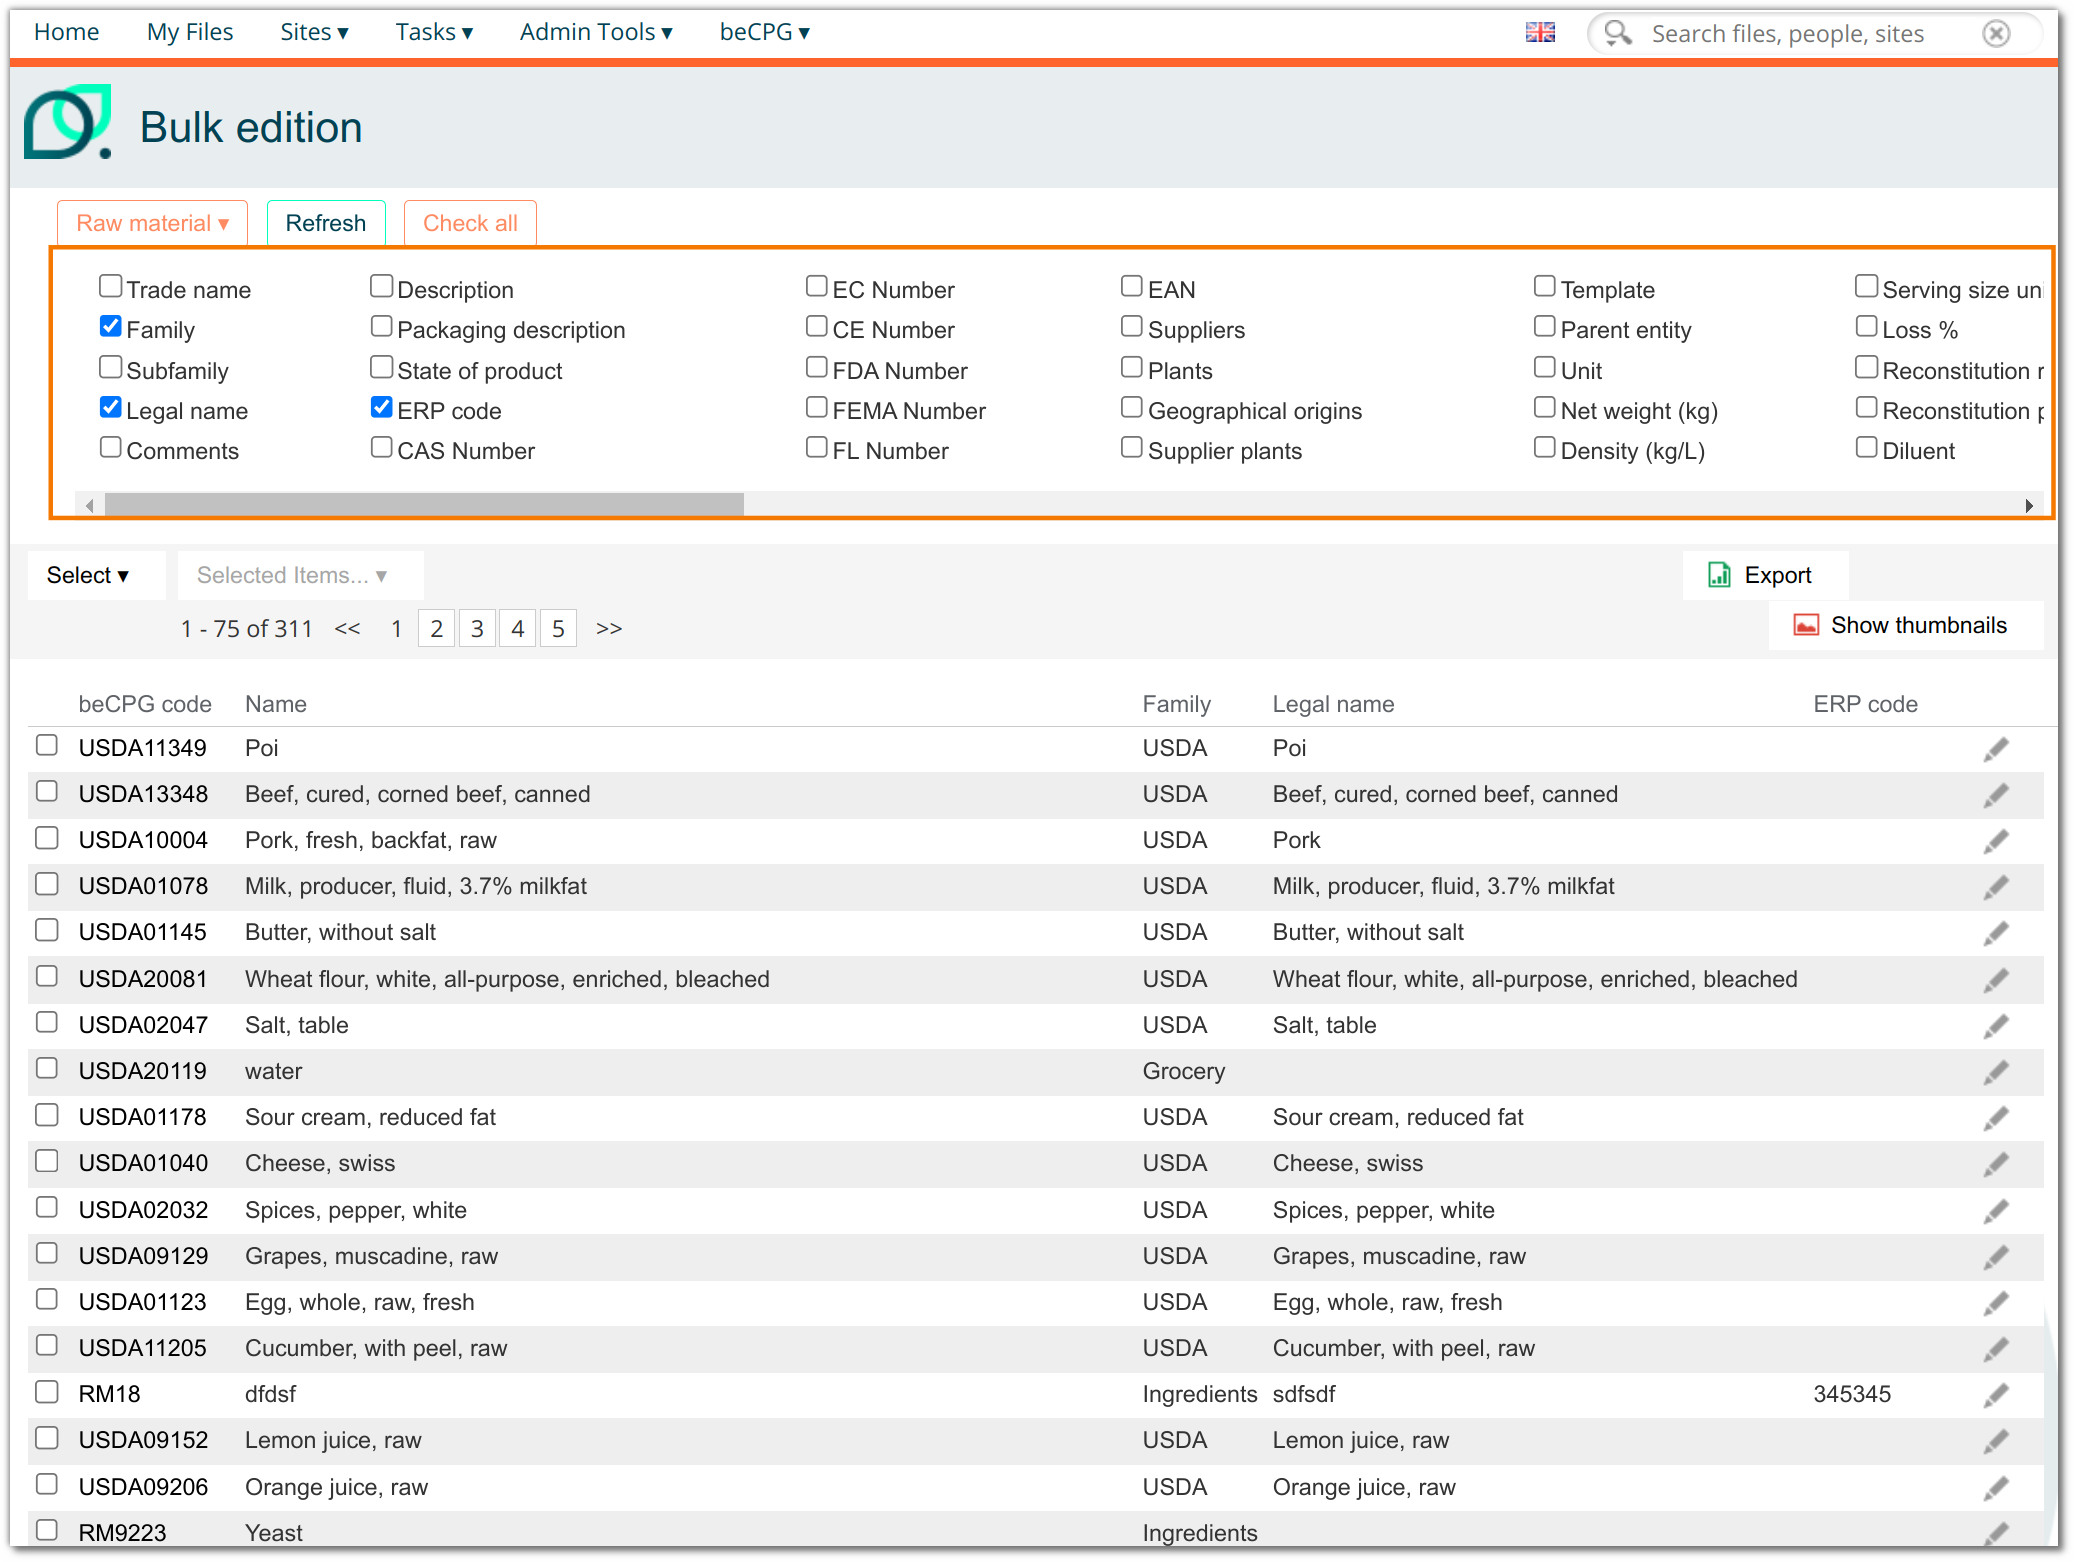
To modify it, you must override the <config> of the product, evaluator model-type and modify the <forms> with the id="bulk-edit".
    <config evaluator="model-type" condition="bcpg:rawMaterial">
       <forms>
         <form id="bulk-edit">
Where used
For each type of product, there is a "Where-Used" datalist. This list has the ID WUsed.
Example :where used of a finished product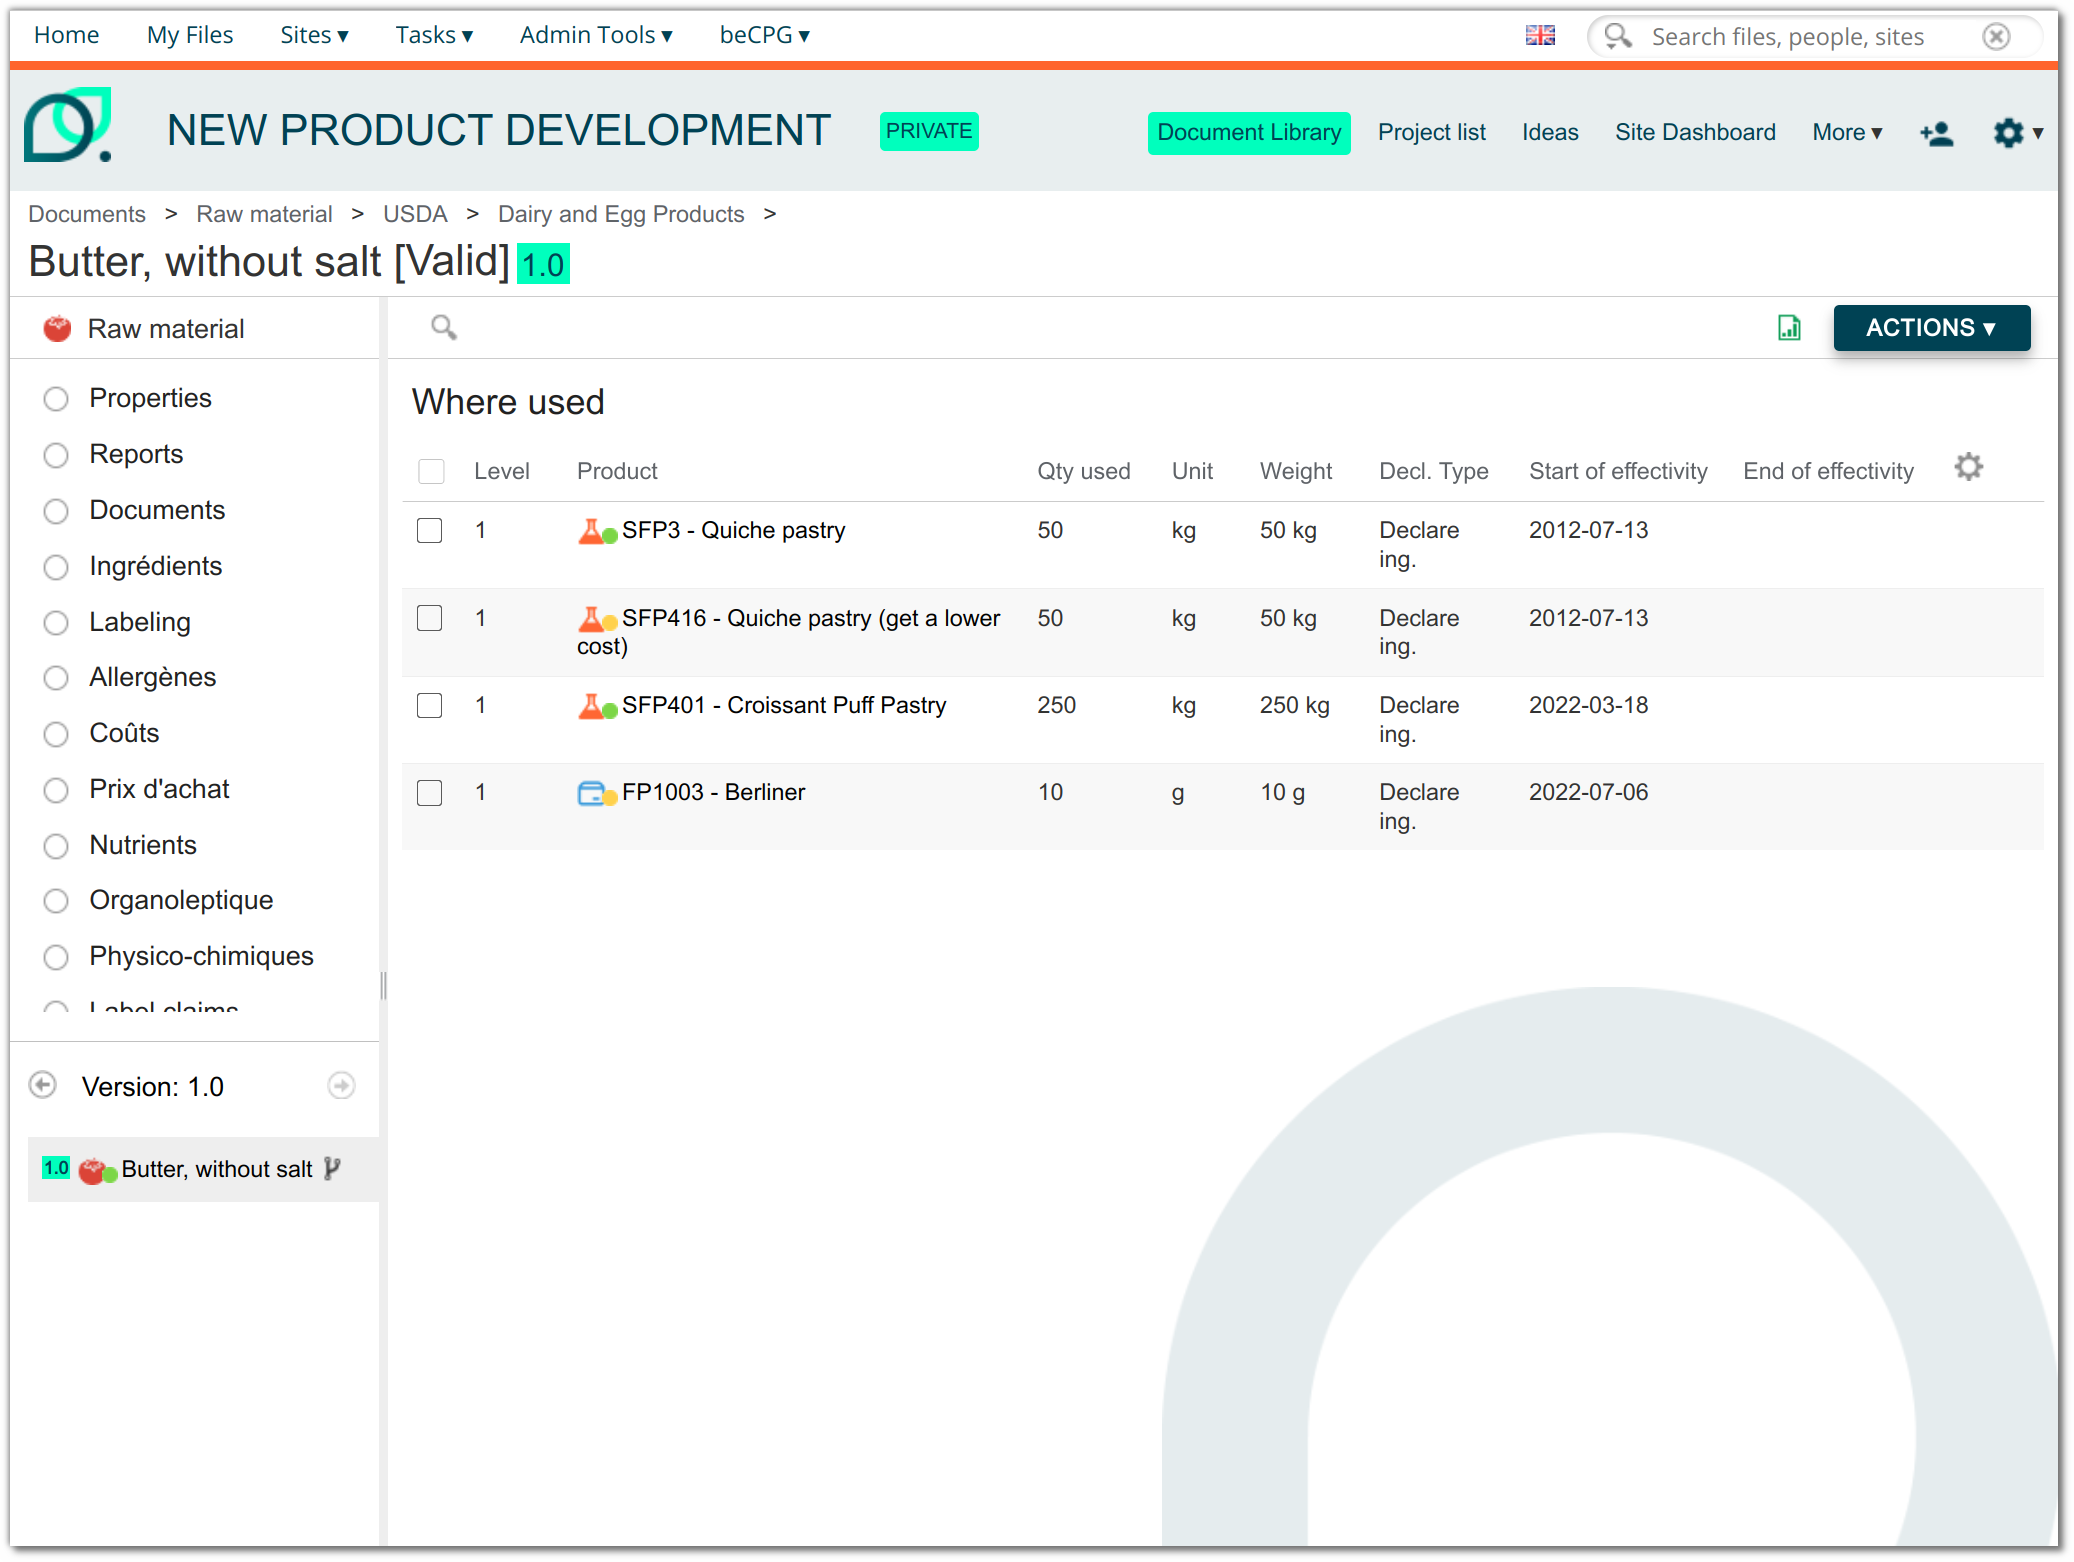
Where used filter
In some datalists, such as the list of nutrient, it is possible to view the use case of a selected cost. Simply select a nutrient and click on " Where-used ". A pop-up window with a form is then displayed.
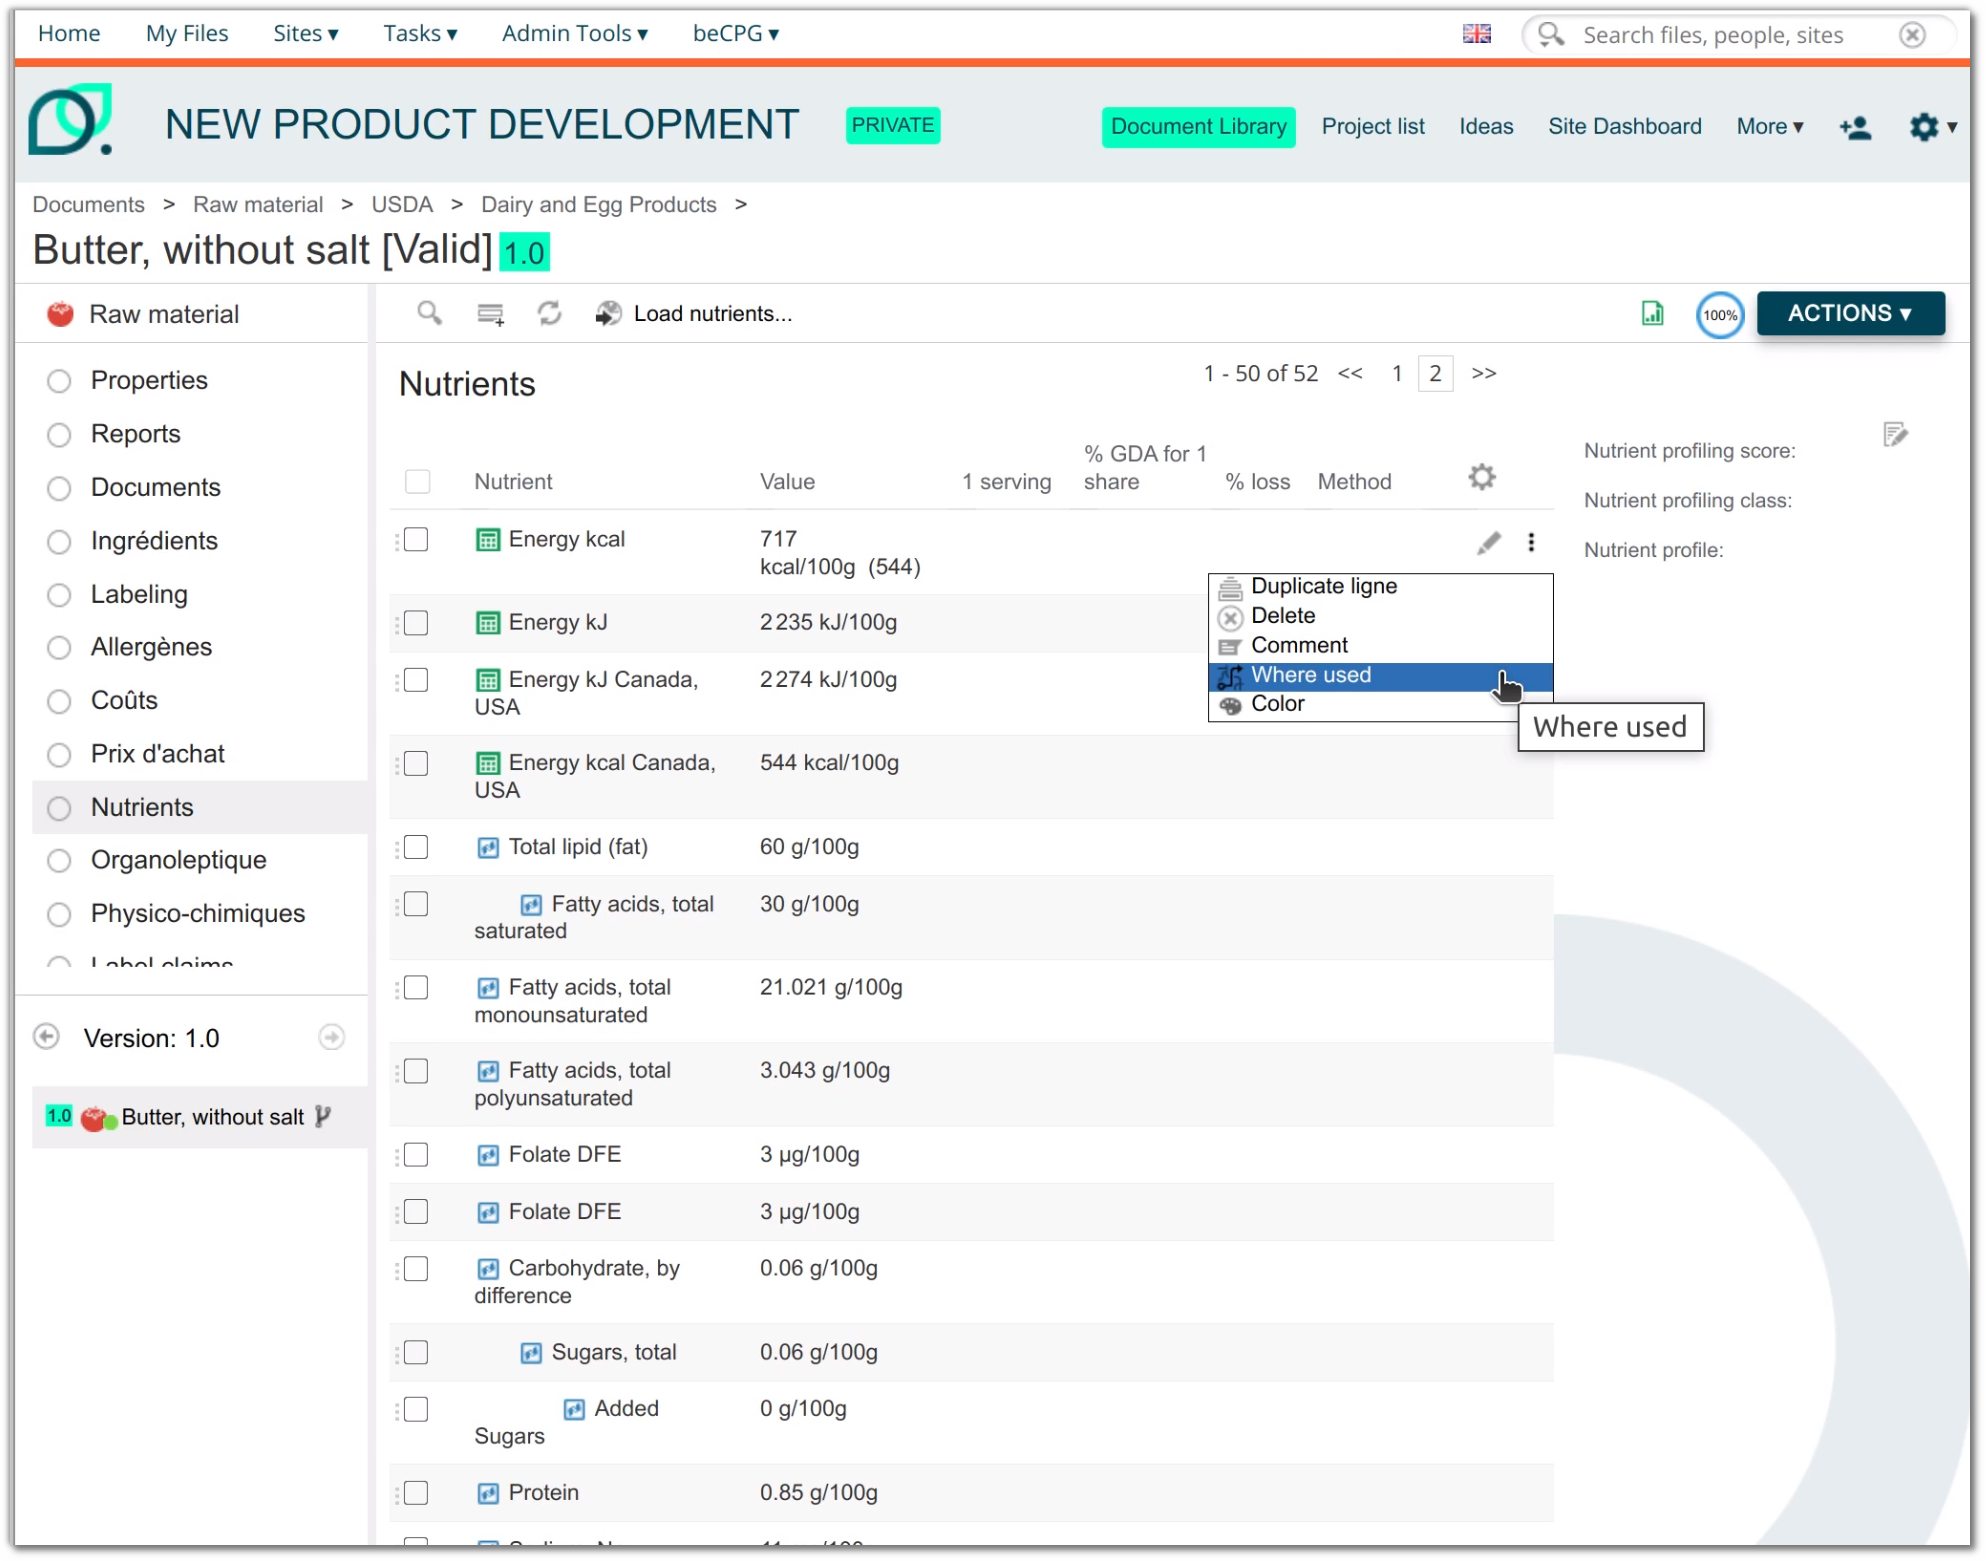
To modify it, you must override the <config> of the product, evaluator model-type and modify the <forms> with the 'id="filter-wused".
    <config evaluator="model-type" condition="bcpg:compoList">
       <forms>
         <form id="filter-wused">
Where used list
Once you have selected the job case filter on the pop-up, you are redirected to another page called "where Used". Choose the search parameters from the drop-down menus. The search results are then displayed.
Example: List of use cases for a cost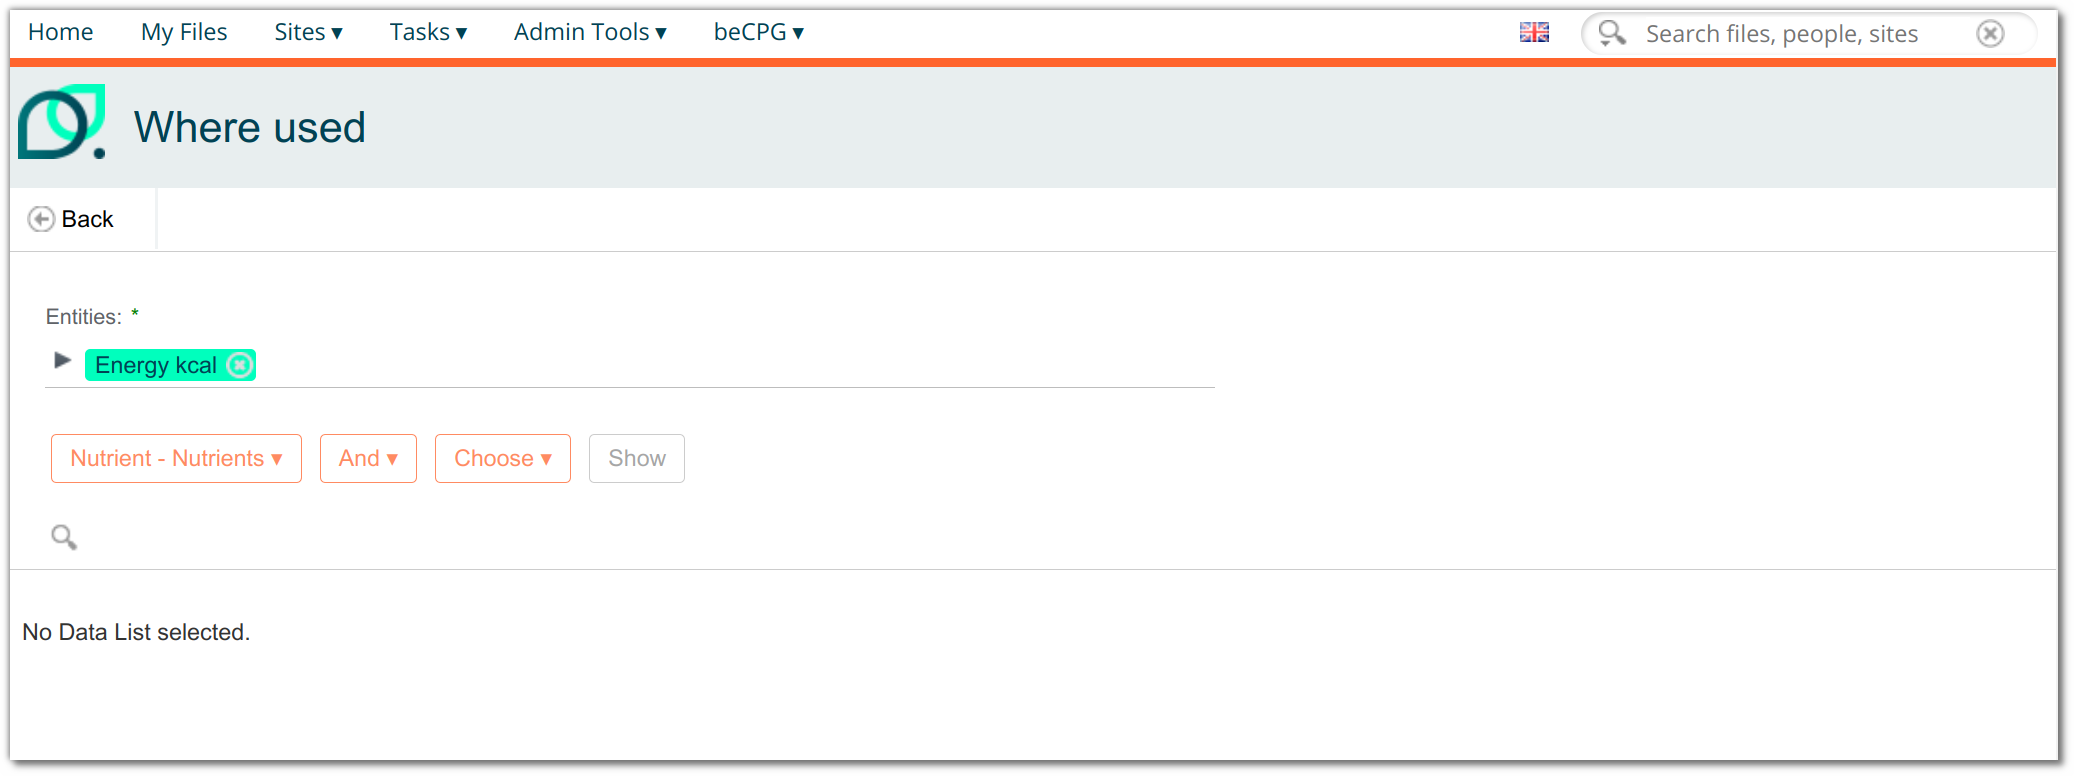
To modify it, you must override the <config> of the product, evaluator model-type and modify the <forms> with theid="datagridWUsed".
    <config evaluator="model-type" condition="bcpg:compoList">
       <forms>
         <form id="datagridWUsed">
- Where used export
This is the same way as for the "export" form. It is possible to make an export form on a where-used list:
<config evaluator="model-type" condition="bcpg:ingList">
       <forms>
          <form id="exportWUsed">
If there is no "exportWUsed" form, the Excel export takes into account the "datagridWUsed" form.
Visibility
To display a field, it must be present in the <field-visibility> section.
Each field is preceded by a <show> with id being the name of the property. To force a field to be displayed, add "force=true".
<show id="bcpg:legalName" force="true" />
Apperance
The modification of the formatting of a field is available in the <appearance> section.
Each field is preceded by a <field> with id being the name of the property.
    <field id="bcpg:meatCharacts" set="charact">
        <control template="/fr/becpg/components/form/controls/textarea.ftl" >
            <control-param name="rows">4</control-param>
        </control>
    </field>
Set
Sets are used to define groups of fields and to display them in sections (e.g. Designation)
<set id="mainInfo" appearance="bordered-panel" label-id="becpg.forms.set.designation.label" template="/org/alfresco/components/form/2-column-set.ftl" />
<field id="bcpg:entityTplEnabled" set="template" />
Template defines the Freemarker template used to display the field, if nothing is defined, the system takes the default template. It also defines the number of columns to present the fields.
Controls
The control-param allows you to perform filters and conditions in the forms to limit the results on a field.
- Multilingual control
This control appears automatically next to the MLText field. It allows the translation of a field. Click the flag to open the multilingual field editing pop-up and select the language to be added:
To add this control to a field, we use the template defined in "mtlanguage.ftl".
<field id="rep:reportLocales" >
    <control template="/org/alfresco/components/form/controls/mtlangue.ftl">
         <control-param name="insertBlank">true</control-param>
    </control>
</field>
Note: It is possible to use the deepl translator to generate translations rather than google translation. To set up multilingual control: clic here
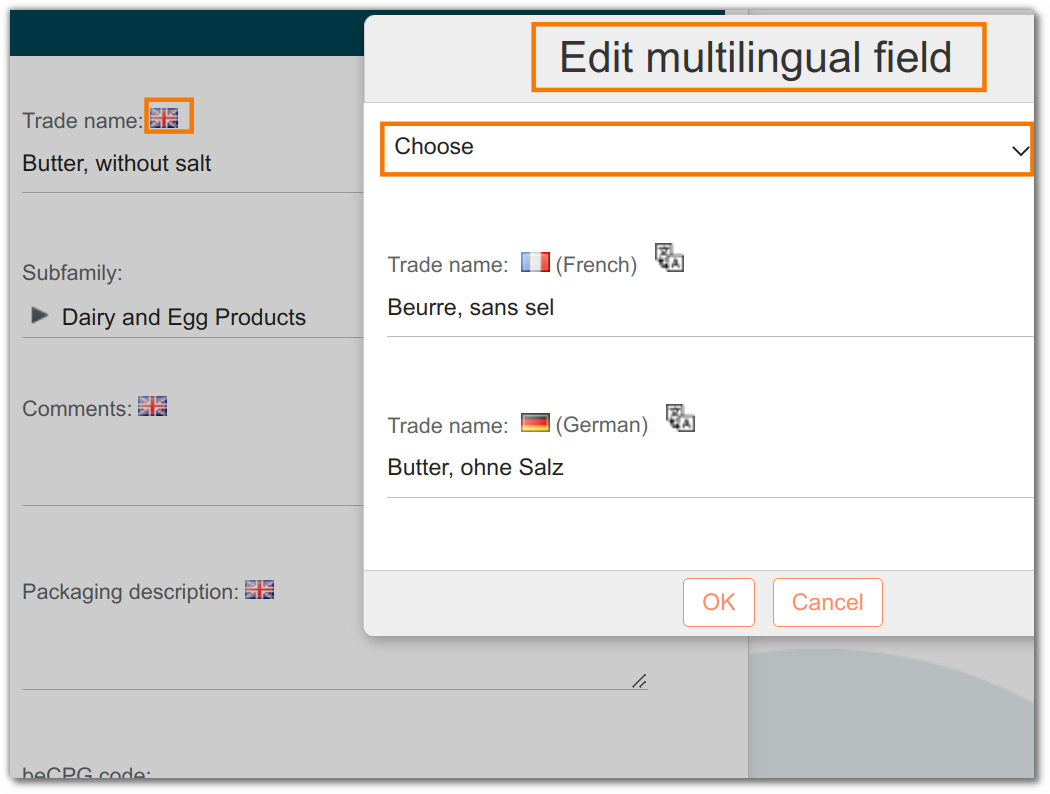
- Autocompletion control
This control allows you to automatically complete a field. The user selects the desired value from the drop-down menu.
For the moment the module provides two controls that can be used as is:
Suggest proposals for a text field
To add this control to a field, we use the template defined in "autocomplete.ftl".
<field id="bcpg:productHierarchy1" help-id="becpg.forms.help.productHierarchy1" set="2-col-product-criteria">
    <control template="/org/alfresco/components/form/controls/autocomplete.ftl">
        <control-param name="ds">becpg/autocomplete/allLinkedvalue/values/System/ProductHierarchy/bcpg:entityLists/semiFinishedProduct_Hierarchy
        </control-param>
        <control-param name="multiple">true</control-param>
    </control>
</field>
- Suggest elements to associate to a node. To add this control to a field, we use the template defined in "autocomplete-association.ftl".
<field id="bcpg:packagingListProduct" set="3-col-product-criteria">
    <control template="/org/alfresco/components/form/controls/autocomplete-association.ftl">
        <control-param name="ds">becpg/autocomplete/product classNames=bcpg:packagingMaterial,bcpg:packagingKit
        </control-param>
    </control>
</field>
It is also possible to have more than one condition. For that you have to use a filter. The url needs a specific encoding. & (equivalent of &) and add the second condition followed by %7C which will be used to isolate the condition (equivalent of "|").
ex : to limit the results to finished products in the validated state.
<control-param name="ds">becpg/autocomplete/product?classNames="Typed'entité"&filter="secondecondition"%7C"Condition"</control-param>
or
<control-param name="ds">becpg/autocomplete/product?classNames=bcpg:finishedProduct&filter=bcpg:productState%7CValid</control-param>
We first use classNames to limit the choice to finished products, then filter and a "|" to filter these finished products on the validated state.
To configure autocompletion controls: click here
Unit control
When the user selects a unit (L,cL,mL, piece...) when editing the properties of a product for example, a "net weight (kg)" field can be displayed to the right of the field depending on the chosen unit.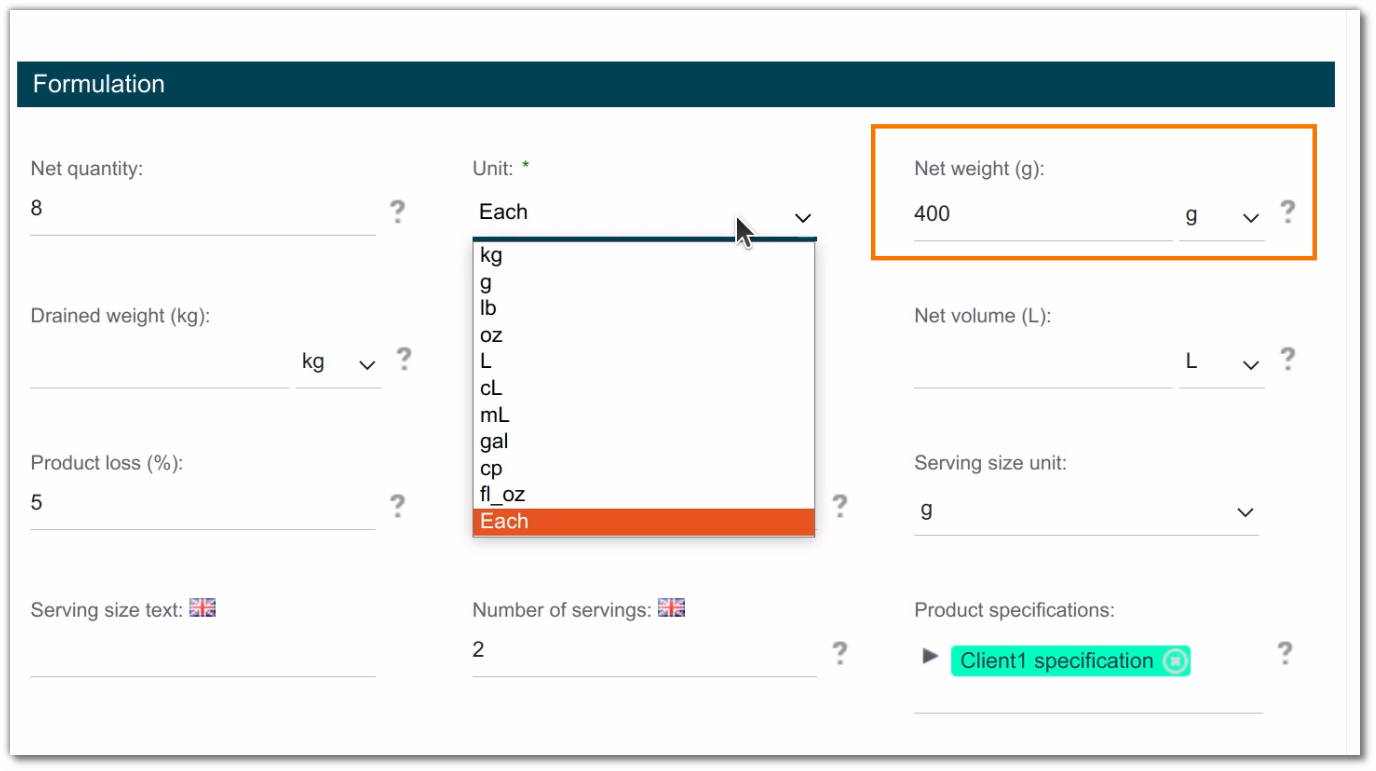 To add this control to a field, we use the template defined in "product-unit.ftl
<field id="bcpg:productUnit" set="formulation">
    <control template="/org/alfresco/components/form/controls/product-unit.ftl">
        <control-param name="options">kg,g,lb,oz,L,cL,mL,gal,cp,fl_oz,P becpg.forms.field.productUnit
        </control-param>
    </control>
</field>
- Checkbox control
In case of multiple possible answers, for example the Report Settings, it is possible to use this control so that you don't have to use CTRL to select multiple options.<field id="rep:reportParameters" > <control template="/org/alfresco/components/form/controls/checkboxmany.ftl"/> </field>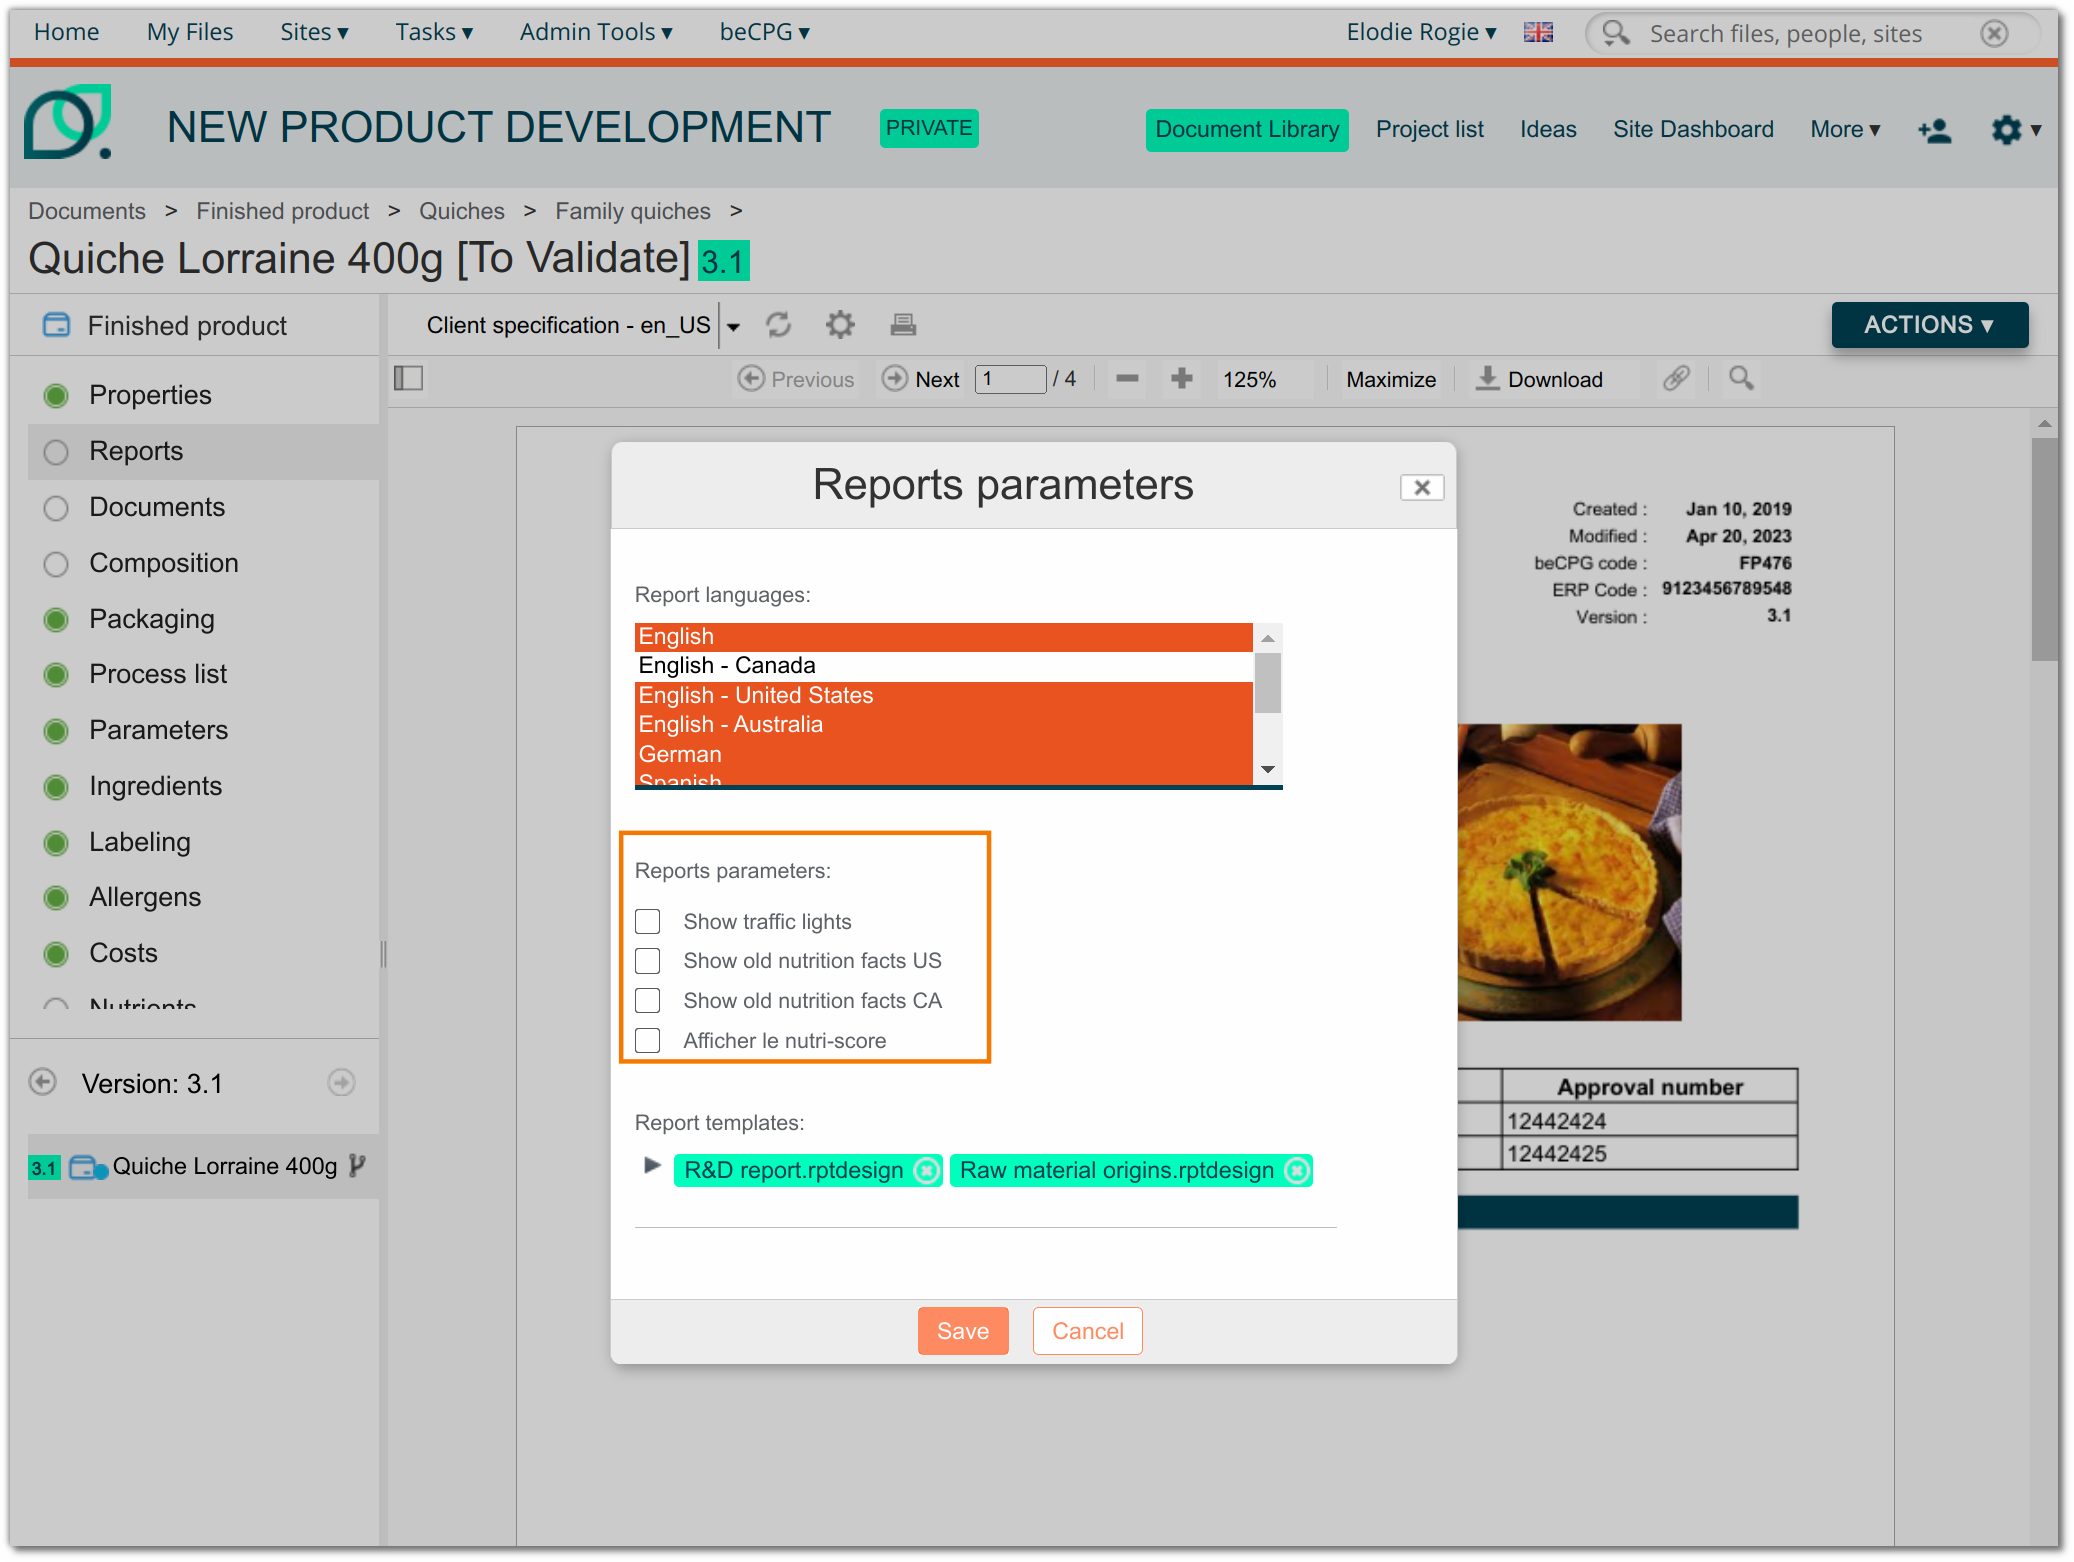
Decision tree control
In some cases, the user is asked several questions. The questions are displayed according to the provided answers . For this, a decision tree control is used.
Example: Decision tree in the form for adding an allergen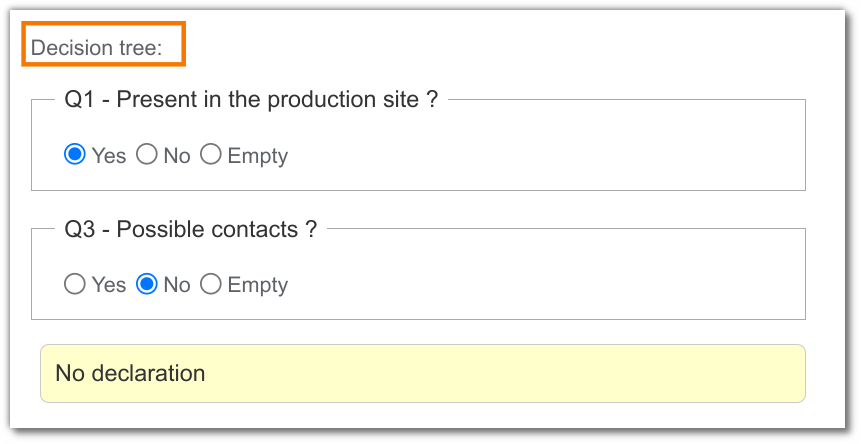
To add this control to a field, we use the template defined in "decision-tree.ftl".
<field id="bcpg:allergenListDecisionTree">
    <control template="/org/alfresco/components/form/controls/decision-tree.ftl">
        <control-param name="prefix">allergenList</control-param>
        <control-param name="data">
            [{id:"q1",choices :[{id : "yes" , cid : "q3" }, {id: "no" , cid : "q2"}, {id:"-", cid :"q2"}]},{id:"q2",choices :[{id : "yes" , cid : "q3", comment : true}, {id:"no", cid : "r1"},{id:"-", cid : "q3"}]},{id:"q3",choices :[{id : "yes" , cid : "q4"}, {id:"no", cid :"r1"}, {id:"-", cid :"q4"}]},{id:"q4",choices :[{id : "yes", cid :"r1"}, {id:"no", cid:"r2"}, {id:"-"}]},{id:"r1"}, {id:"r2"}]
        </control-param>
    </control>
</field>
To configure the decision tree control: click here
Color picker control
Some of the fields consist of a color picker. So they have a color picker control.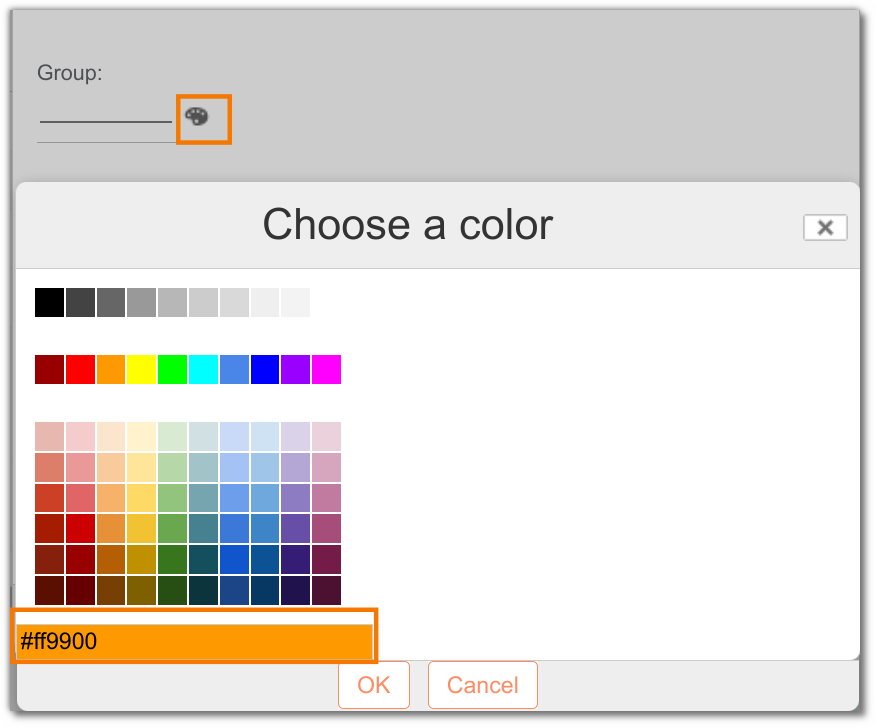
To add this control to a field, we use the template defined in "selectcolorpicker.ftl".
<field id="bcpg:dynamicCharactGroupColor">
    <control template="/org/alfresco/components/form/controls/selectcolorpicker.ftl" />
</field>
- Control to fill a value by default
Some fields can be filled in by default with a specific value.
e.g.: The field will always be completed with 125
<control template="/org/alfresco/components/form/controls/textfield.ftl">
    <control-param name="defaultValue">125</control-param>
</control>
- Control to restrict the number of characters
ex: The field cannot contain more than 25 characters.
<control>
      <control-param name="maxLength">25</control-param>
</control>
- Control to add a link
Association fields can have a link that takes you back to the linked entity with one click. This is the case, for example, with the entity model. This link can be disabled (false) or enabled (true).
<control-param name="showLink">false</control-param>
Label
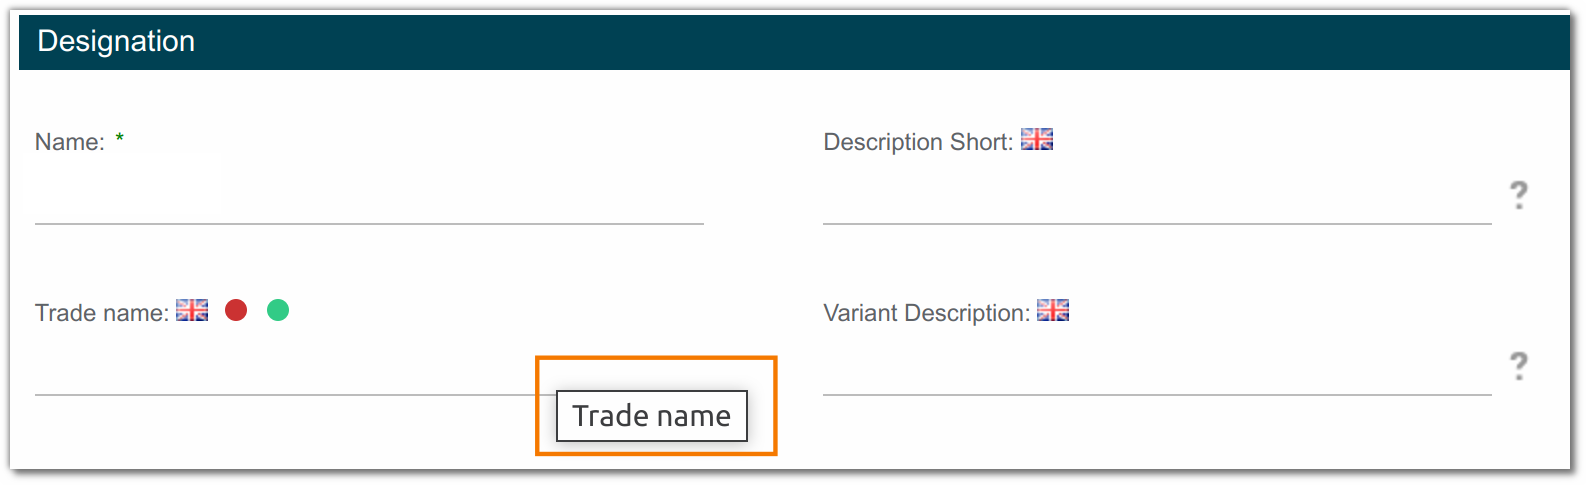
The label= and lable-id parameters allow you to modify the name of a field. The label-id includes the notion of translation by indicating the code of translations entered in a properties file loaded on the system. Example :
<field id="cm:title" set="mainInfo" label-id="becpg.forms.field.tradeName">
Help id
The help-id parameter is used to display help descriptions to complete the field.
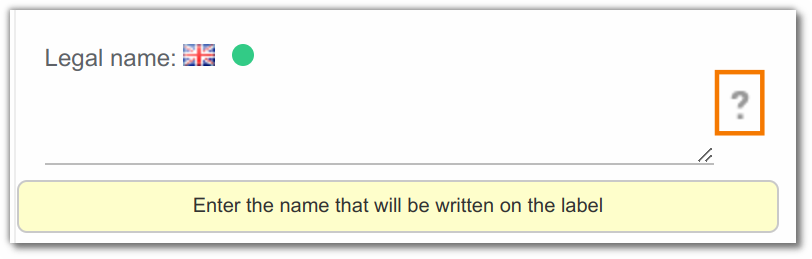
<field id="bcpg:legalName" help-id="becpg.forms.help.legalName" set="mainInfo" />
It is possible to translate this field into several languages like the label.
Help
The help parameter allows you to specify the column sizes in a json format, for list forms.
Example :
<field help="{"maxAutoWidth":265,"pattern":"{cm:name}"}" id="cm:name" mandatory="false" read-only="true"/>
The possible parameters are:
{
 "with": 100, // Width
 "minWidth": 200, // Minimum width
 "maxAutoWidth": 500, // Maximum auto width
 "tooltip": 150, // Displays a tooltip if the text exceeds 150 characters (line break = 25 characters)
 "pattern": "{cm:name} - {bcpg:code}", // Pattern that can be used in a columnRenderer
 "className": "align-right|align-center|align-justify|indent|hide-ifopen|bold-ifopen|italic-ifchild|bold-ifclose|hide-ifchild|hide-iflevel1|hide-iflevel2...", // Aligns the text
 "numberFormat":  { "maximumSignificantDigits": 3, "minimumFractionDigits": 3 },
 "forceUnit": "ppm or perc" // Forces the ingredient or allergen quantity to be displayed in % or ppm
}
For the number format, please refer to the options below: https://developer.mozilla.org/fr/docs/Web/JavaScript/Reference/Objets_globaux/Intl/NumberFormat
Mandatory
The parameter mandatory="true " makes the field mandatory.
<field id="bcpg:erpCode" mandatory="true" set="mainInfo" />
Read only
The parameter read-only="true " prevents field editing.
<field id="bcpg:code" read-only="true" set="mainInfo" />
Description
The parameter description and description-id allows you to override the browser's pop-up description.
    <field id="cm:title" label-id="becpg.forms.field.tradeName" mandatory="false" read-only="false" set="mainInfo" description-id="becpg.forms.field.tradeName">
        <control template="/org/alfresco/components/form/controls/textfield.ftl" />
    </field>
3. Configuration files publication
Files update
To take in account the modification, we need to import the updated files.
- Import the model file {$client}Model.xml in the folder Repository>Data dictionary>Model.
- Import the form file {$client}-form-config.xml in the folder Repository>Data dictionary>Configurations.
Model refresh and publication
- To publish the model, it's possible to:
- activate the model by clicking on "Edit the properties" and tick the "Model active" box.
- with the designer, select the relevant model in the top left menu. The model and form content is displayed on the left panel. Click the on the "Publish" button.
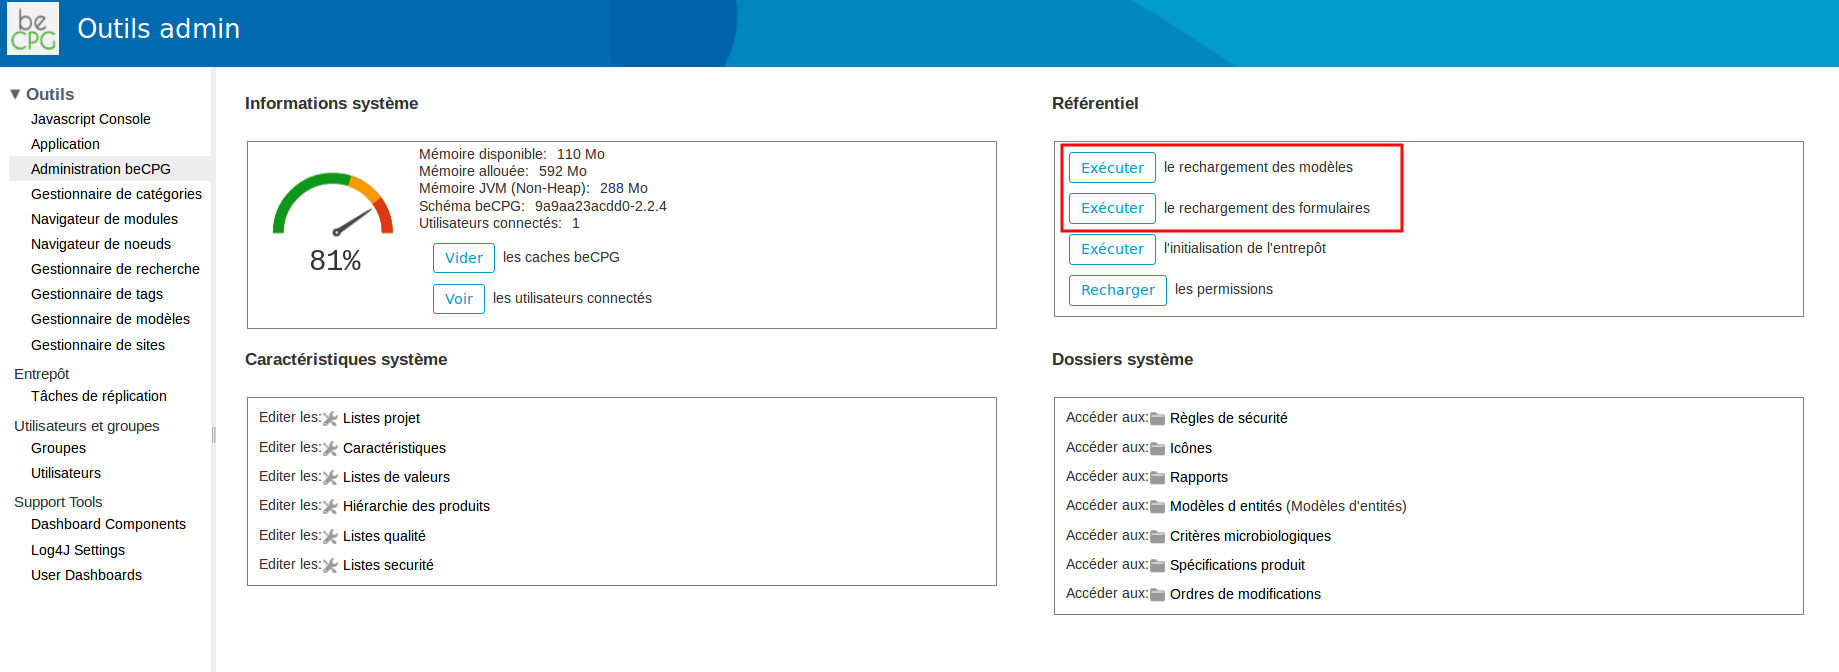
Reload the model form the Administration beCPG.
Form refresh and publication
The publication and reload of forms are depending on beCPG version:
- Before version 4.0 : in the admin tools, click on reload forms button.
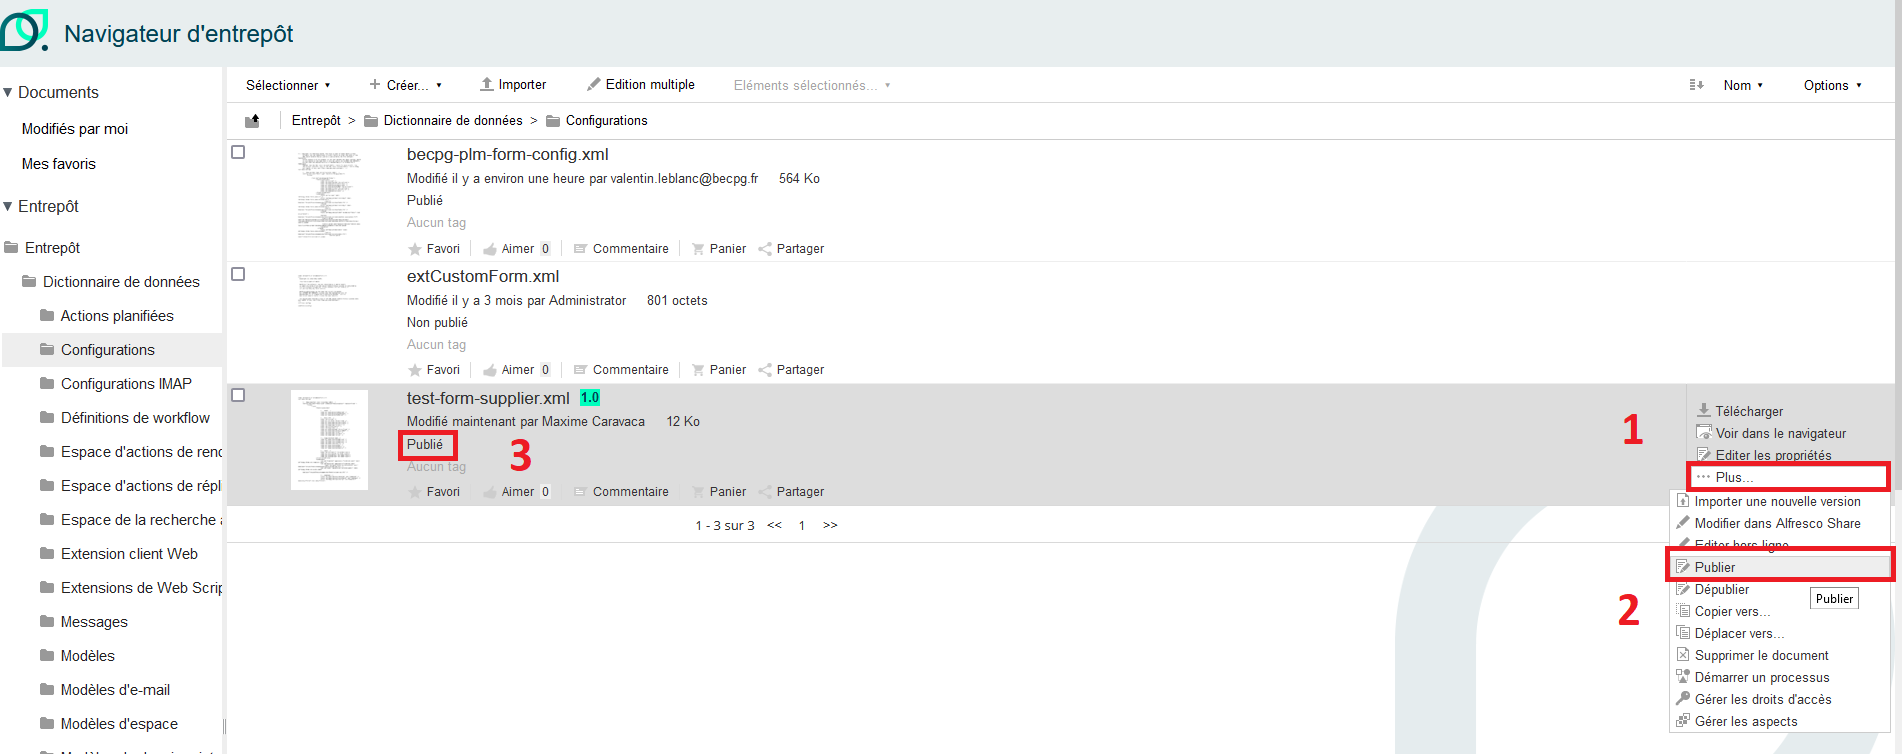
- Since version 4.0 : click on More -> Publish, or publish from the designer (as presented in point 3)
Wizards
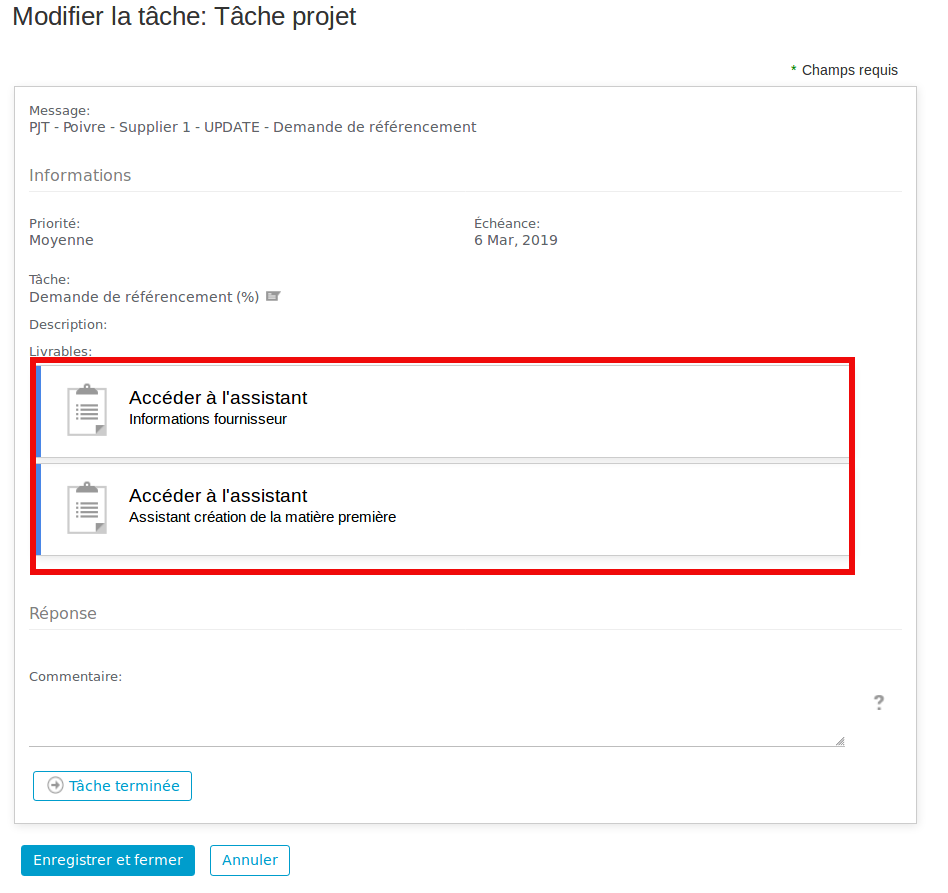
beCPG allows you to create an advanced wizard with Alfresco share config. The wizard can then be used alone or during a project task or plm action.
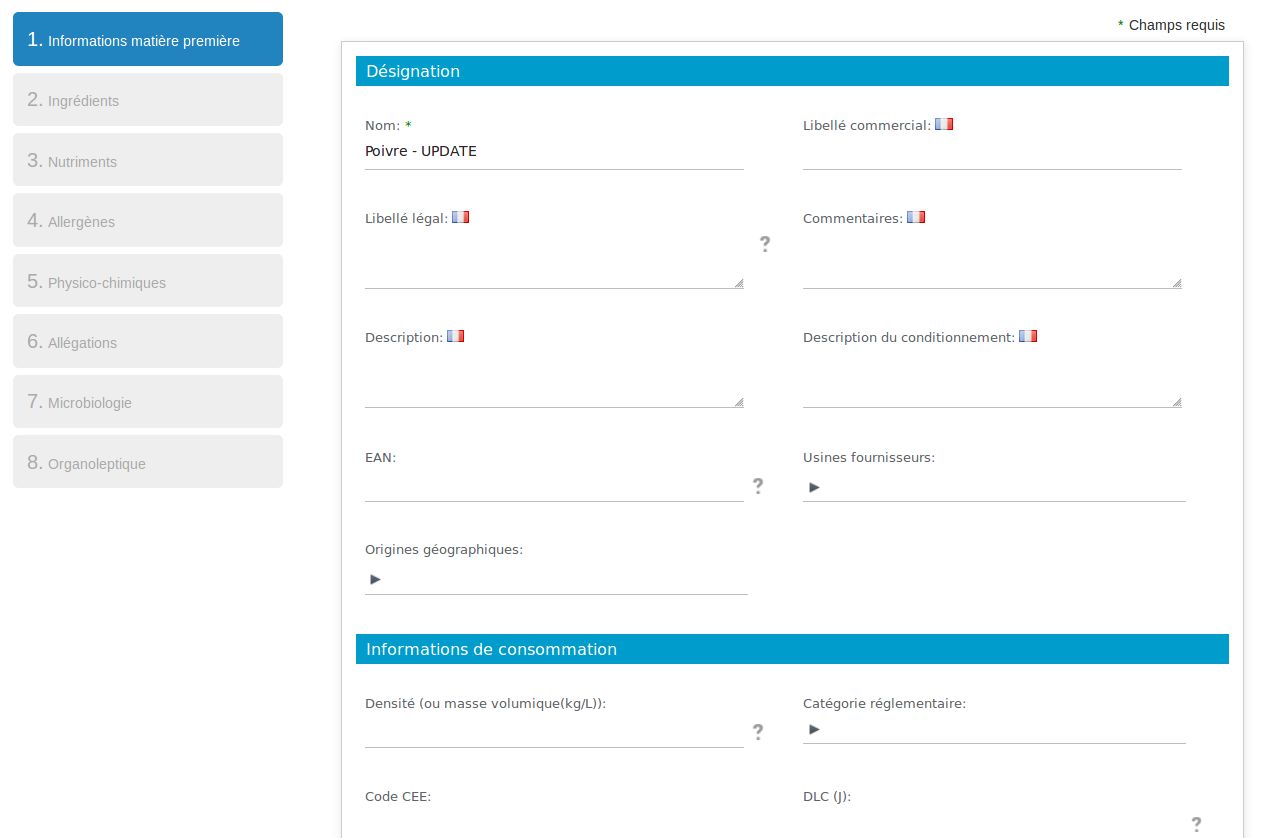
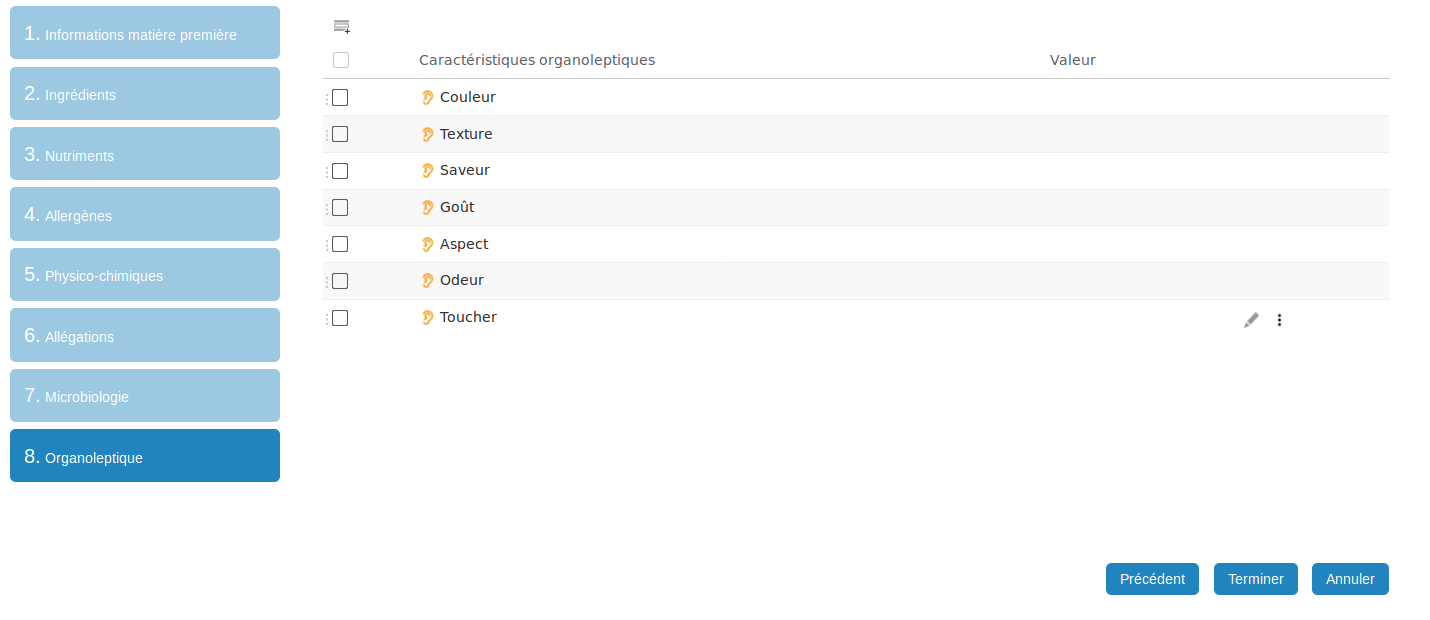
For example, when creating a project to reference a raw material, the user will create a project by defining the context (reasons for the project, due dates, etc.) and selecting a supplier. The supplier then receives a listing request on his portal with one or more wizards attached. These wizards correspond to a series of specific forms with their own ID. The supplier will have to fill in the fields with information about the raw material. This wizard for the creation of raw materials has the id "supplier-mp ".
Example: "supplier-mp" Wizard
Add a wizard
Since version 3.2.0, wizards are defined in the : becpg-plm-share-config.xml.
To add a wizard, you must define it in the file share-config-custom.xml by listing the different steps
<config evaluator="string-compare" condition="wizard">
        <wizards>
            <wizard id="sample-npd">
                <step id="step1" label="Création demande" type="form" formId="create-article"
                    itemId="pjt:project" nextStepWebScript="becpg/project/entity?nodeRef={nodeRef}"></step>
                <step id="step2" label="Information produits" type="form"
                    formId="create-article" itemId="bcpg:finishedProduct"></step>
                <step id="step3" label="Composition produit" type="entityDataList"
                    listId="compoList" itemId="bcpg:compoList"></step>
                <step id="step4" label="Emballages" type="entityDataList" listId="packagingList" itemId="bcpg:packagingList"></step>
            </wizard>
        <wizards>
</config>
This way:
- You can use multiple formId with or without existing nodes.
- You can call intermediate webscript with nextStepWebScript (the webscript must return a nodeRef to be used in the next step).
- You can display the entity datalists.
To call the wizard to open an existing node: /share/page/wizard?id=sample-npd&destination=
To call the wizard to open an existing node: /share/page/wizard?id=sample-npd&nodeRef={nodeRef}
See part [Extend beCPG].(../installation/server_configuration.md) for more details on overloading the share file.
To add the form to an entity, you must override the <config> of the entity, evaluator node-type and modify the <form> with the wizard ID in the {$client}-form-config.xml by adding the fields to be displayed.
Example: Adding the "supplier-mp" wizard to the Raw Material entity
<config evaluator="node-type" condition="bcpg:rawMaterial" replace=true>
    <forms>
        <form id="supplier-mp">
Refreshing and publishing wizards
Since version 3.2.0, it is possible to deploy the becpg-config-custom.xml directly as a form, with the same operation. However, the name becpg-config-custom.xml must be spelled correctly.
Surveys
Since version 3.2.3, it is possible in beCPG to create questionnaires that can be integrated in wizards. The questions and their answers are to be entered in the administration, in a list of characteristics of type "Questionnaire". It is possible to create questions with answers of type:
- Simple text, by selecting "textarea" in "Comment type"
- List of choices, by creating and associating the possible choices to the question with the "Parent" field.
- Multiple choice list, by selecting "checkboxes" in "Comment type" you have to choose as answer type "checkboxes", then create and associate the possible choices to the question with the "Parent" field.
Once the questions are created in the administration, add a new list of type questionnaire on the entity model and populate with the desired questions.
To add the questions to the wizard, you need to add a step in the becpg-config-custom.xml file:
<step id="stepxxx" label="Your survey label" title="Your survey title" type="survey" listId="surveyList" itemId="survey:surveyList"></step>
Validation handler
A validation handler is a JavaScript function called by the form execution when a field value must be validated. beCPG uses 3 validation handlers defined in the becpg-validation-handler.js:
- mandatoryIf: displays a field based on the selection of another field
- hideIf: hides a field depending on the selection of another field
- filterBy: filters the field based on the selection of the parent field
- GTIN: validates the field if it's in GTIN format
- It is also possible to use regular expression in the hideIf conditions
To use these handlers, constraints must be added to the <field> that has the ID of field that must be validated in the form. Don't forget to replace field by assoc or prop in the name of the field.
Example: Display the "acme:fieldId" field if the "field_bcpg_code" field is not empty:
<field id="acme:fieldId">
     <constraint-handlers>
         <constraint type="MANDATORY" validation-handler="beCPG.forms.validation.mandatoryIf" event='keyup,change@[{"prop":"field_bcpg_code", "condition": "NOTEMPTY"}]' />
     </constraint-handlers>
</field>
Example: Hide the field "acme:fieldId" if the field "field_bcpg_code" does not have the value Other:
<field id="acme:fieldId">
     <constraint-handlers>
         <constraint type="MANDATORY" validation-handler="beCPG.forms.validation.hideIf" event='keyup,change@[{"prop":"field_bcpg_code","condition":"RegExp_^(?!Other$).*"}]' />
     </constraint-handlers>
</field>
Example: Hide the "acme:fieldId" field if the "field_bcpg_code" field is empty:
<field id="acme:fieldId">
     <constraint-handlers>
         <constraint type="MANDATORY" validation-handler="beCPG.forms.validation.hideIf" event='keyup,change@[{"prop":"field_bcpg_code","condition":""}]' />
     </constraint-handlers>
</field>
Example: Validate the "acme:fieldId" field if it is in GTIN format
<field id="acme:fieldId">
     <constraint-handlers>
         <constraint type="MANDATORY" validation-handler="beCPG.forms.validation.GTIN" event="keyup" />
     </constraint-handlers>
 </field>
Example: Filter the "acme:fieldId" field to contain only values prefixed with the "field_bcpg_code" field value
<field id="acme:fieldId">
    <constraint-handlers>
        <constraint type="MANDATORY" validation-handler="beCPG.forms.validation.filterBy" event='keyup,change@[{"prop":"field_bcpg_code","condition":"STARTWITH"}]' />
    </constraint-handlers>
</field>
More details at : http://docs.alfresco.com/5.1/concepts/dev-extensions-share-form-field-validation-handlers.html
Models designer
The beCPG models designer allows the creation of data models and forms. It’s accessible from the upper band with the administrator role.
The designer is composed of 3 panels :
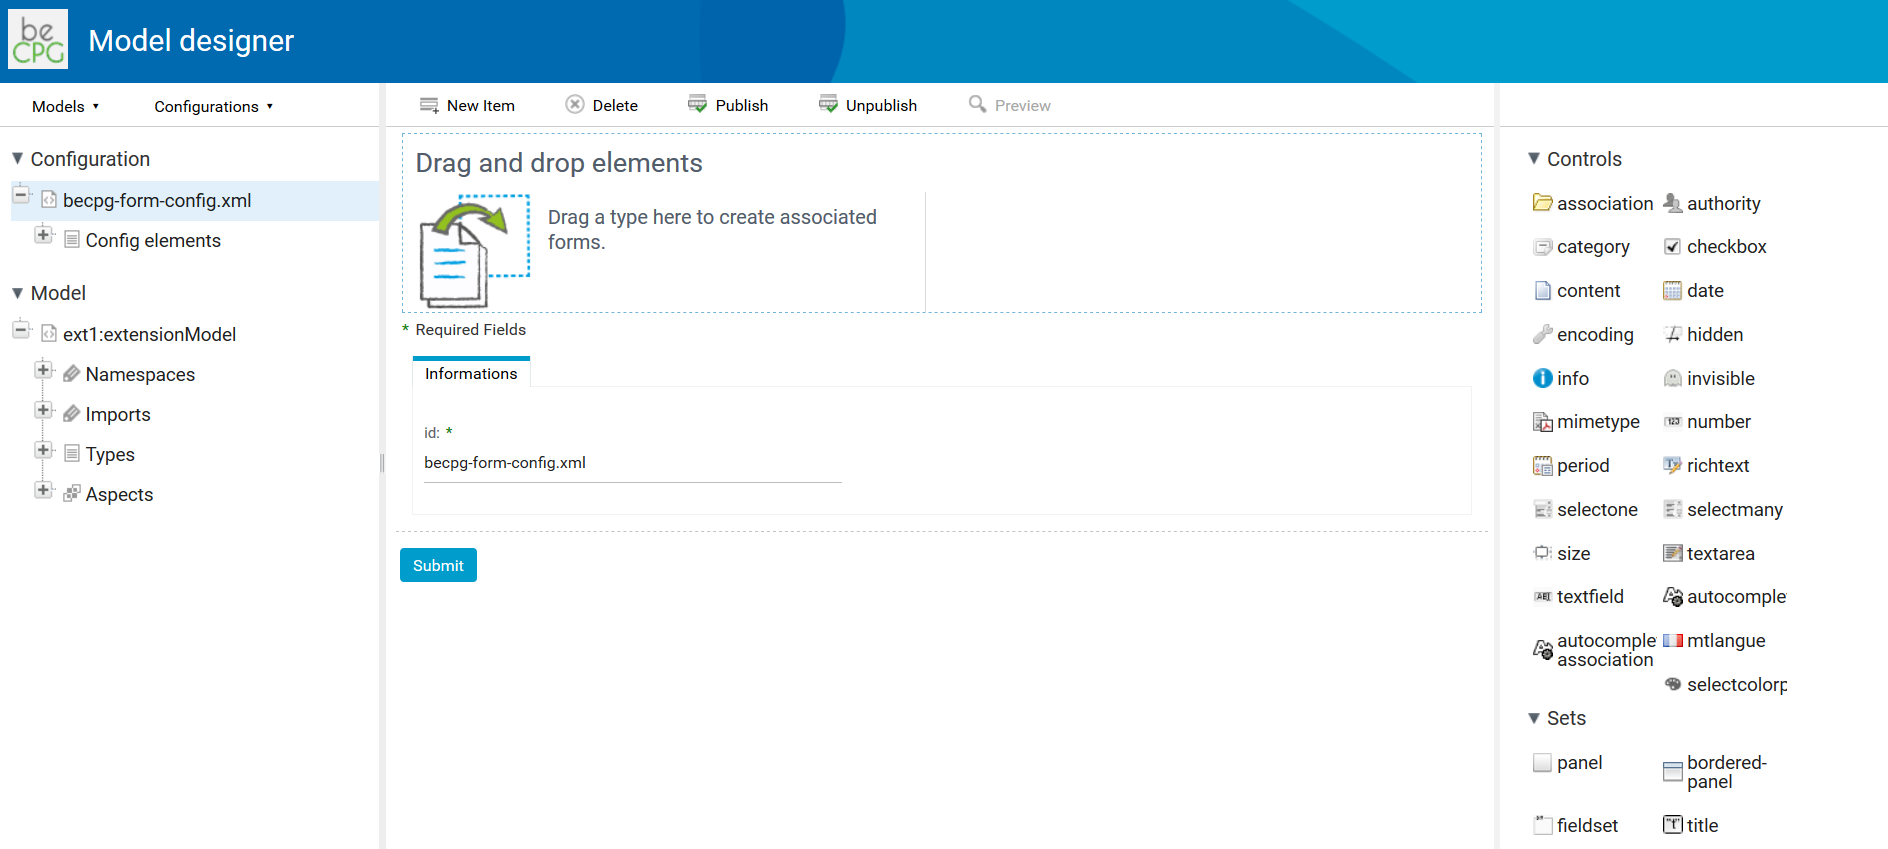
- The left panel displays a tree representative of the model and a tree representative of the forms ;
- The central panel displays the edition forms for forms and models ;
- The right panel displays a palette for grouping and control.
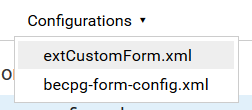
The choice of the file to display the model and the form is done thanks to the drop down menu in the tool bar of the left panel.
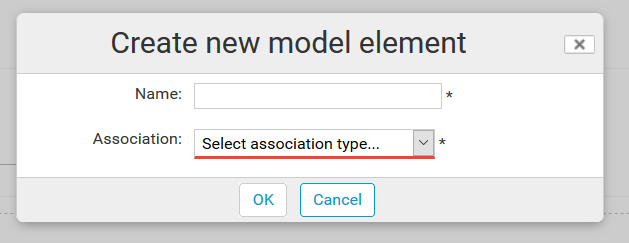
The models tree allows the creation of types, aspects, properties and constraints by positioning on the tree and pressing the button « New child ». The choice of the element type to be created is asked and eventually, the choice of the model type too.
Once the model has been created or modified, at the model root, press « Publish ».
Notes :
- Every mandatory field has to be filled,
- A type can be deleted if neither of the elements in the repository or in the bin has it ;
- A property can only be modified by overloading the type or the aspect.
The creation of a form is done by dragging and dropping a type to the forms tree or thanks to the « New child » button. The association between controls and fields or fields grouping is done by drag and drop from the palette to the area corresponding in the central panel.

In order to publish a form, hover over the forms tree root and press « Publish ».
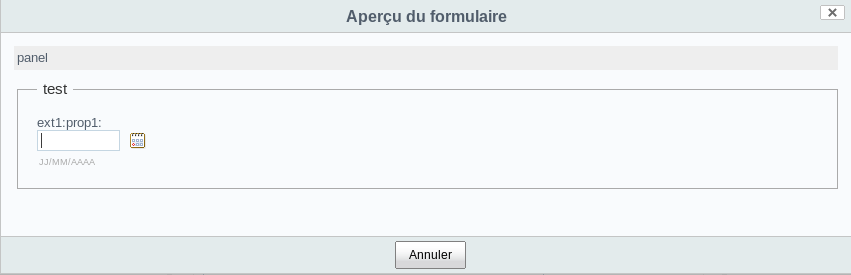
The overview is done by selecting, in the models tree, a type and by pressing « Overview ». The type should be published. The form with the « Create » identifier associated to the type should be published.
For more information: http://ecmarchitect.com/alfresco-developer-series-tutorials/content/tutorial/tutorial.html
Tutoriel
Advanced method of publishing files
here is another way to publish the modified files.
Go to the folder of your instance: cd /opt/becpg-srv-instances/inst1\
Create a config folder if it has not been created yet: mkdir config
Put your modified files in this folder.
Create the file docker-compose.override.yml if it does not exist in your instance folder: touch /opt/becpg-srv-instances/inst1/docker-compose.override.yml
Edit it by adding the volumes in the becpg section to override the configurations:
Example If your file is called becpg-config-custom.xml:
version: '2'
networks:
    internal:
services:
    becpg:
        volumes:
              -./config/becpg-config-custom.xml:/usr/local/tomcat/shared/classes/alfresco/web-extension/becpg-config-custom.xml:ro
See part [Extend beCPG].(../installation/server_configuration.md) for more details.
- Finally restart the beCPG service to allow the new configurations to be taken into account: docker-compose up -d
For more details on stopping and starting the service: click here