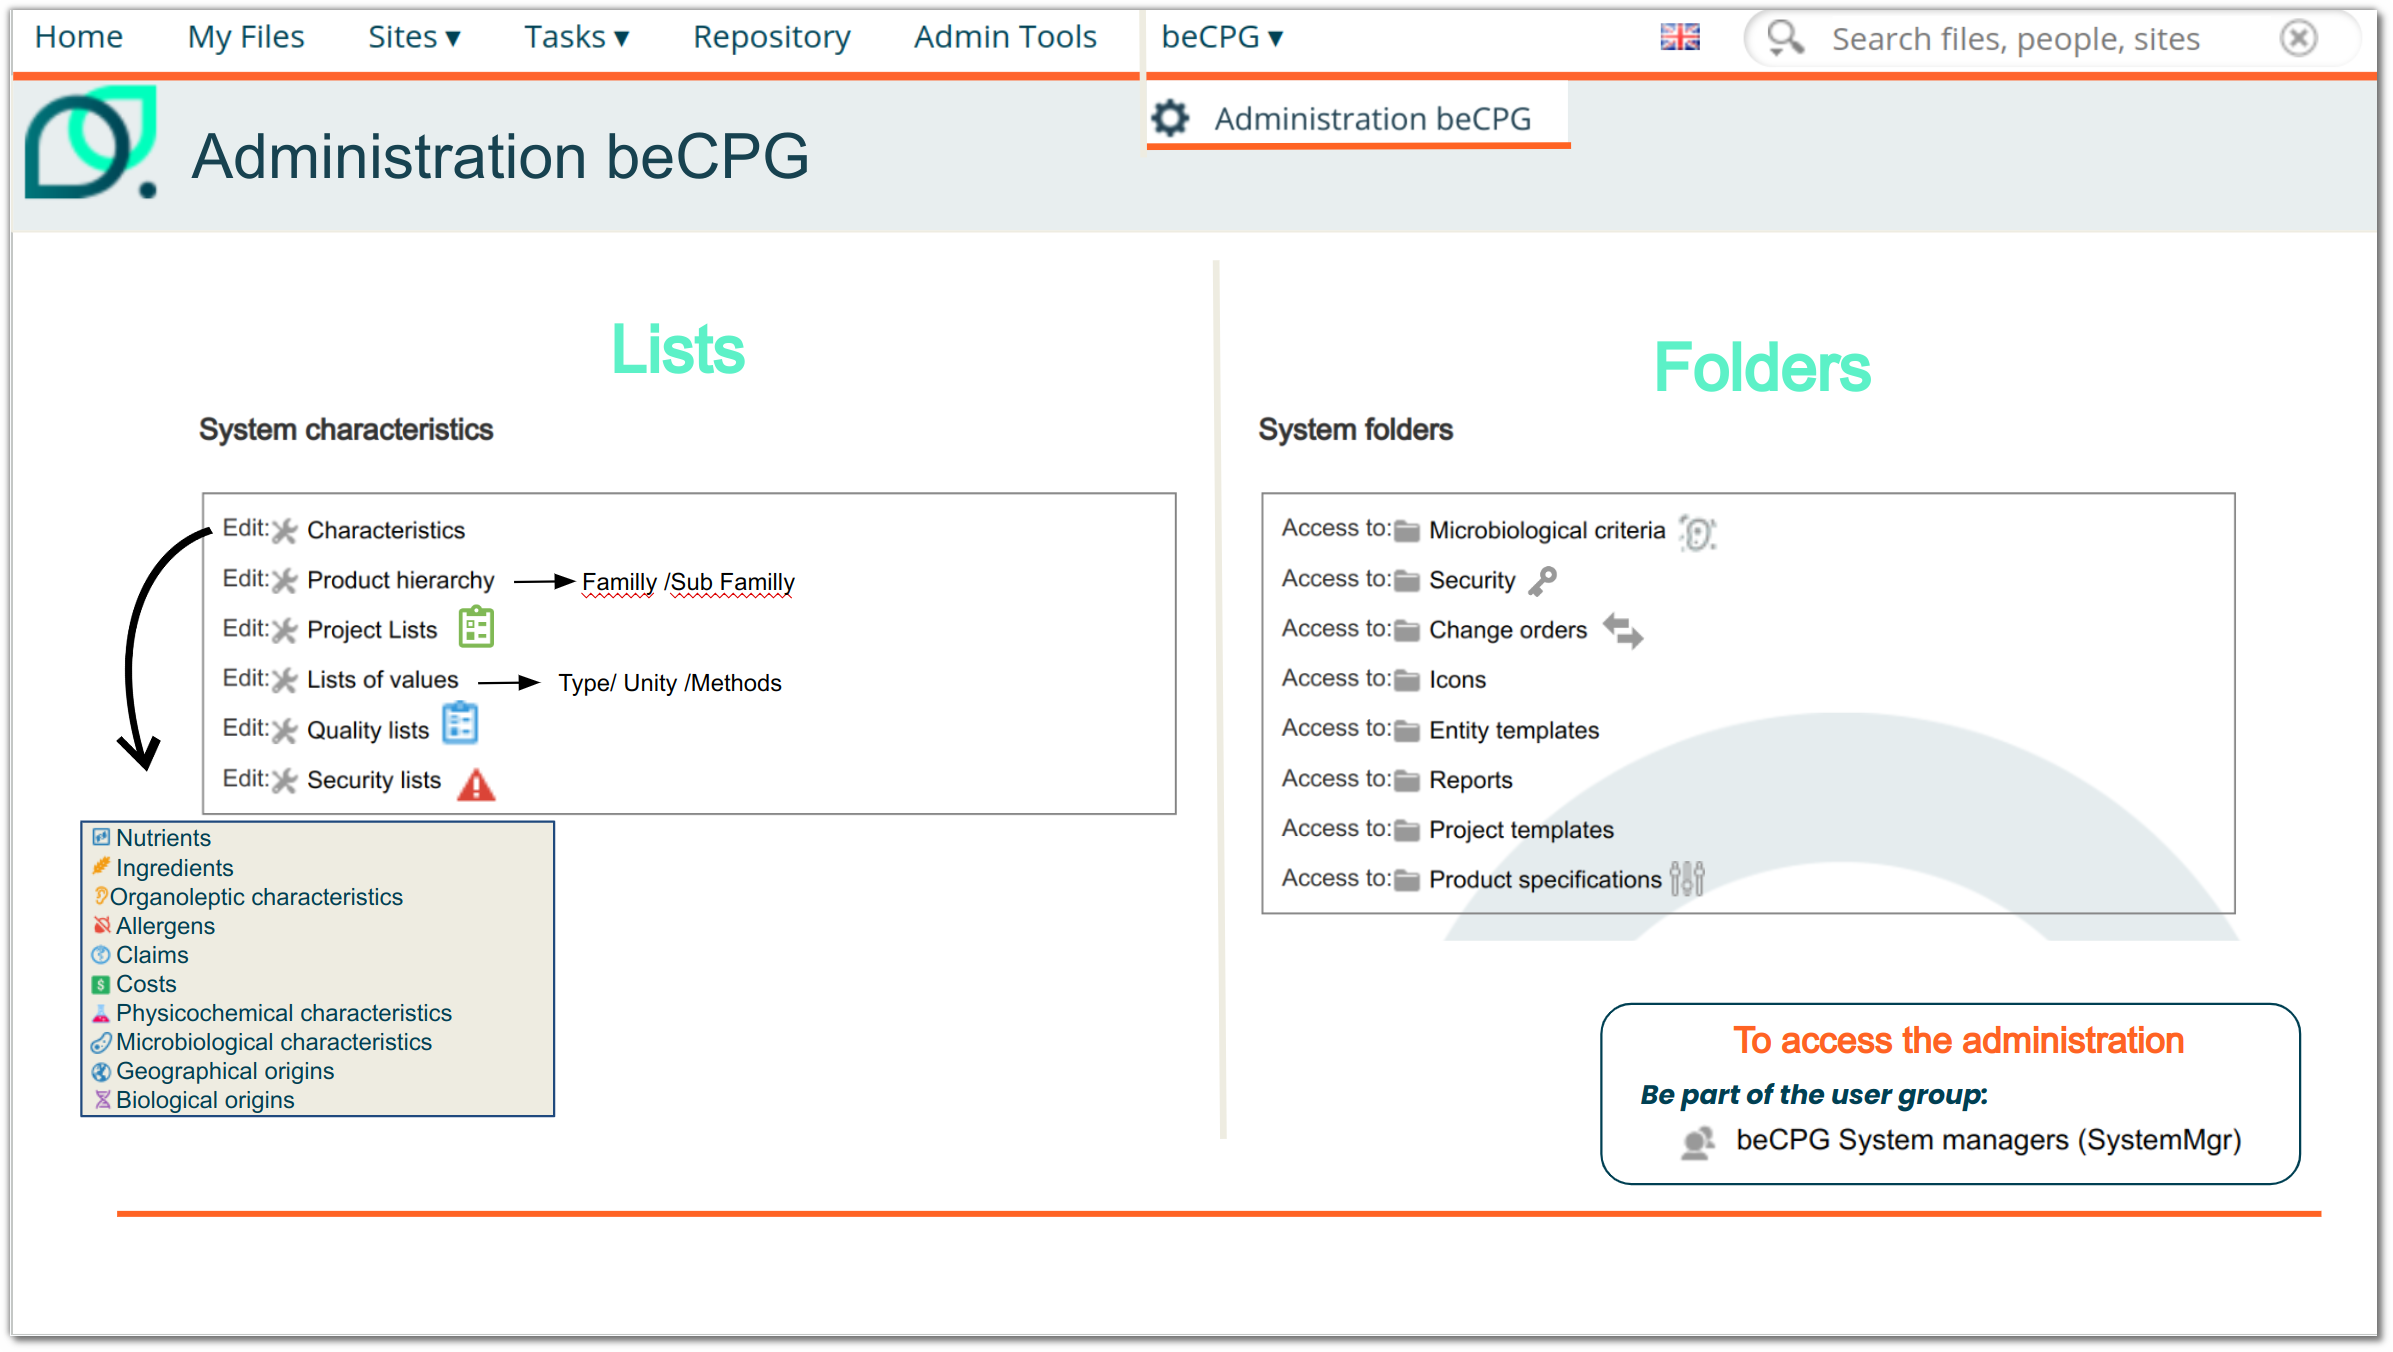
beCPG administration console
The beCPG administration console is available through the menu « beCPG » on the upper headband:
This console provides access to system characteristics and system folders.
System characteristics
Characteristics
Lists of value
Product hierarchy (family, subfamily)
Project lists
Quality lists
Security lists
Characteristics
The following lists of characteristics are available in the administration:
- Ingredients
- Allergens
- Claims
- Cost
- Nutrients
- Organoleptic characteristics
- Physico-chemical characteristics
- Storage conditions
- Precautions for use
- Geographical origins
- Organic origins
- Trademarks
- Subsidiaries
- Target markets
- Taxes
- Customs codes
- Certifications
- Plants
- Process steps
- Resource parameters
- Notifications
- Labeling templates
- Mentions
- Publication channels
- Laboratories
- Regulatory usages
- Toxicities
- Ingredient toxicology
Creation
For example, the addition of an allergen will enable users to declare this allergen in a product's allergen list. The same applies to all other characteristics.

Edition
To edit a row in the list, follow the steps below:
- Find the row you want to edit (either directly in the list by scrolling through it manually or by using the search filter).
- Click on the pencil icon at the far right of the row. This will open the edit form.
- Edit the information.
- Save the changes.
Make sure all the information is correct before saving, as some changes may affect calculations or the data displayed.
Deletion
To delete a value, you must select “yes” in the "deleted” column. This value will no longer be selected in the drop-down list for the field concerned. However, it will still appear on entities using this value. This feature avoids constraint errors linked to the permanent deletion of a value.

Propagate
The "Propagate" function allows you to automatically add one or more characteristics (physicochemical, claims or nutrients) present in a raw material to all cases of use of the latter whatever it may be: semi-finished, finished product or a generic raw material.
This makes it possible to add a characteristic formulated or not exceptionally to a formula if it is present in one of the raw materials which compose it.
The models allow lists to be filled in advance based on “standard” and systematic characteristics. Propagation allows you to handle the exception.
Ex: development of a prototype rich in calcium
Characteristic configuration
The characteristics concerned are as follows:
- nutrients
- claims
physicochemicals
Administration
Click “Add” or “Modify” the characteristic(s)
- Click “Propagate”
- Complete and save the characteristic
Product Reference
- Add the desired characteristic(s) to the raw material(s) concerned.
- Complete the values
- Formulate the use cases.
Reads Groups
The reads groups option in the administration allows you to restrict access to the values available in a drop-down list based on groups.
When one or more groups are defined in the Reading Group field of a list value:
- Only users belonging to these groups will be able to view and select this value in the drop-down menus (particularly on product sheets).
- Other users will not see this option.
This feature is particularly useful in contexts where several subsidiaries coexist in the same instance. It simplifies the interface for each user, prevents selection errors, and better organizes the choices available by work scope.
Although this option is very practical for managing complex contexts, it is always preferable to standardize processes and drop-down list values whenever possible in order to facilitate data maintenance, improve data entry consistency, and reduce the number of exceptions to be managed.
Ingredient characteristics
beCPG offers a non-exhaustive list of ingredients for the food and cosmetics sectors, which you can customize by adding your own ingredients, either by import or manually. The “Name” corresponds to the appellation used in the search to associate the ingredient with its category, while the “Legal name” designates the name appearing on the label. This distinction allows you to add further details to the name, making it easier for users to enter ingredients within entities. *example: Soy lecithin (E322 - emulsifier).
This list also includes several other parameters:
- Plural legal name: Name displayed on the label if the ingredient is present more than once. example: Flavor > Flavors.
- No. E: Regulatory code (example: E322).
- CAS: Number assigned to a chemical substance by the U.S. Chemical Abstracts Service (CAS).
- EINECS: EC number identifying a chemical substance listed in the European Inventory of Existing Chemical Substances (EINECS).
- EC No: EC nomenclature, numerical classification of enzymes according to the chemical reaction they catalyze.
- FDA Cat: FDA code for US regulations.
- FEMA No.: Unique identification number for flavorings, assigned by the Flavorings and Extracts Manufacturers Association.
- No. FL: Code related to aromas and flavors.
- Parent entity :For compound ingredients (e.g. custard cream), it is possible to copy the ingredients of a raw material.
- Linked search:: Used to link ingredients so that they appear together in searches.
- Regulatory code: Used for specific interfaces (example: Interface with Decernis.).
- Regulatory category: Associates a type with the ingredient, for additives (e.g. antioxidant) or groupings (e.g. spices).
- Compliance comment: Information on ingredient compliance.
- Evaporation rate: Amount of water present in the ingredient.
- Allergens: Binds an allergen directly to the ingredient. If this ingredient is added to an entity, the allergen is automatically added in contain.
- Rate of allergens provided %: Quantity of allergens present in the ingredient, to be indicated in the form: CODE_ALLERGEN1|qté1, CODE_ALLERGEN2|qté2, or simply qté (indicating the same quantity for all allergens). example: If the ingredient contains 80% F1 allergen and 77.9% FX1 allergen, it should be formatted as follows: F1|80, FX1|77.9.
- Type of activity: Selects the geographical origin expected in this ingredient. If required, this field can be displayed in the product's ingredient list to help users complete this field.
- SVHC: Indication of hazardous substances (example: endocrine disruptor).
- SVHC type: Type of substance of very high concern.
The “Toxicology” tab allows you to specify certain toxicological data used for calculations:
- POD systemic (mg/kg/day): reference dose at which a systemic toxic effect may occur.
- Dermal absorption (%): percentage of substance that penetrates the skin after application.
- Oral absorption (%): percentage of a substance absorbed
- MoS/MoE: margin of safety / margin of exposure. Ratio between the dose with no observed adverse effects and actual exposure. The higher this figure, the safer the ingredient is considered to be.

- Max skin irritation rinse-off (%): Maximum capacity of an ingredient to cause skin irritation after rinsing.
- Max skin irritation leave-on (%): Maximum capacity of an ingredient to cause skin irritation without rinsing.
- Max sensitization (%): Maximum potential of the ingredient to cause an allergic reaction.
- Max ocular irritation (%): Risk of irritation to the eyes.
- Max phototoxic (%): Maximum risk of the ingredient becoming toxic when exposed to UV light.
- Acute oral toxicity (mg/kg): single dose causing a toxic effect when ingested.
- Acute dermal toxicity (mg/kg): single dose causing a toxic effect when absorbed through the skin.
- Acute inhalation toxicity (mg/L): toxic dose when inhaled over a short period. May indicate a hazard when aerosolized.
- Acute inhalation toxicity type: indicates the type of effect observed.
- Aquatic toxicity M-factor: Factor used in the environmental classification of an ingredient that is highly toxic to aquatic organisms.
- Is super sensitizing: indicates whether the ingredient can cause hypersensitivity even at low doses.
- Toxicological data: by checking this box, calculations are performed in the ‘Systemic values (%)’ and ‘Max value (%)’.
- Systemic values (%): this field is filled in automatically after checking ‘Toxicological data’ and depends on the Toxicities for which the ‘Calculate systemic values’ column is set to ‘YES’.
- Maximum values (%): this field is filled in automatically after checking ‘Toxicological data’ and depends on the Toxicities for which the ‘Calculate maximum values’ column is set to ‘YES’.
The "Hazard Classification" tab allows you to automatically generate the hazard statements and associated pictograms required on labels and SDSs based on the data entered for the substance:
- Hazard Classifications: Enter the hazard class and the associated H statement using the following format: [hazard class]:[hazard statement], separated by commas. Ensure that each hazard class entered is included in the "Hazard class" list in the safety lists.
- Signal Word: Enter "Warning" or "Caution".
- Pictograms: Select the pictogram to be associated.
All settings are then entered into a CSV format database on beCPG.
Allergen characteristics
A list of allergens pre-established with GS1 and INCO already exists in the system by default.
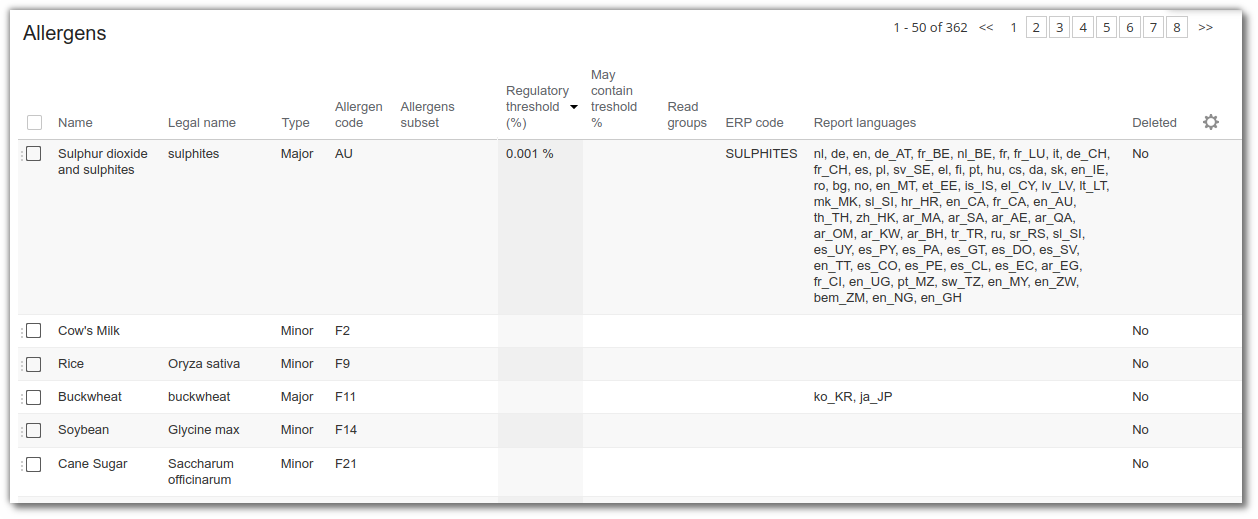
Create an allergen If you need to add new allergens, click on "Add". A form appears, allowing you to enter :
The name of the allergen to be selected
The legal name of the allergen (this is the name that will appear in brackets on the label)
Type: major or minor
Major allergens must be declared on the ingredient list. Minor allergens have two functions:
- To manage child allergens of major allergens e.g. hazelnut is a nut allergen for children. Hazelnut will be recognized as an allergen and the name will be declared.
To manage allergens that are not required to be declared ex: rice
Allergens subset
These are minor allergens on which translations are stored so that they can be recognized in beCPG as allergens. ex : Allergen "nuts" has minor allergens "almonds", "hazelnuts", "walnuts" etc. If child allergens are present, here is the labeling :almonds, ... If child allergens are not present, here is the labeling : ...,almonds (nuts),...
- Regulatory threshold (%)
Some of allergens are considered present only above a certain quantity. This is the case for sulfite in European regulations. In cosmetics, you can also use specifications if the threshold depends on the type of product application. To configure the threshold in the specification, refer to the Allergenssection.
- May Contain threshold (%)
In order to carry out analyses on the presence or absence of adventitious contamination of an allergen in your product according to VITAL®, it is also possible to define a threshold for which the allergen is not considered to be present as adventitious contamination.
- Report languages Language for which the allergen is considered. e.g.: In Japan, tomatoes are a major allergen.
Note: the allergen must be indicated as major; it will be considered minor for languages not indicated.
Characteristics Claims
beCPG offers a non-exhaustive list of claims commonly used in the food and cosmetics industries, which you can customize either by importing or manually. The “Name” corresponds to the name used in the search, while the “Legal Name” refers to the name appearing on the technical data sheet. This distinction allows you to add additional details to the name, making it easier for users within entities to enter ingredients. Example: Canada Source of Calories.
Each line in the list includes several additional parameters that allow you to configure the behavior of the claims in more detail:
- Type: allows you to define a family of claims to facilitate filtering in the interface. The available types can be customized in the Value Lists menu.
- Formula: allows you to define the automatic calculation for so-called “calculated” claims. The calculation must be written in SPEL (Spring Expression Language) More information via this link
- Regulatory Threshold: This parameter allows you to set a threshold above which the claim becomes applicable. It is based on a comparison of the claimed % values with the applicable %. (e.g., if the threshold is set at 80%, the claim will only be considered valid if the claimed % value reaches at least 80% of the applicable %.)
- Manual: If this option is enabled, the claim will not be made automatically. The user will have to manually select the claim value.
- Read group: by default, all claims can be added to an entity. If a read group is defined, only that group will be able to select the claim from the drop-down list to add it to the entity. Other users will not see the claim in the list; instead of its name, they will see the message ‘Access denied’. (Please note: this does not prevent these users from entering a value).
- Report Language: Indicates the target language for which the claim is considered. This allows you to manage geographical variations in multilingual reports.
Characteristics Physicochemical
The physical and chemical characteristics are defined by several fields that determine its identity, how it is calculated, and how it is distributed across the different composition levels. This section allows you to define its name, code, unit, and formulation and propagation rules.
- Name: name of the physical property.
- Code: code of the physical property.
- Description: description that can be displayed in the technical data sheets in addition to the legal name.
- Legal name: legal wording of the physical property to be displayed on the technical data sheet.
- Unit: unit of the physical property.
- Type: allows you to define a family of physicos to facilitate filtering. The available types can be customised in value lists menu.
- Formulated: by default, the physico is manual. If this box is checked, the value will be formulated based on the values entered in the levels below as follows: (lower level value / quantity used in the composition) * quantity of the entity used in the composition.
- Formulated with volume: by default, the physico takes into account the quantity used in the formulation. If this box is checked, the value will be calculated based on the net volume (L) [bcpg:netVolume].
- Formula: allows you to define the automatic calculation for so-called "calculated" physicos. The calculation must be written in SPEL (Spring Expression Language) More information via this link
- Propagate: by default, the physico must be added manually to each level for it to appear on the finished product. If this box is checked, as soon as you add the physico to an RM, it will automatically be propagated to all levels up to the finished product.
- ERP code: allows you to enter a code that will enable interfacing with an ERP system.
Characteristics Toxicities
This list allows you to select the toxicities that will be calculated by checking “Toxicologic data” in the list of ingredients.
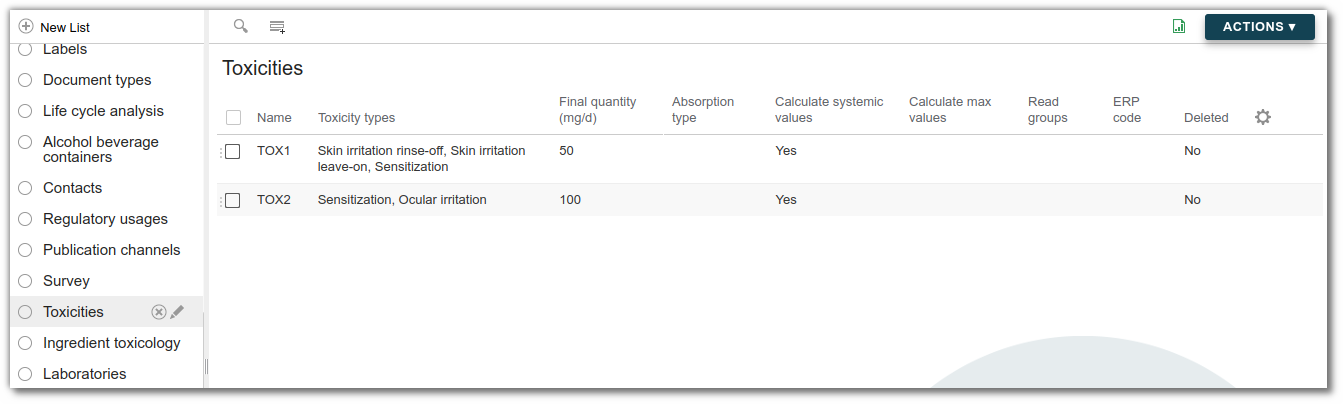
- Name: name of the toxicity that appears after calculations in the “Ingredient toxicology” list.
- Toxicity types: choice of type in order to know which fields to calculate.
- Final quantity (mg/d): Quantity not to be exceeded for toxicity.
- Calculate systemic values: Boolean to check to calculate systemic data. The value appears in the ‘Toxicology’ tab of the Ingredients list.
- Calculated max values: Boolean to check to calculate maximum data. The value appears in the ‘Toxicology’ tab of the Ingredients list.
Notifications
It is possible to generate email notifications to users, either on a regular basis or during specific events (document updates, changes to FP, RM or SFP, etc.).
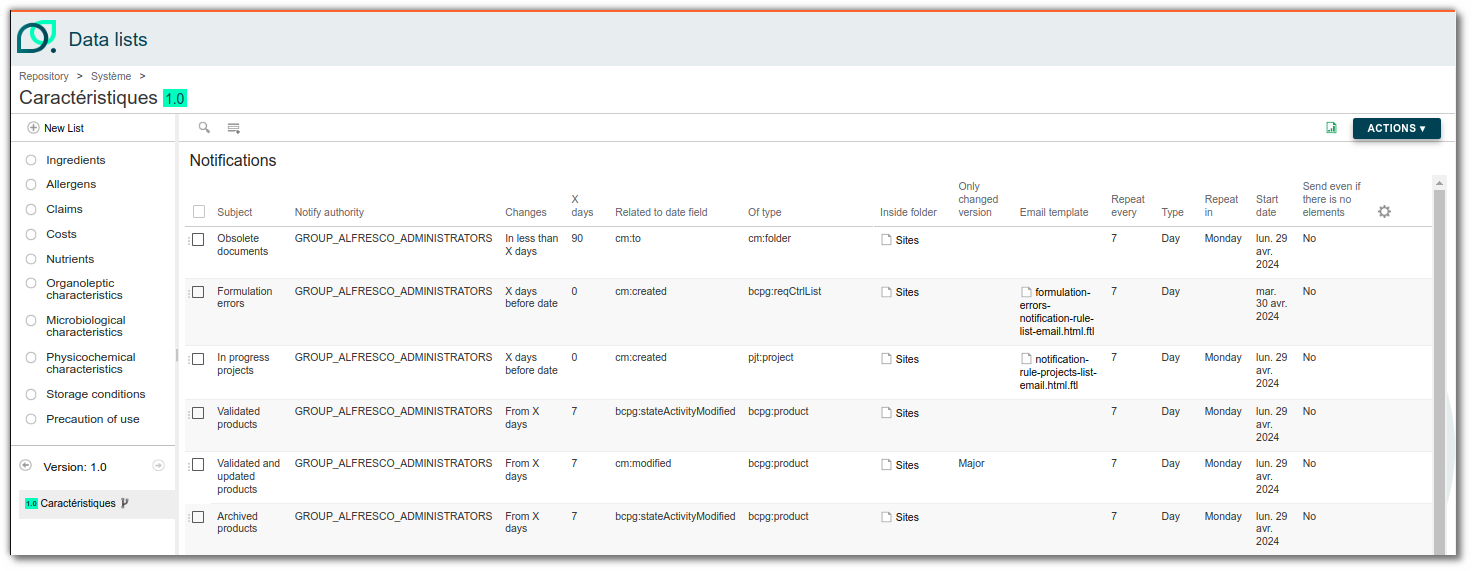
You can add a notification in the ‘Notifications’ section of ‘Characteristics’:
Notifications:
- Notify authority : groups or users to notify
Changes:
- X days before date: value between MIN and (today-X)
- X days after date: value between (today+X) and MAX
- From X days: value between (today-X) and today
- In less than X days: value between today and (today+X)
X days to date: date equal to (today+X).
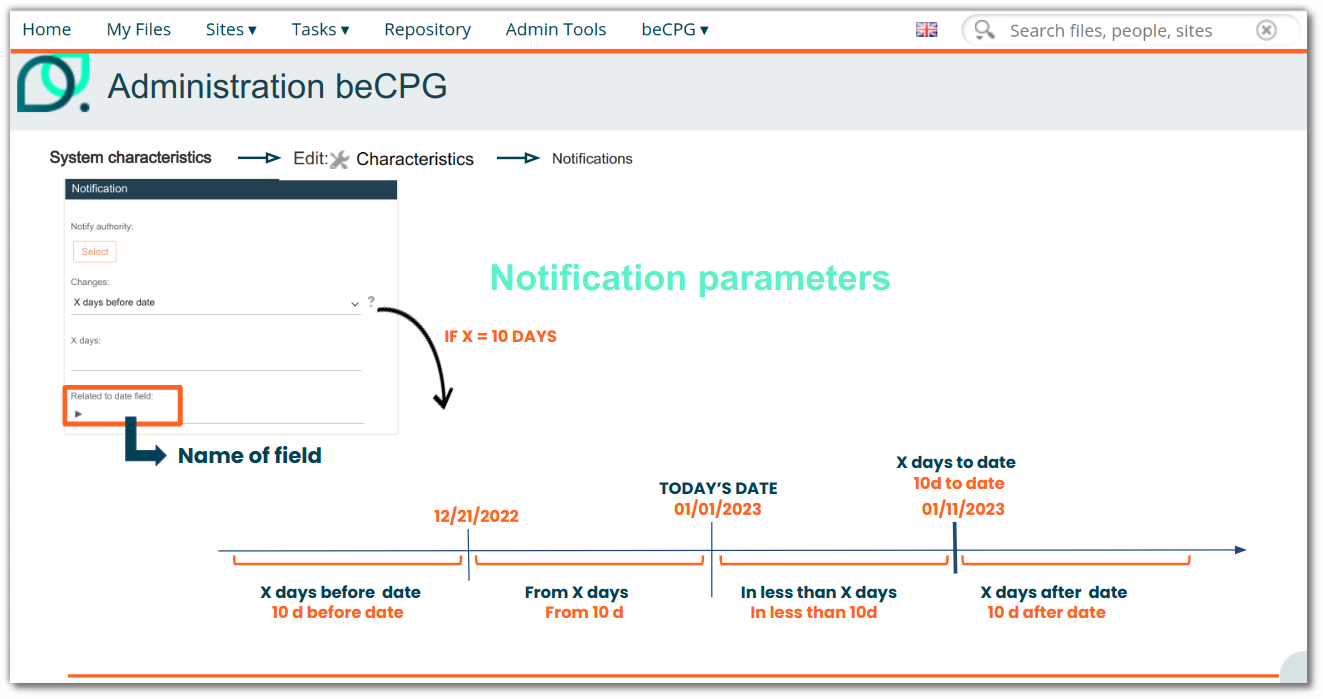
ex : Today's date = 1/1/2023 & X = 10 d & Date = bcpg:certifcatDate X days before date: All certificates prior to 12/21/2022 X days after date: All certificates after 1/10/2023 From X days: Date between 12/21/2022 and 1/1/2023 In less than X days: Date between 1/1/2023 and 1/10/2023 X days to date: Certificate to this date 1/10/2023
X days: indicates the number of days used in the above rules.
- Related to date field: date field to be analysed. Example: cm:modified for any modification of the entity.
- Script: allows you to apply modifications or calculations to the entities found by the search.
e.g. archive products whose end-of-sale date has passed
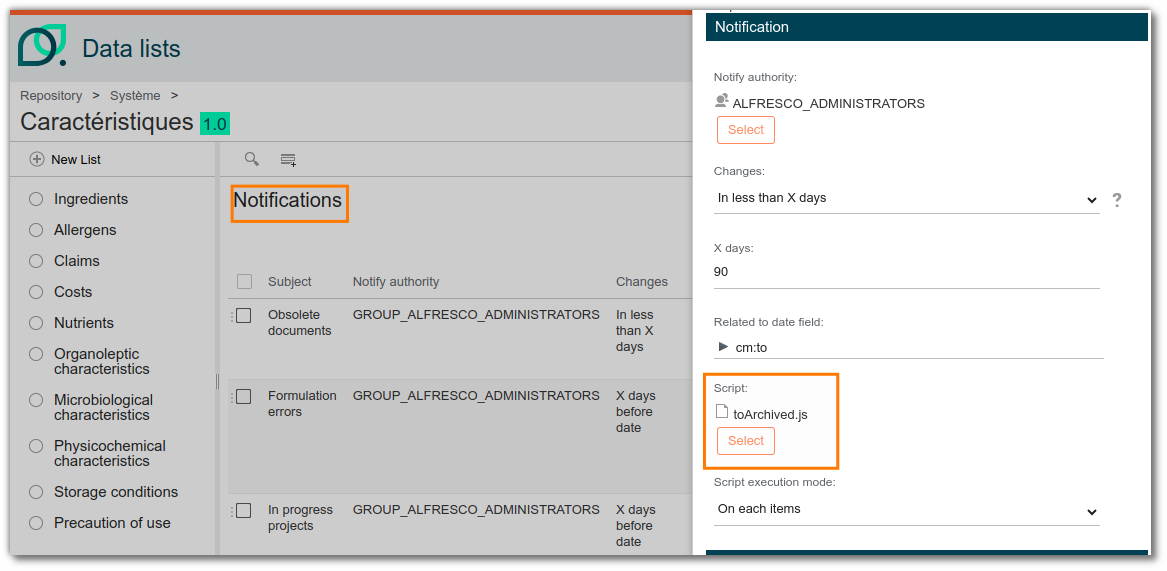
- Script execution mode: Allows you to define how the script is executed in relation to the elements to be processed.
Two modes are available:
- On all items: The script is launched once and receives all the elements as input. The processing of the elements is then managed within the script, generally via iterative loops (e.g. ‘for each’). For example, if 1,000 elements are involved, the script performs 1,000 iterations within a single execution.
- On each items: The script is launched as many times as there are elements, with a single element per execution. For example, for 1,000 elements, the script will be executed 1,000 times, each time on a single element. Note: We recommend using this mode because it allows you to split the processing into individual executions, making it easier to manage errors and control execution times.
Filters:
- Of type: type of entity concerned (e.g. raw material, finished product, etc.).
- Inside folder: file/site where the documents to be notified are located.
- Only changed version: notify only in the event of minor or major changes.
- Advanced filter (Lucene): option to add a filter in JSON format.
Example: receive only notifications concerning semi-finished products associated with a particular factory:
{
    "query": "@cm\\:name:\"Fiche*\"",
    "entityFilter": {
        "entityType": "bcpg:semiFinishedProduct",
        "criteria": {
            "assoc_bcpg_plants_added": "nodeRef"
        }
   }
}
or
{
    "query": "@cm\\:name:\"Fiche*\"",
    "entityFilter": {
        "entityType": "bcpg:semiFinishedProduct",
        "criteria": {
            "assoc_bcpg_plants_added": "nodeRef"
        }
    },
    "nodeFilter": {
        "criteria": {
            "assoc_bcpg_clients_added": "nodeRef"
        }
    }
}
or
{    "query":
    "+@{http://www.bcpg.fr/model/becpg/1.0}productState:\"Valid\" OR
    +@{http://www.bcpg.fr/model/becpg/1.0}productState:\"Simulation\" OR
    +@{http://www.bcpg.fr/model/becpg/1.0}productState:\"ToValidate\""
}
Example: receive only notifications concerning semi-finished products with the status ‘Validated’ with a specific hierarchy 1:
{
  "query": "+@{http://www.bcpg.fr/model/becpg/1.0}productState:\"Valid\" AND (@{http://www.bcpg.fr/model/becpg/1.0}productHierarchy1:\"workspace://SpacesStore/328e0919-1ca5-4bc0-90c2-9edefff37951\")",
  "entityFilter": {
    "entityType": "bcpg:semiFinishedProduct"
  }
}
Email :
- Subject: subject of the message sent.
- Email template: predefined template (accessible via: Repository > Data dictionary > Email templates).
Recurring:
- Repeat every :: Enter a number to complete the type.
- Type: Specify the frequency of repetition per day/week/month/year.
- Repeat in: allows you to set the day of dispatch (useful for weekly frequency).
- Start date: date of activation of the recurring notification.
- Send even if there is no elements: sends the notification even if no entity is found.
Report:
- Report template(s): Allows you to insert the URL for downloading an export into the email. An export template must be created for each notification because exports are stored in the same location with the name as the key. Each time the notification is sent, the export is updated in the folder: System > Exchange > Export > Notifications.
To create an export template, click here
Surveys
It is possible to configure survey for use in the project wizard (particularly for supplier portal projects).
To do this, go to the administration features, then open the Survey list:
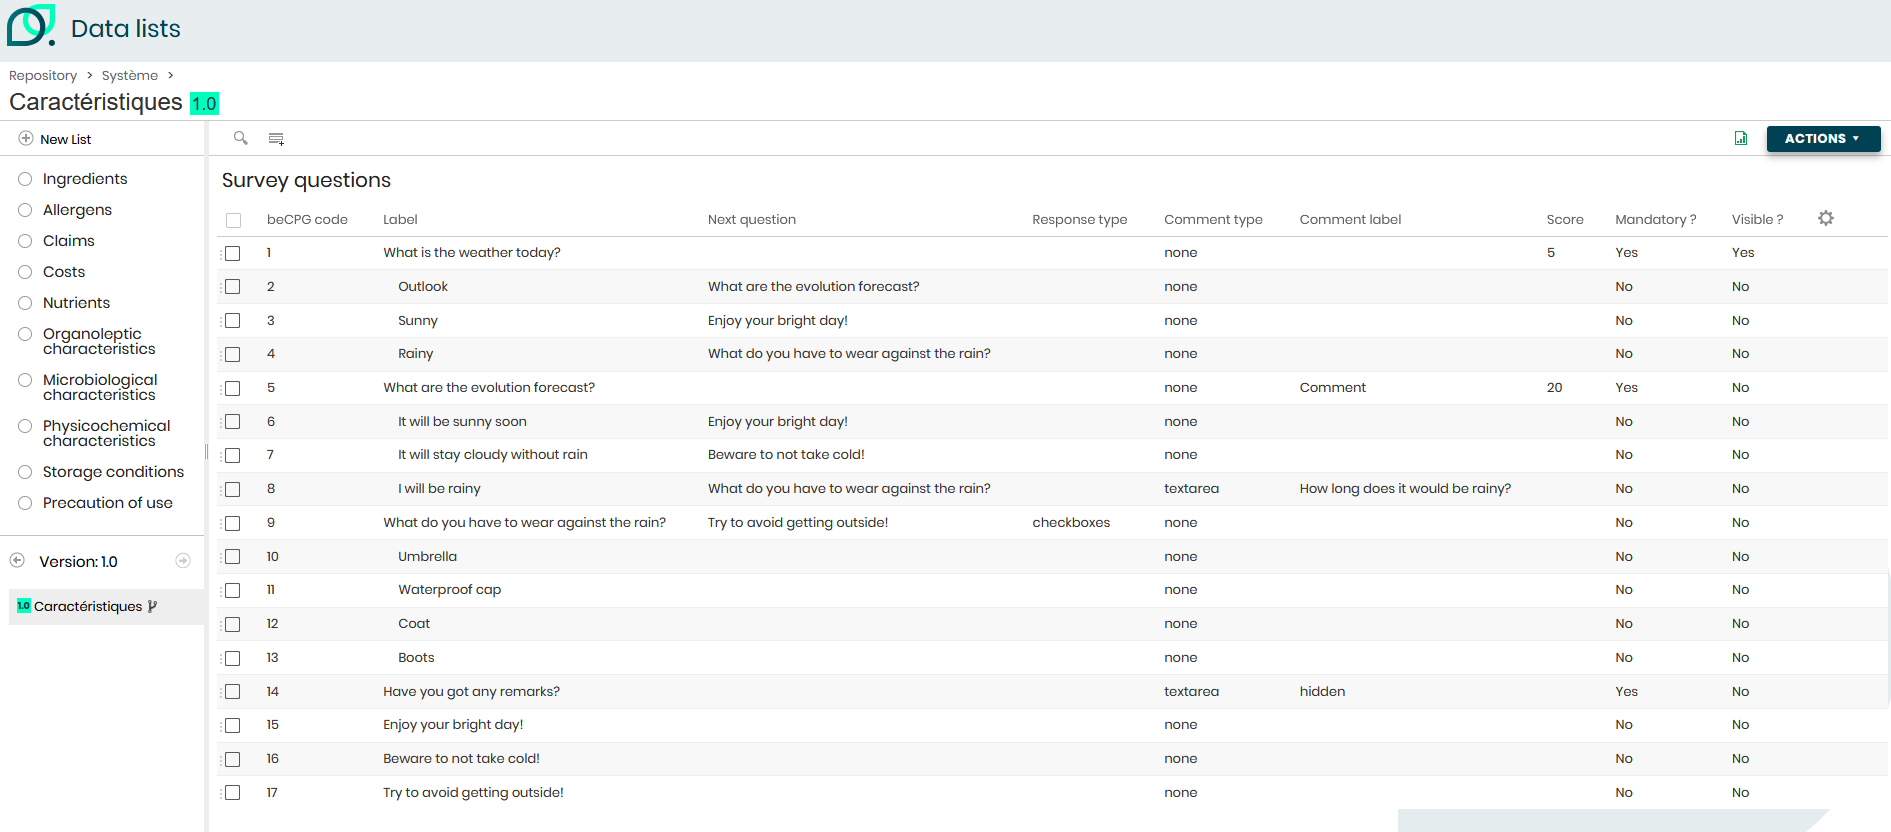
Question settings:
Here, you will find several fields to complete:
- Sort: Allows you to manage the order in which questions are displayed in wizards.
- Label: Name of the question or answer. You can add HTML tags to make text bold, underlined, italicised, etc.
- Parent: Select the question to link to the answer.
- Mandatory: This option allows you to define a question as mandatory. Please note: this feature is not available for checkboxes and single-choice lists.
- Visible: Allows you to display a default question that is not linked to the Next question field. Unchecked questions will only be displayed depending on the answer given to the previous question. If they are not presented to the user, they will not be included in the score or visible on the technical data sheet.
- Note: Allows you to add a description below the question.
- Upper note: Allows you to add a description above the answer.
- Lower note: Allows you to add a clarification below the answer.
- URL: Allows you to add a link below the question (to a regulatory text, for example).
- Criterion: Allows you to link questions to a criterion and generate a score per criterion based on the entity model. (e.g. I want to evaluate my suppliers by creating a CSR criterion that I add to my supplier entity in the ‘Score’ list).
- Score: I indicate the score that each question will earn on my criterion. I indicate the total score for my question and the number of points earned for each answer. The score is equal to the sum of the answer scores divided by the question score out of 100%. (Cannot be used outside of single or multiple choice questions).
- Response type: This field must be set on the parent (question) for single-choice or multiple-choice questions only. There are four types of answers:
- Default (empty): Radio buttons. To be used for the following question concept.
- List: Single-choice list of values.
- MultiChoiceList: Multiple choice list.
- Checkboxes: Checkboxes.
- Comment type: Allows you to select the display format for the question (parent) or comment to be displayed in addition to a "Radio button" type answer (e.g. If "Other", specify in the comment). Keep "None" for single or multiple choice questions (parents).
- Default (None): Keep this setting for single-choice or multiple-choice questions (parent questions).
- Text: For an open-ended question with a short answer (one line).
- Multi-line text: For an open-ended question with a long answer (several lines).
- Number: For a question where the answer is a number that may include decimals (e.g. 21.5).
- Integer: For questions where the answer must be a whole number (e.g. 18).
- Percentage: For questions where the answer is a percentage (e.g. 2.5%).
- Date: For questions where the answer is a date (e.g. launch date).
- Date & time: For questions where the answer is a date and time (e.g. appointment request).
- Comment label: Displayed on the answer (child) in addition to a ‘Radio Button’ type answer.
- Next question: Name of the question to be opened depending on the answer given. This setting can be made on the question in the case of a successive question or directly on the answer if its display depends on that answer. It is possible to specify several questions in this field. (e.g. on an MP, you ask if there is any flavouring present; if the supplier answers ‘yes’, they will have to complete all the questions concerning flavouring).
- Automatic generation of questions: Questions can be added manually to the Survey list of an entity or its model (so that they appear on all entities associated with this model), or generated automatically according to the defined settings.
- Survey list:Allows you to choose the Survey list of the entity in which the question will be available.
- If the field is filled in, only questions related to this list will appear in the drop-down list.
- If the field is empty, the question will be available in all Survey lists for the entity.
- For automatic generation, this field determines the list in which the question will be created automatically.
- Generation activated: If unchecked, the question must be added manually to entities. If checked, it will be generated automatically based on at least two criteria (the name of the previously selected list and one of the criteria below).
- Related characteristics: Criteria used to automatically generate questions, for example: Materials, for paperboard, ask the supplier about the presence of reinforcement, as well as its name and weight.
- Entity types: Allows you to choose the types of entities on which the question will be generated (e.g. raw material, semi-finished product, finished product, packaging, packaging kit and project).
- Related families: Allows you to select the family or sub-family of an entity for which you want to generate the question automatically. (e.g. for additive raw materials, I want to know their medium).
- Subsidiary: Allows you to generate questions based on the subsidiary (e.g. France).
- Plants: Allows you to generate questions based on the manufacturing plant (e.g. name of the production line).
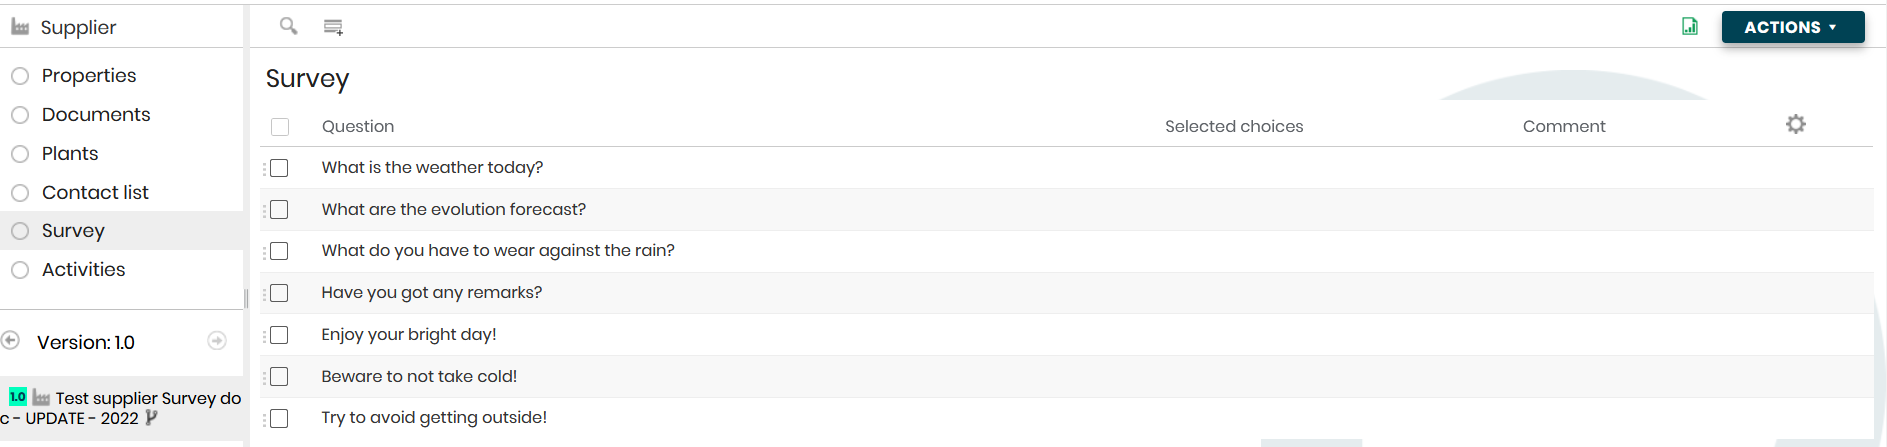
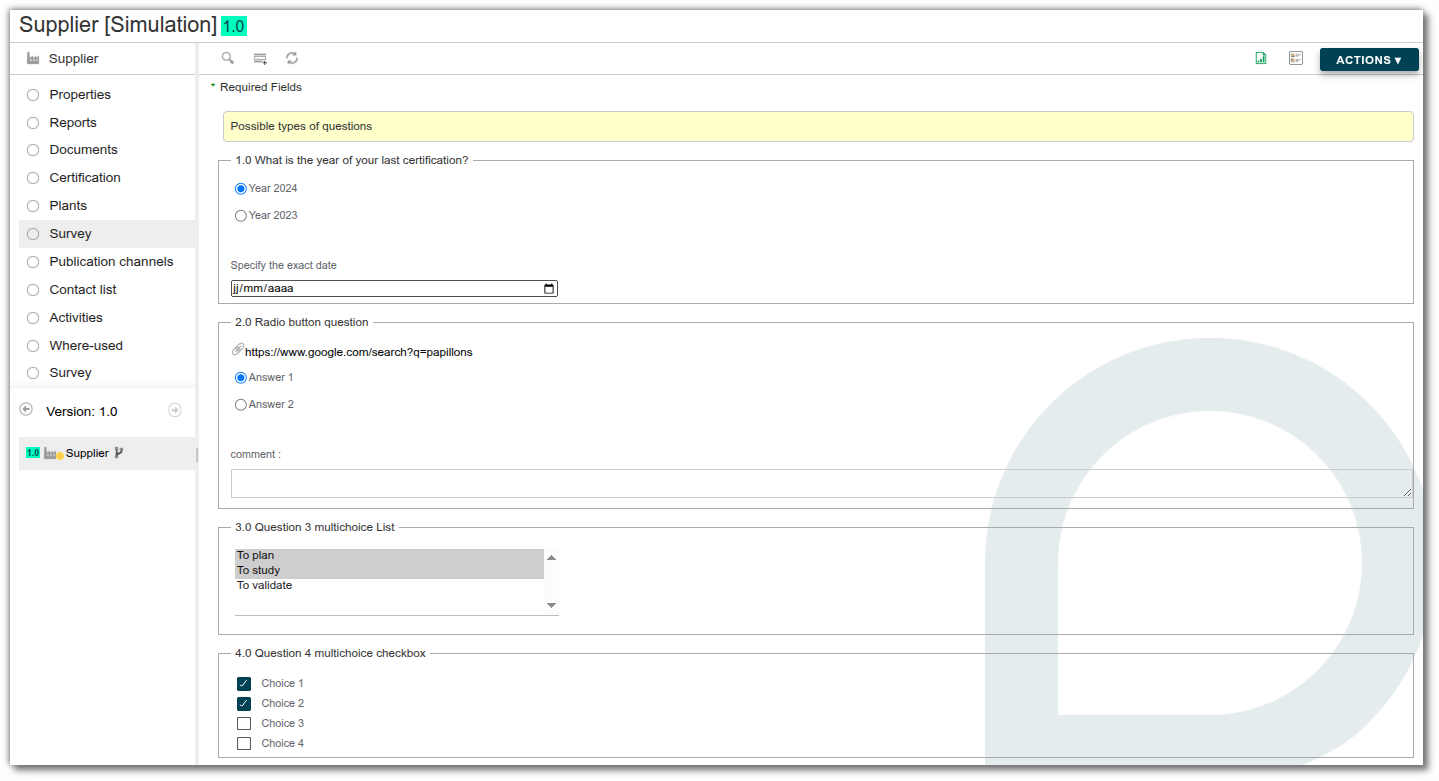
Displaying questions about the entity
The questions are then added or can be added to a Survey list for an entity or entity model. Two views are then available. Here is an example of how it might look with the settings we have just configured:
- Questions/answers view:
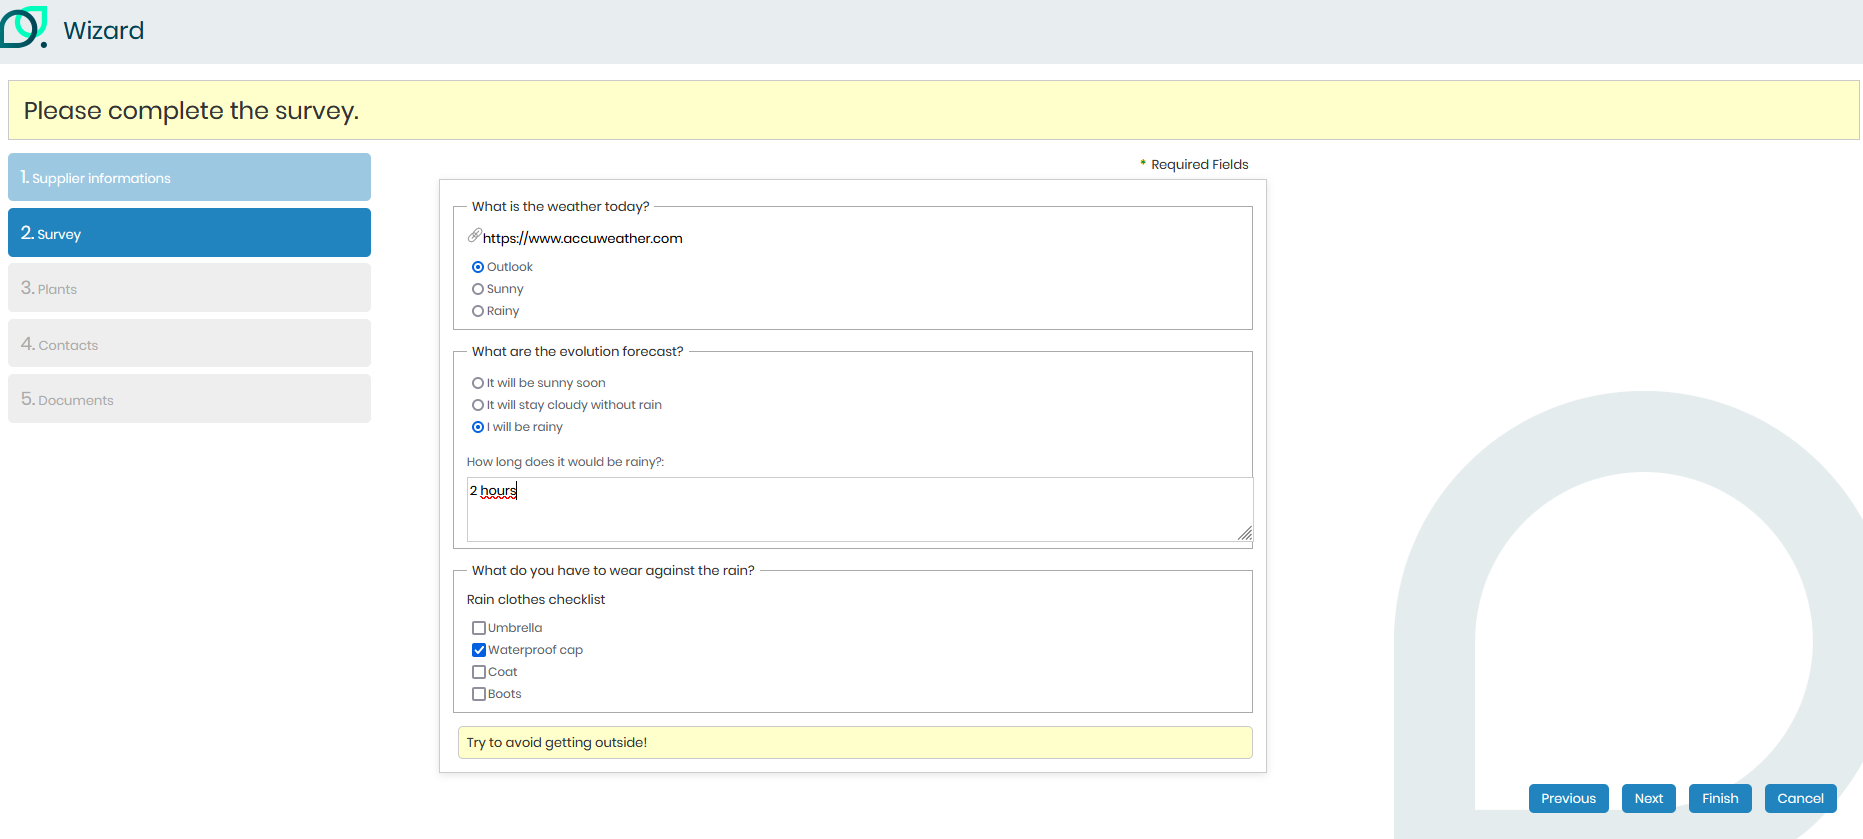
- Wizard view:
Click on ‘Survey view’ to view your survey as it appears in the wizard.
](images/becpg-admin-survey-07.png)
Displaying survey in a project deliverable
- Project deliverables wizard view:
To configure the wizard settings, refer to the Wizards documentation.
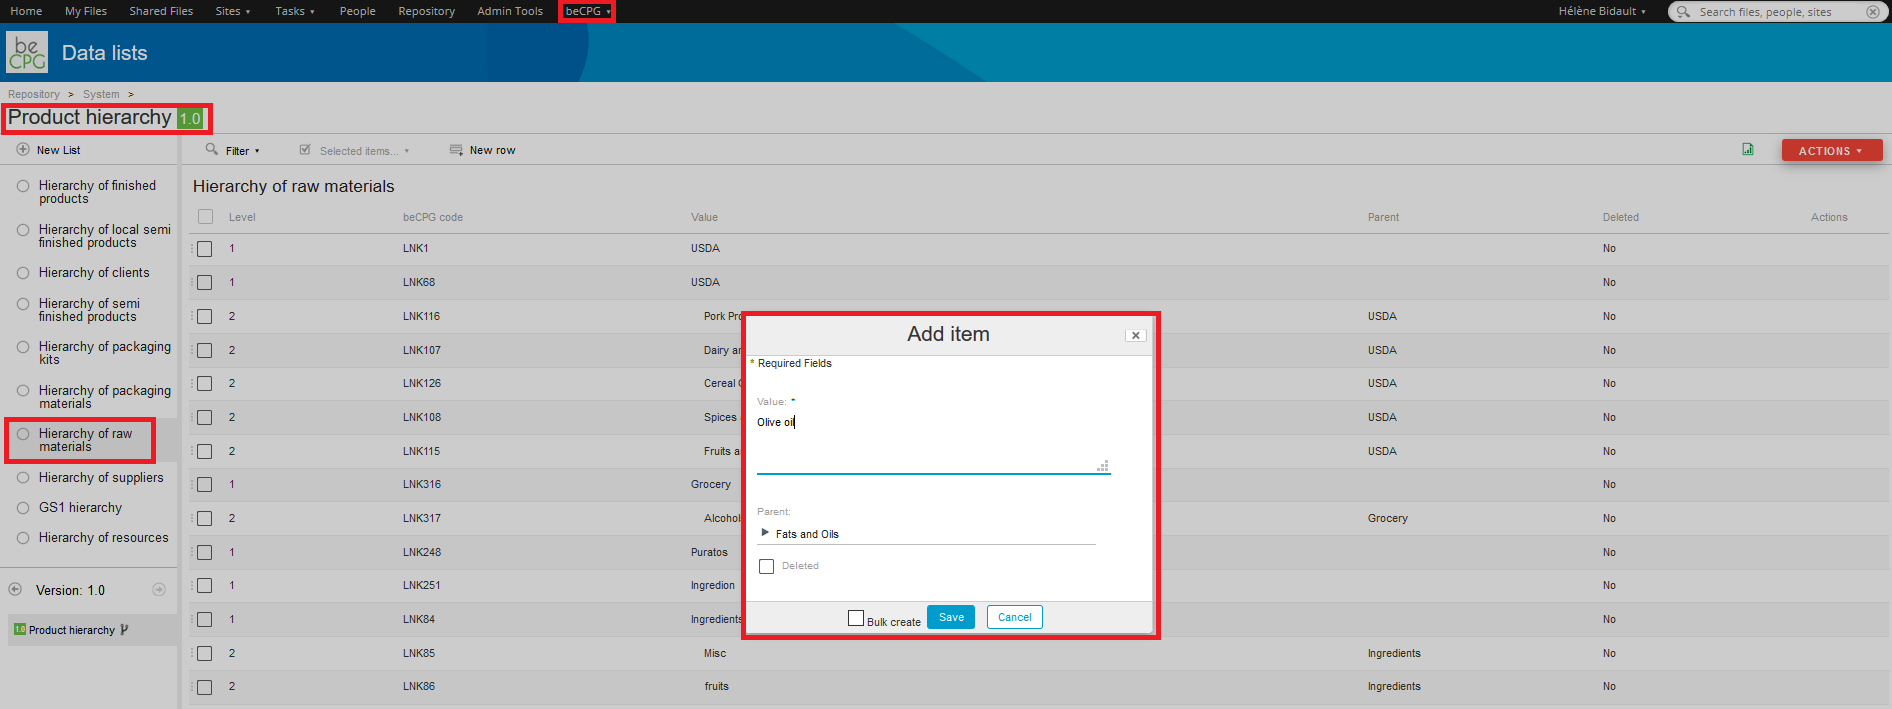
Products hierarchy
The product hierarchy is configured per type of product :
Add a family : In order to add a family to raw materials, it’s necessary to fill the « Hierarchy of raw materials » list.
Value : grocery
Add a subfamily : In order to add a subfamily to raw materials, it’s necessary to fill the « Hierarchy of raw materials » list.
Value : pasta, rice, semolina Parent : grocery This allows to link the family to the sub family.
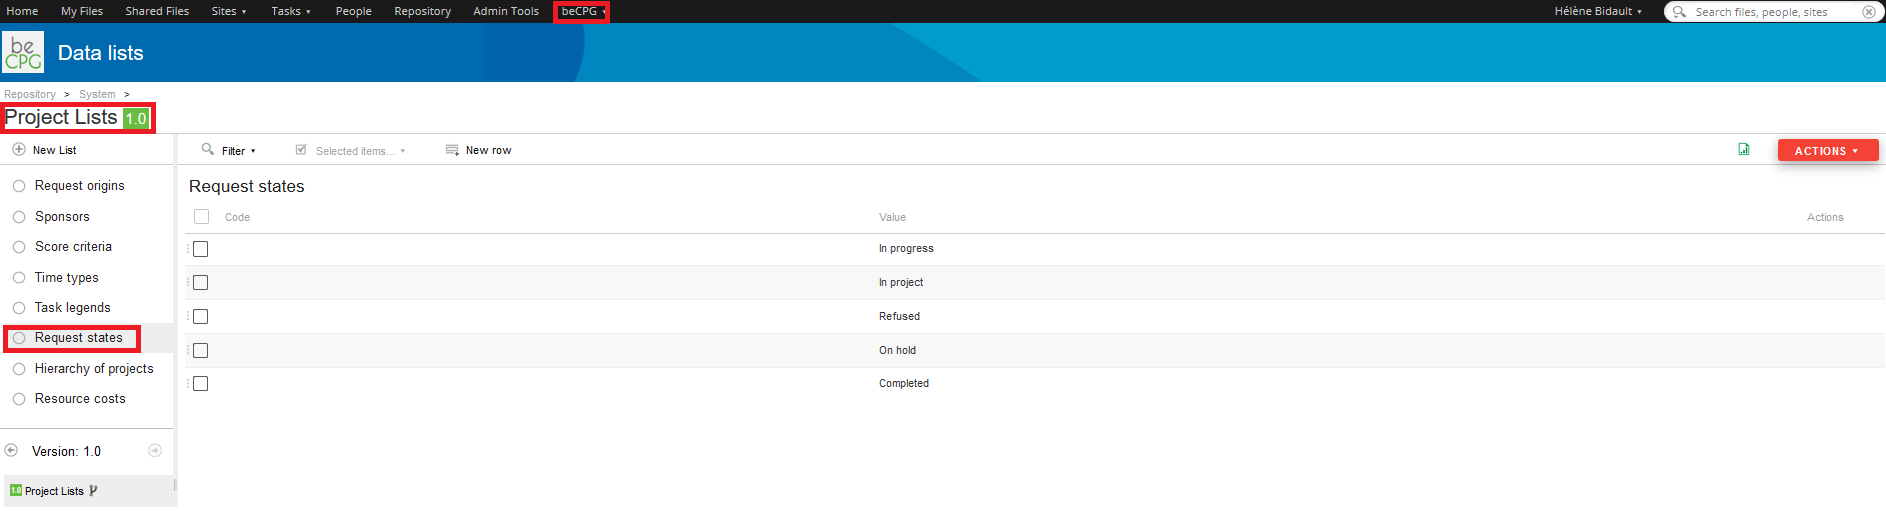
Projects list
In the projects lists, there are :
- The steps’ legends (which associate colours to steps) ;
- Projects hierarchy (projects’ families and subfamilies) ;
- Requests status ;
- Requests origins (ex : the service which made the request) ;
- Sponsors (persons or sponsor service of the project) ;
- Score criterion types (list of values allowing an score criteria to be linked to a type)
- Score criteria (criteria to evaluate the project, for example, market or feasibility).
Stage legends
This list allows you to assign a colour to each stage. In your project template, you can then link each task to a stage in order to better visualise progress. It is also possible to define on which sites the stages will be available.
Score criteria
The system automatically calculates grades and rankings (e.g., A, B, C, D) in the "Score" list based on data entered for the entity, such as LCA, physicochemical data, nutrients, and costs. Calculations for the evaluation criteria are defined in the administration and then added to the entity, model, or specifications as needed. It is also possible to generate an overall grade for the finished product based on the grades for each raw material using the "Formulate" option.

- Name: Enter the name of the criterion to be displayed on the score list.
- Description: You can enter a description that is not visible by default on the PLM.
- Criterion type: Sort your score criteria by type to apply filters, for example.
- % Weight : Specify the weighting for each criterion. The sum of the weightings for the criteria present on the entity must be equal to 100%.
- Formula: Calculation formula used to generate the score when the criterion is not linked to a question.
- Detail formula: Formula used to display the details of the score calculation.
- Range formula: Formula used to generate a ranking (e.g. A, B, C, D).
- Is formulated: Allows you to formulate a score on the entities at the level above (e.g. I generate a CSR score on my supplier and I want to formulate it on my Raw Material to generate an overall score on it).
It is then possible to:
- add criteria to the "Score" list of an entity model
- or create specifications with the "Score" list and add all the criteria with categories. As soon as the specifications are associated with the entity, the score list is generated on the entity model.
To configure the Score list settings in the specifications, refer to the Score documentation.
List of value
Packaging material
This list is initialized with CITEO values when the system is created:
- Steel
- Aluminum
- Paper-cardboard other than bricks
- Bricks
- Glass
- Plastic - Bottle and vial in clear PET
- Plastic - Bottle and vial in coloured PET, in PE or PP
- Plastic - Rigid packaging in PE, PP or PET
- Plastic - Flexible PE packaging
- Plastic - PS rigid packaging
- Plastic - Complex packaging or other resins excluding PVC
- Plastic - Packaging containing PVC
- Other materials - Unprocessed materials from renewable resources and sustainably managed with recycling channel or organic recovery in development (wood, cork).
- Other materials - Without recycling channel and energy recoverable (textile, other materials...)
- Other materials - Without recycling channel and non recoverable (stoneware, porce-lain, ceramics)
If the list has not been initialized, you can ask beCPG to import the file "07 - pmLists.csv".
This list can be customized. Please note: added values will not be recognized by the CITEO report.
Ingredient Type
This list is initialized with the additive types defined by regulations (European, American, etc.). It can be customized to create other grouping categories (e.g. flavorings, vegetables, mushrooms), in a similar way to other lists. The “Value” corresponds to the name used in the search to associate the type to the ingredient, while the “Legal name” designates the name displayed on the label.
In the label, the ingredient type is used to group ingredients according to their regulatory classifications. example: antioxidant: E300; emulsifier: E472, E322.

Other options are also available in this list:
- Plural legal name: Name displayed on the label if the grouping contains several values.
- Threshold (%): Allows you to group ingredients related to this category if their proportion is below a certain threshold. example: Group spices only if their quantity is less than 2%.
- Do not declare: If this box is checked, the category and associated ingredients are not declared. example: Do not declare the “anti-caking agent” category.
- Place at the end: If this box is checked, the category and associated ingredients are placed at the end of the list. example: The “casings” category is systematically placed at the end.
Quality lists
Control methods
- Name: Name of the method used on physical-chemical, microbiological, control, control plan and analysis lists.
- Description: Description of the physical method.
System folders
Entity templates
The entity templates are parameterised by type of entity (raw material, finished product, semi-finished product, customer, supplier, etc.). Once the template has been parameterized, as soon as a user creates an entity, the system initializes the files and lists in relation to the template. Entity templates have a specific appearance that distinguishes them from conventional products click here for more information.
Folders
Entities’ templates are configured per entity type (product, client, supplier) in which there are subfolders, for example : images, documents etc. When the model is parameterized, once a user will create a product, the system will initialize the entity’s folder according to the folder model by creating the subfolders.
Data lists
Entity templates allows you to define the characteristics managed on each product (ie : costs, allergens, nutrition facts). Each time you create a new product, it inherits characteristics defined on template.
- From beCPG admin console, open "Entity templates".
- Open folder "Templates of product"
- Open "Finished Product" data lists

- For each data list, add characteristics you want to manage on every
product
> Costs, select costs previously created (Cost raw material,
Cost packaging, Cost production)
> Nutrients, select nutrients previously created (Energy, Fat,
Sugar, ...)
> * etc...
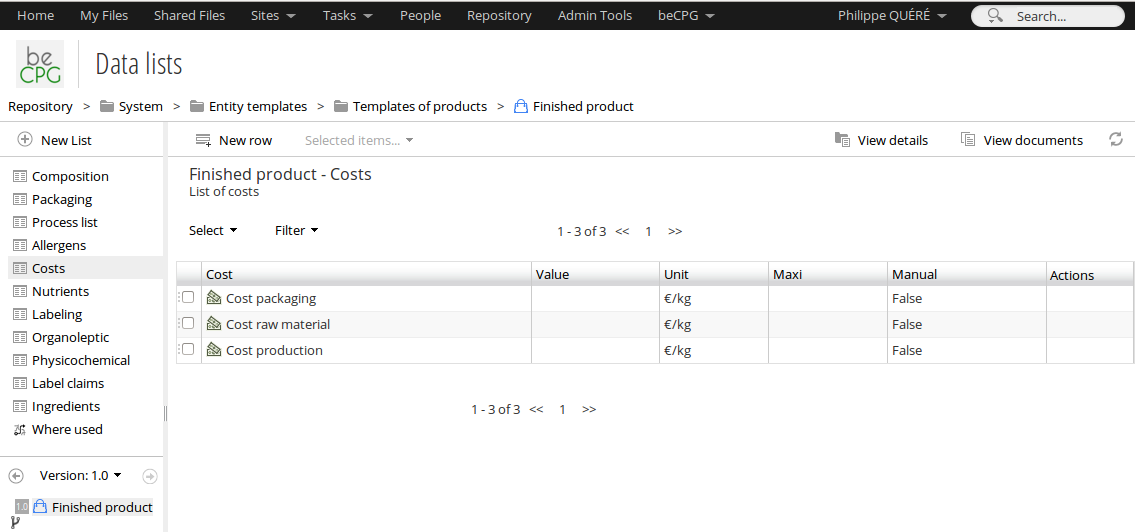
- Do the same with other templates : semi-finished, raw material, ...
- Now, when you create a new product, it inherits characteristics defined on template.
Note:
The new allergen will be added to new products, but won’t be added to already existing products as long as they are no formulated or as long as the administrator doesn’t click on the « Synchronize the entities » action.
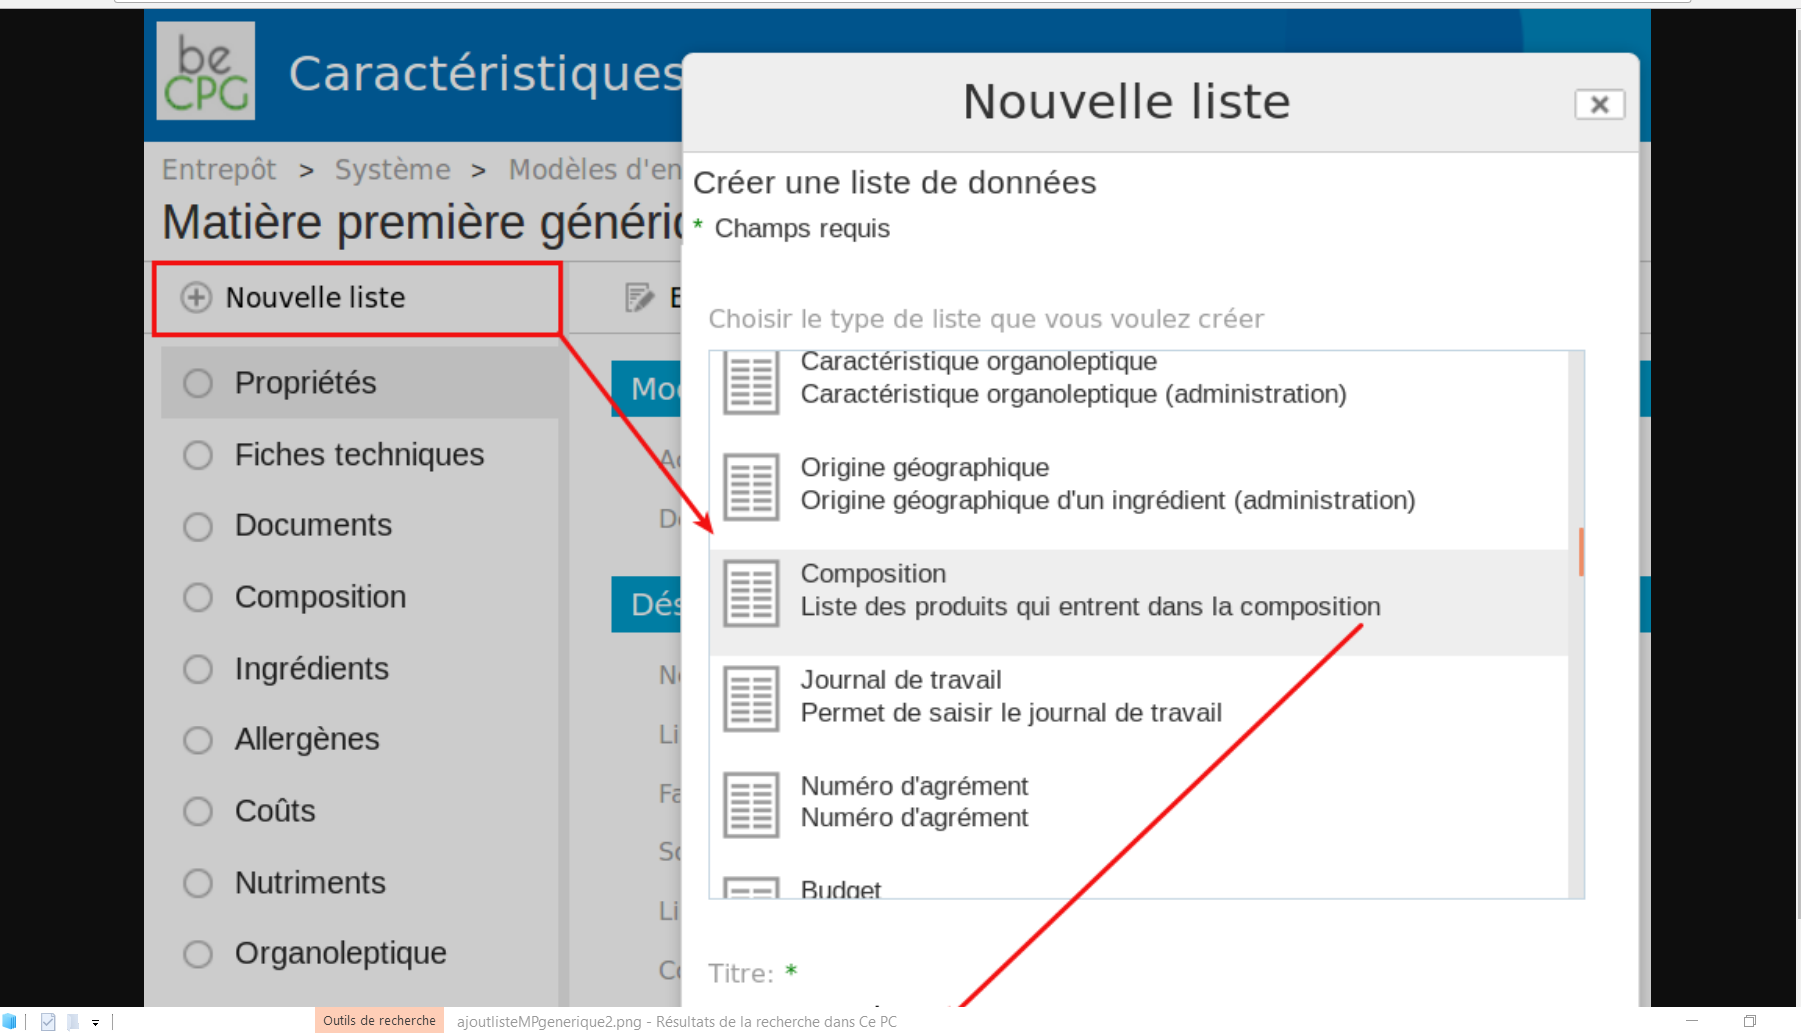
Creation of a new template for raw material (if it is really necessary)
Repository> System> Entity templates> Product templates
- Make a copy of a raw material template,
- Change the name of the copy (for example : "Fresh fruit Raw Material"),
- Click on the "Fresh fruit Raw Material" template,
- Change the informations in the lists (physico-chemical ...)
Now you have 2 different templates for raw material. When you will create a raw material, you will have to chose the right template.
Add a list to an entity
Other lists can be added to entity templates. To manage additional information:
- On the model: Add a list

- Select the list. You can rename it if required.

The following lists are available:
Life Cycle Assessment (LCA) - Process List - Materials - Claims - Microbiology - Resource Parameters - Control Parameters - Fish Information - Packaging - Alcohol Beverage - Stocks - Hazards - Price - Selling Price - Product - Time Spent - Custom View - Budget - Expense - Sample - Score - Invoicing - Request List - Publication Channels - Certification - Contacts - Composition - Variant Characteristic
Add a Custom View
The custom list allows you to create where-used lists or reports on your entities.
1. A where-used list (WUsed)
The customized list of where-used is accessible to all associations, whatever their type. Two criteria are essential to define it: the technical name of the type carrying the association and the technical name of the field/association.
Example: I'd like to add the list of “raw material” where-used lists for my suppliers, so that I can view the raw materials they supply me with.

The Customs view type is bcpg:rawMaterial (the field being present in the raw material properties). If a field appears in a list, the type will be that of the list, not that of the entity.
The name of the custom view is WUsed-bcpg_suppliers (with the technical name of the field being bcpg:suppliers).
Note: It may be necessary to create a datagridWUsed form to display the list on the entity. Documentation is available via this link
2. A SmartContent list (SmartContent)
AThe Smart Content list is a virtual read-only list that displays the content of a list linked to another entity. It is particularly useful for avoiding data duplication or rewriting information that already exists elsewhere in the application.
To set up a Smart Content list, you must:
- Define the ID of the target list in the Associated Type field (e.g., bcpg:nutList).
- Name the custom view (Custom View Name field) by prefixing it with SmartContent-, followed by a meaningful identifier (e.g., SmartContent-nutList).
- Use a SPEL formula to dynamically identify the object whose list you want to display.
Example 1: Displaying the list of nutrients for the first component
Suppose you want to display the list of nutrients linked to the first component in the composition list.
SPEL formula to use:
spel(compoList[0].product)
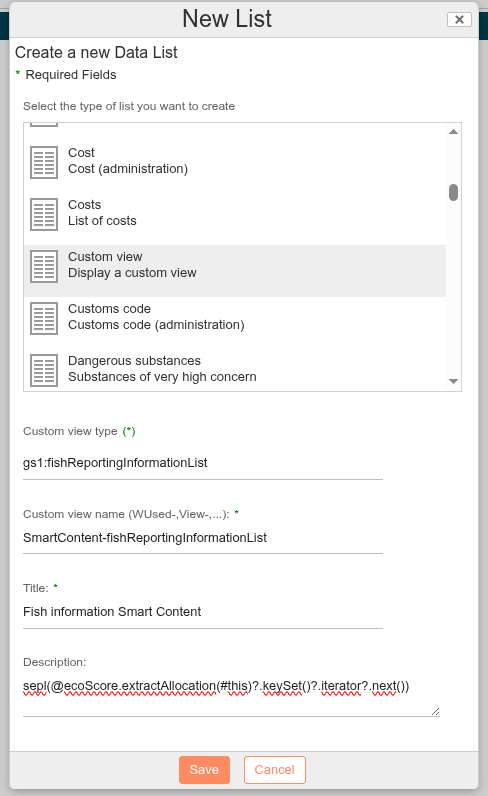
Example 2: Displaying GS1 Fish Information
You want to display the GS1 Fish Information list available for a raw material used in the product's composition.
SPEL formula to use:
spel(@ecoScore.extractAllocation(#this)?.keySet()?.iterator?.next())
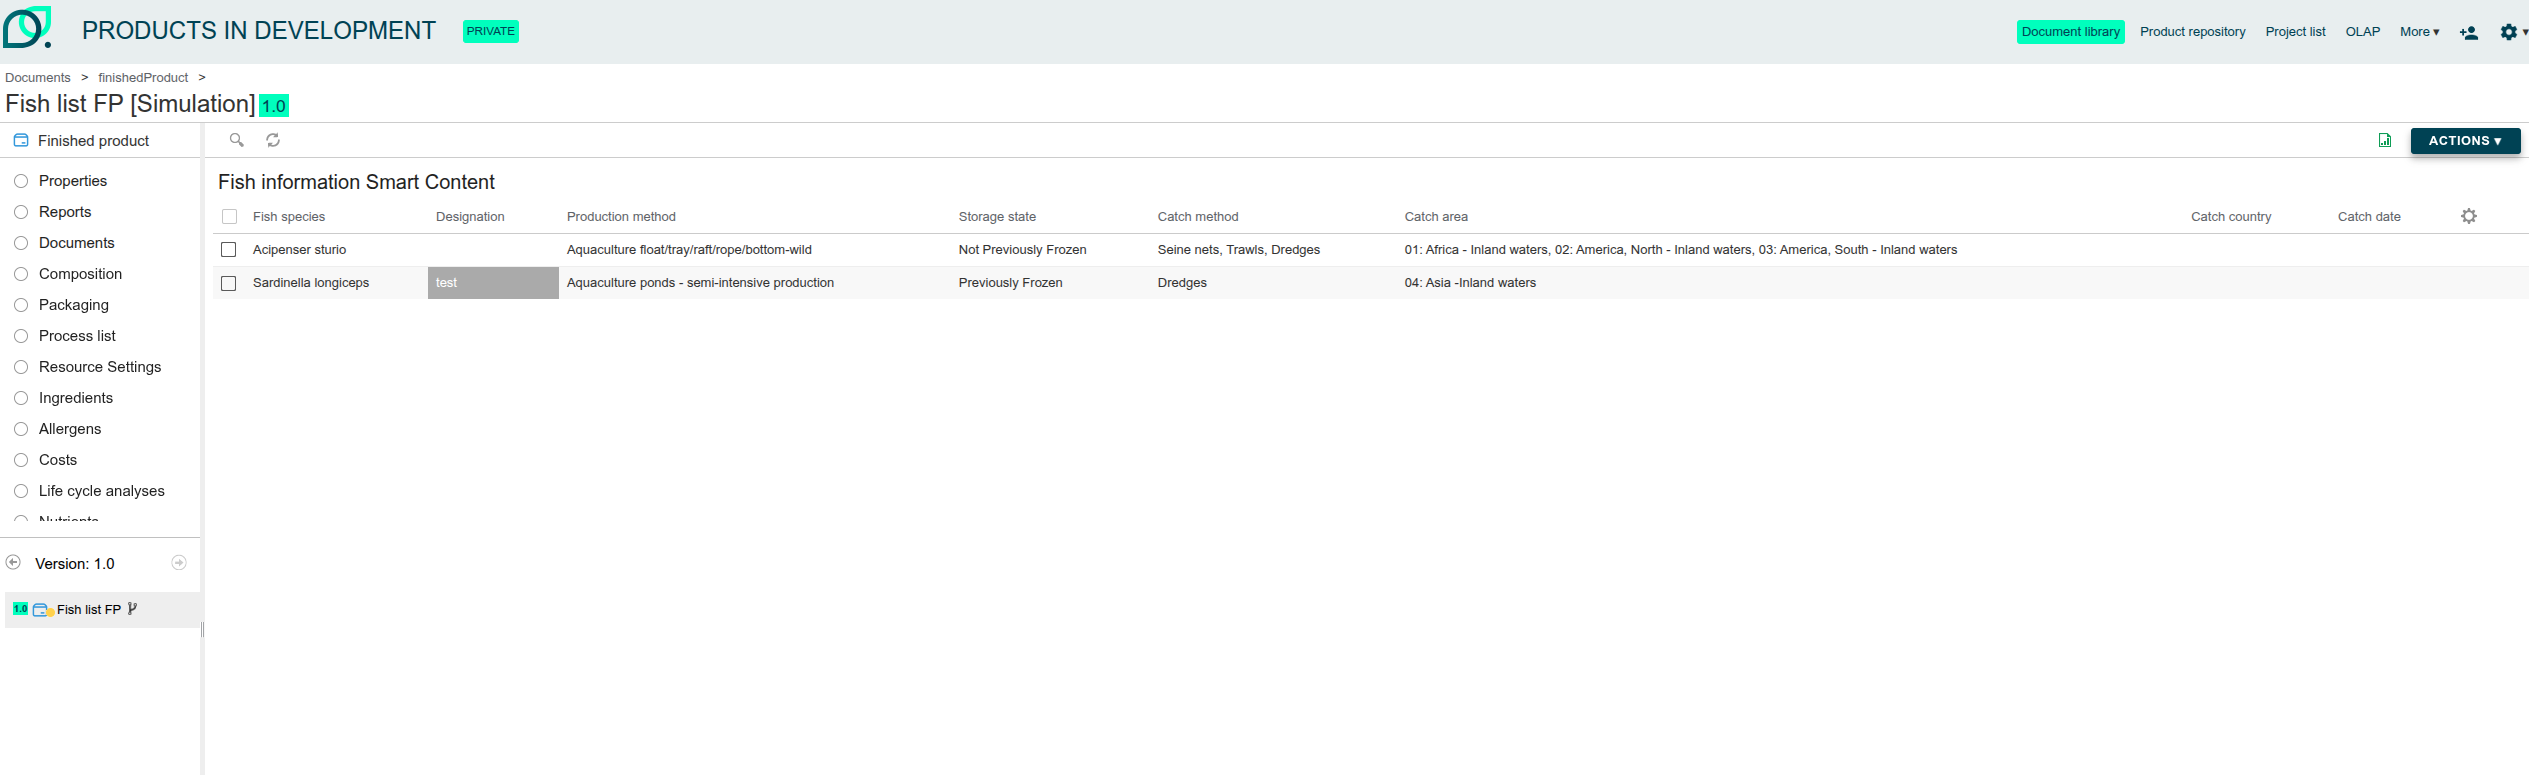
This formula allows the source object to be dynamically extracted from the allocation defined for the eco-score.

Creation of a generic raw material
Purpose
You create and use a generic RM because you want to manage independently several "identical" RM which have slight differences (suppliers, origins ...)
You will have te create an entity template call "generic raw material". It will have a composition's list so it will be possible to add in the composition list the "identical RM" The generic raw material will bring together the informations.
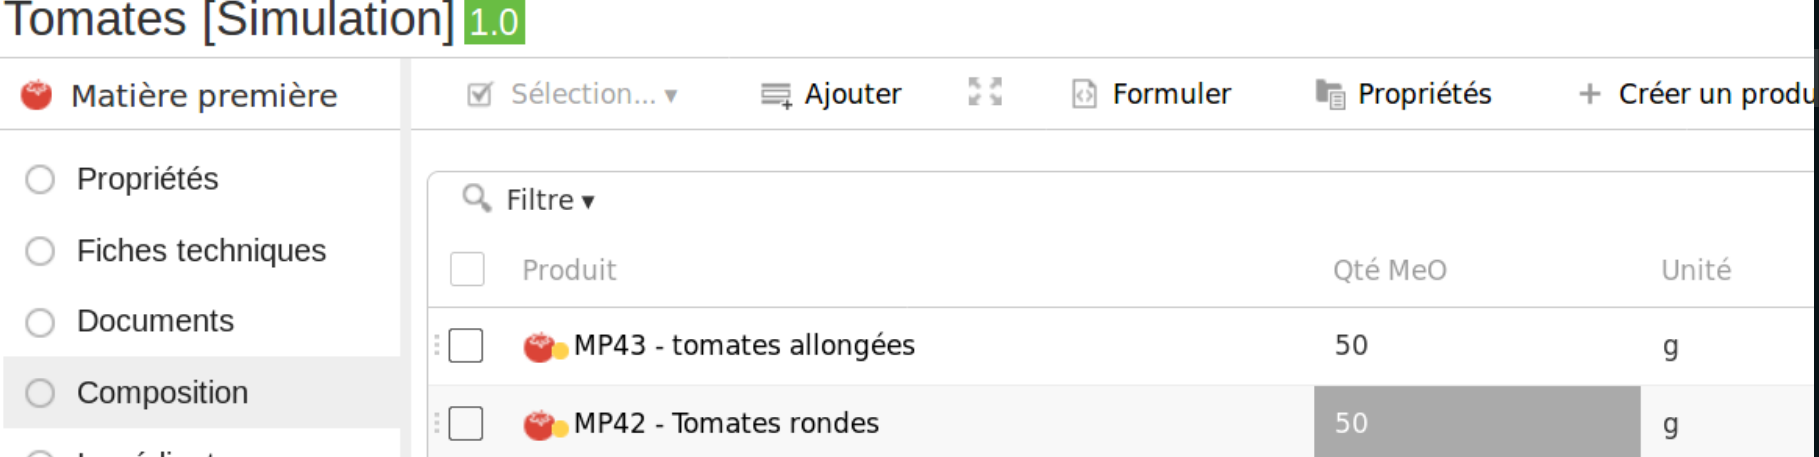
For example, you have 3 tomatoes with 3 different suppliers and with different quantities of minerals. You will create one unique RM which will synthesize all the informations.
How to create a specific entity's template : "generic RM"
Repository> System> Entity templates> Product templates
- Make a copy of a raw material template,
- Change the name of the copy to : « Generic Raw Material »,
- Click on the Generic Raw Material template,
- Add a new list and choose « Composition »,
- Name this new list "Composition" for example,
- Save.
How to use this entity template :
- Go back to your original folder,
- Create a raw material,
- Name your raw material,
- Choose the template : Generic Raw Material,
- Save.
Now, it is possible to add in the composition list of your raw materials, the similar RM. Formulate,
The various fields : nutrients, allergens ... will be completed automatically using the information you added in the "similar" raw materials. The calculation are the same as for the semi-finished products and the finished products.
Formulation
If BeCPG is not linked to your ERP: It is possible to formulate your recipes with the raw material contained in the generic raw material. You just need to create a different ERP code. For example : ERP code of your generic RM + ERP code of your supplier. It will be easy to tell them apart.
If BeCPG is linked to your ERP : It won't be possible because your ERP won't tell the RM apart. Only the ERP code of the generic RM will be recognized by your ERP.
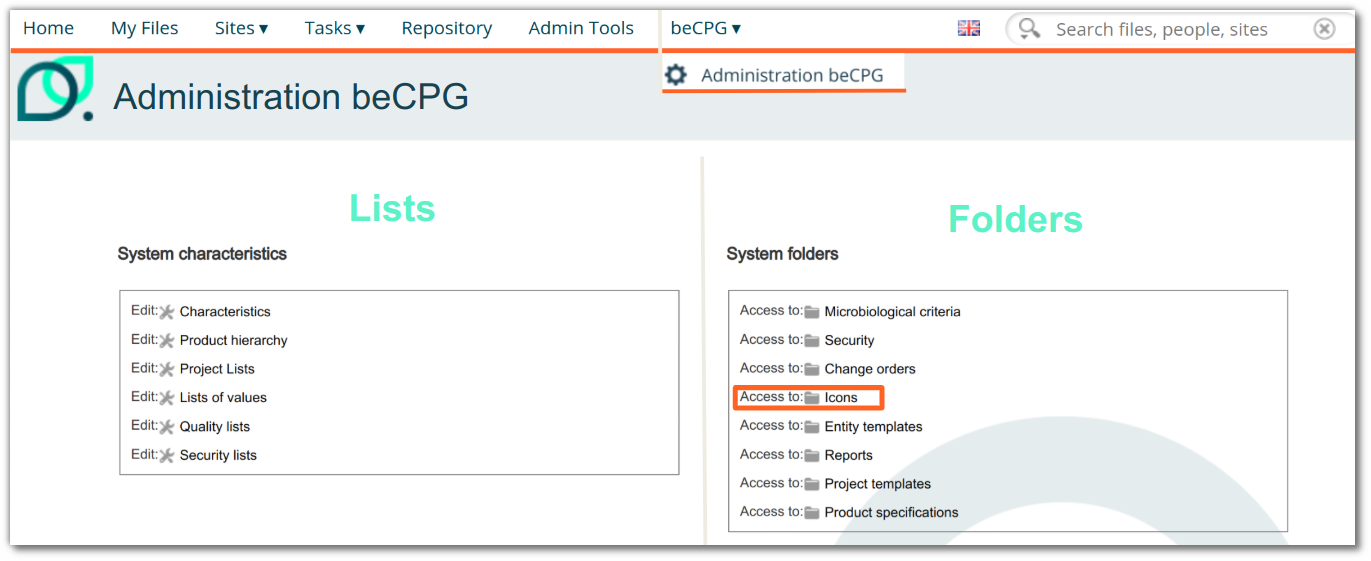
Icon personalization
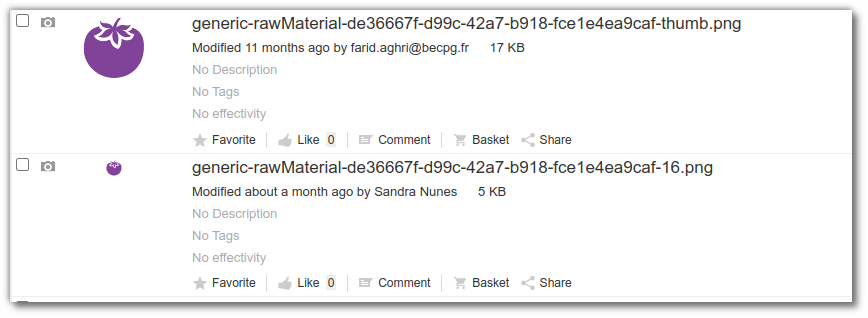
The icon for entity models can be customized on the product visual or the composition. New icons are added to the administration “icons” folder, respecting a specific nomenclature format:
On the entity for the product visual, a 64px X 64px icon:
generic-[name of Type]-[template node]-thumb.pngFor the dashlet, a 32px x 32px icon: :
generic-[name of Type]-[template node]-32.pngIn the composition/packaging/resource/drop-down list, a 16px X 16px icon:
generic-[name of Type]-[template node]-16.png
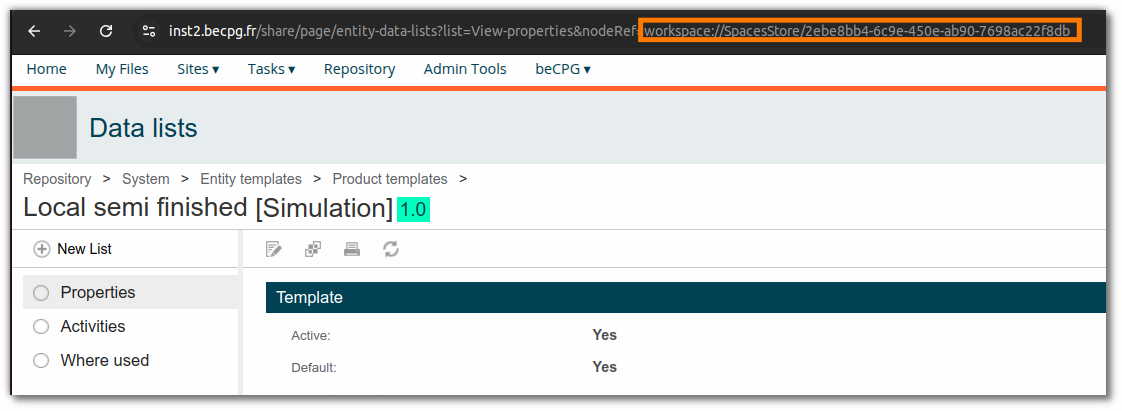
You can obtain the model's node in the URL when viewing it.
example:
Note: Please check that your images conform to the required formats. Clear the beCPG and browser caches after use.
Project Template
To avoid having to recreate the same structure each time, projects are generally created from a predefined template. The use of a template is particularly appropriate for recurring projects, such as product validation. Certain deliverable parameters need to be defined at the project template level only.
Deliverable Document
On deliverables, it is possible to add a link to a document or folder stored either in the project or in the associated entity. When the task is executed, a direct link to this document is displayed using the URL defined below:
/share/page/site/ + "Name of the site" + /document-details? ou /artworks-viewer? + nodeRef={}
- "Name of the site" : Refers to the site in which the project will be classified. This is generally a “simulation”.
- /document-details? : Redirects to the document details page.
- /artworks-viewer? : Redirects to the document annotation page.
- nodeRef={} : Can be replaced by the following formats to access a specific document:
- nodeRef={nodeRef|xpath:} : Opens a document stored in the project, at the location defined after xpath.
- nodeRef={nodeRef|propName} : Opens a document saved in the project properties.
- nodeRef={pjt:projectEntity|xpath:} : Opens a document stored on the project entity, according to the path specified after xpath.
- nodeRef={assocName|xpath:} : Opens a document located in a project association (assocName), with the path specified after xpath.
- nodeRef={assocName|propName} : Opens a document saved in the properties of a project association (assocName).
- nodeRef={assocName|@type} : Access to a document according to the type specified in the association (assocName).
ex: Documentation page:
/share/page/site/simulation/document-details?nodeRef={pjt:projectEntity|xpath:./cm:BAT/cm:Artwork.pdf/.}
/share/page/site/simulation/document-details?nodeRef={pjt:projectEntity|xpath:./cm:BAT/cm:Brief.docx/.}
/share/page/site/simulation/document-details?nodeRef={pjt:projectEntity|xpath :./cm:Documents/.}
Annotation page:
/share/page/site/simulation/artworks-viewer?nodeRef={pjt:projectEntity|xpath:./cm:BAT/cm:Artwork.pdf/.}
If the document to be completed remains the same, you can save it in the project template and associate it with a deliverable. Once the document has been completed, you can import a new version directly into your project.
Deliverable Wizard and Catalogue
Wizards are forms available in the deliverables, designed to enter information about the project or the associated entity, with a more ergonomic design. They are used in particular in the supplier portal. Documentation on the creation of Wizards can be found at this page.
New security attributes can be configured:
- enforceTask="true" to require an assigned workflow task for edit access.
- skipSecurityRules="true" to ignore protected fields when using the wizard.
The wizard appears when the task is run, thanks to a URL specified in a deliverable associated with this task on the project template.

/share/page/ + wizard?id= + &nodeRef={}
- wizard?id : Wizard id
- &nodeRef={nodeRef} : Display a project wizard (ex:/share/page/wizard?id=sample-npd&nodeRef={nodeRef})
- &nodeRef={pjt:projectEntity} : Display a wizard on the entity linked to the project in the Entity field
- {assocName|propName}: replace with the property of the project association
- {assocName|@type}: replace with the type of the project association (for example, bcpg:finishedProduct)
- &destination= : Create a new node (ex: =/share/page/wizard?id=sample-npd&destination=)
- &catalogId= : linkcatalogues to check taht the fields have been filled in (/share/page/wizard?is=wizardIdnodeRef={nodeRef}&catalogId=catalogId)
Note : It is possible to link a catalogue without a wizard using the following format :
/share/page/ + wizard? + nodeRef={} + &catalogId=
ex:/share/page/wizard?nodeRef={nodeRef}&catalogId=catalogId
Microbiological criteria Folder
The microbiological criteria can be in the administration to avoid unintentional modifications by users. A folder is available in the administration: beCPG menu > Administration > Microbiological criteria > System folders: Microbiological criteria
Click here for more information on microbiological criteria.
Reports models
Entity reports (example : product technical sheet)
There exists two types of reports for the product sheet:
- System report (always generated by the system, automatically) ;
- User report (chosen by the user when he edits the product). This type of report is an upon request report.
Product reports are defined in Repository> System> Reports> Product reports.
The addition of a new report is made like that :
Add a folder ;
Add the file .rptdesign and then edit its metadata :
The name of the report ;
- The product type (raw material, finished product etc.) to define the product type on which the report can be applied ;
- Tick « System model » to indicate if the report is automatically generated for this type of product. In the case in which the report isn’t a system report, the user must select it when he edits the product ;
- Tick « Default model » to indicate that the report is the default report for the product, which means that it will be display per default when the user opens the « Reports » list. It’s not possible to have more than one default report for a type of product. Reports which are not default reports are classified in the product « Documents » folder when the report is generated.
- Report extension
To create or modify a BIRT report, please refer to « Product report model modification ».
When a product is created or edited, the system generates a report which is associated to the product.
Extraction reports from a research
These reports are defined in the folder Repository> System> Reports> Export search.
They are BIRT or EXCEL reports which export a research result. They are also used for the projects follow up.
To add a new report :
Add a folder ;
In this later, add :
The BIRT or EXCEL report, filled with its name and its metadata. The name will be displayed on the results page of a research ;
- The file extension must be « xls » for an EXCEL report and « rptdesign » for a BIRT report ;
- Define its permissions on the report folder. People must have the « Reading » permission to be able to see the report in the result of a query.
Solely for the BIRT reports : Definition of the data to be exported to feed the report, which name is ExportSearchQuery.xml. This file defines the attributes of a product which must be exported during the report execution : > product properties (state, name etc.); > product’s links (supplier, clients, etc...); > * product’s characteristics (costs, nutrients, allergens, etc...).
To create or modify a BIRT report, please refer to « Modification of a product report model ».
EXCEL reports are easy to create. In EXCEL, in the first tab, define the principal type to extract as follow :
TYPE    bcpg:finishedProduct
COLUMNS cm:name bcpg:code   bcpg:erpCode    bcpg:productHierarchy1  bcpg:productHierarchy2
#   Nom Code    Code ERP    Famille Sous famille
On the following tabs, extract the principal type data lists. Example for the composition :
TYPE    bcpg:compoList
COLUMNS bcpg:erpCode    bcpg:compoListProduct   bcpg:compoListProduct_bcpg:erpCode  bcpg:compoListProduct_bcpg:productHierarchy1
#   Produit Composant   Composant – Code ERP    Composant – Famille
Columns and types attributes are internal names given to fields. lumns and types attributes are internal names given to fields.